HSP : Hot Soup Processor ver3.6 / onion software 1997-2021(c)

Programming Manual
- Quick Start
- Programming Guide
- Script format
- Editing and executing scripts
- How HSP works
- Extend HSP (New!)
- HSP extension plugin, extension module (New!)
- Extended runtime (New!)
- Game development with HSP (New!)
- One Key Help
- How to create an executable file
- Creating a screensaver
- parse boot options
- Rewriting the executable file
- HSP script sample
- Main window hidden EXE file
- Disable directory movement
- Debug window
- HSP Extended Macro
- Script color coding and tabs
- Easy input
- Peas Editor
- Using the UTF8 compatible version runtime
- About using the 64-bit (x64) compatible version runtime
- About script editor extensions
- Basics of script writing
- Extended Grammar
- HSP basic operation concept
- HSP Tasks
- Screens and windows
- Font and character display (New!)
- Use of image files
- Current position
- Placement object
- Layer object (New!)
- current color
- About CEL related instructions
- Get input (New!)
- Use memory buffer
- Multimedia playback
- Uninitialized variable detection
- Console version HSP
- interrupt
- Standard module name
- Common directory
- Error message
- HSP system tolerance
- PACKFILE and encryption
- Convert to C source
- About using boot setting #bootopt
- Callback Routine (New!)
Quick Start
This manual explains how to program HSP on Windows and general language specifications.
For those who are new to programming, first read " Introduction to HSP for beginners "
Recommended to read.
In development environments other than the Windows version, the operation may differ, but the basic grammar and operation mechanism of HSP3 do not change even if the platform is different.
See HSP3 Overview for more information.
If you have some programming experience and are new to HSP, We recommend that you read this quick start and try it out. If you have any questions during the process of using it, you can search this manual or use the help browser. Please check it out.
-
The list of programs executed by
- HSP is called script . The editor that edits this is the HSP script editor (hsed3.exe). After launching this and writing the script, You can execute it by pressing the [F5] key. Please try it by executing the attached sample program. In
- HSP, you can specify multiple "instructions" + "parameters (separated by", "" like
pos a, 10. You can do it) ”to write the script. Instructions are executed in order from the first line. - When you move the cursor to a keyword (instruction) in the HSP script editor and press [F1], You can easily refer to the reference with the help browser. The basics of the
- instruction are similar to BASIC. You can assign variables with
variable = number, As a parameter, an expression that mixes numerical values and variables such asscreen 0, x * 64, yCan be specified.
You can assign either numbers or characters to the - variable. No variable or type declaration is required.
Describe the character string in the form enclosed in "(half-width double quotation marks) such as
a =" string ". String operations can only be combined ("+").
The array of - variables is specified in parentheses in the form of "variables (elements)". To use an array, Declare in advance with the dim and sdim instructions.
- The goto and gosub instructions are provided as the basic mechanism for controlling the flow of the program. The label specified there is defined in the form of "* label name" at the beginning of the line.
- Repeat description is usually done with repeat ~ loop instruction. This is a C language for, while, do You can think of it as a simplification. In addition to this, C language-like macro instructions such as while ~ have, do ~ until, for ~ next, and switch ~ case are prepared. For more information, see Standard Macro Definition File .
- In addition to being able to define instructions and functions, there is a mechanism for dividing the namespace and reusing the source. It is prepared. For more information, see the Modules section and See Module Feature Guide .
- The created script can be converted to an executable file by pressing [ctrl] + [F9]. For details, see How to create an executable file .
Programming Guide
Script format
HSP is operated by a program (instruction and execution order). The source is a script (source file). This is a text file format with a .hsp or .as extension. (The extension .hsp was added from HSP3.0.) Scripts can be created with applications such as the HSP script editor (HSED3.EXE) that comes with HSP and a text editor.
Editing and executing scripts
HSP Script Editor (HSED3.EXE) makes it easy to create and edit HSP scripts. It is possible to execute. If you use the HSP script editor
- Write a text script
- Select the "Compile + Run" menu or press F5 on the function key to run the script
.
HSP Script Editor (HSED3.EXE) is an editor for HSP script editing. It can also be compiled and executed automatically. To use the HSP Script Editor, the following files must exist in the same directory as HSED3.EXE.
- HSED3.EXE
-
HSP script editor body
- HSED3_EN.EXE
-
HSP script editor body (English version)
- HSP3.EXE
-
HSP executable file body
- HSP3DEBUG.DLL
-
HSP Debug Module DLL
- HSPRT
-
HSP Runtime Module
- HSPCMP.DLL
-
HSP Code Compiler DLL
HSP script editor is the main body (HSED3.EXE) and HSP executable file (HSP3.EXE) Must always exist in the same directory. Also, in order to create an executable file (EXE file), the runtime The file (HSPRT) is also required in the same directory.
By launching HSED3_EN.EXE, menus and other interfaces can be opened. It will be in English. There is no change in the function of the HSP3 main unit, but in the English version environment If you want to use it, please try this.
When you start the HSP Script Editor, a new text editing window Is displayed. After that, you can load files and load files like a normal text editor. I will write the HSP script while saving. The basic operation is almost the same as "Notepad" that comes with Windows. You can also select cut & paste, search, etc. of the character string from the menu.
To run the HSP script you are editing, go to the menu Select "Compile + Run" or press F5 on the function key. Press Run or CTRL + F5 to run the last compiled script.
If an error occurs during compilation, the content of the error after compilation A dialog will be displayed informing you of the line number where the error occurred.
Example: test.hsp (2): error 7: Label name is already used (2nd line)
The above example shows that a "duplicate label" error occurred at line number 2. If an error occurs, select "Move to specified line" (or CTRL + J) from the "Cursor" menu and select "Move to specified line" (or CTRL + J). Go to the line where the error occurred and check its contents.
As a general usage, create a script by repeating editing and execution with the HSP script editor, When completed, use "Automatic Executable File" ([Ctrl] + [F9]) from the menu to create the completed script. Convert to EXE file or SCR file (screen saver) to complete one software.
The HSP script editor creates the following files at runtime. These files are only needed at compile time, so when the script is complete You can delete it.
- HSPTMP
-
Temporary file of source script
- OBJ
-
Temporary file of execution object
Simply drop the source script icon on the HSED3.EXE icon or in the window You can edit it. Also, if you installed HSP from the installer, Just double-click the source script icon (file with ".hsp" extension) You can open the source.
After the source script is in the edit state, the directory where the source file is stored is It will be the current directory.
How HSP works
HSP executes the script in the following flow.
- Compile
-
Parses source scripts (text files) with .hsp extensions and Create an object file (AX file) for HSP. (The work up to this point is done by the script editor (HSED3.EXE) and the code generator (HSPCMP.DLL))
- execute
-
Read the object file (AX file) and execute it. (This part is usually done by the HSP body (HSP3.EXE))
Compiling the source script is done instantly and creates an object file. The object file eliminates unnecessary parts of the source script, comments, etc. It stores binary data in a compact and fast-running format.
The HSP body is the core part for reading and executing the specified object file. This is all done in HSP3.EXE, so no other DLLs or modules are needed.
If you want to distribute software made with HSP, EXE (execution) that can be executed by itself You can create a file. When you create an EXE file, Simply double-click on the file and the script will work. This is a convenient function when distributing as online software or douujin software.
For details, refer to " How to create an executable file ".
Specify the file name of HSP3.EXE directly from the batch file or command prompt. You can also run it with. hsp3 demo.ax If you enter, an object file called "demo.ax" will be executed.
In HSP, there are some extended execution files besides HSP3.EXE. These are called "HSP runtimes" and there are several types depending on the application. For more information, see the HSP Runtime section.
Extend HSP
With HSP, you can increase the number of instructions and extend the functions by using extension plug-ins and extension modules. This is a convenient way to handle advanced functions easily, but if you know how it works, you can use it even more.
To do this, first remember how the Windows OS executes files.
You all know that when you double-click a file with the .exe extension to start it, the program starts running.
The .exe file is finally launched for programs, accessories, etc. installed on Windows.
In contrast, there is also a .dll extension. This is a program file that can be additionally loaded after the .exe file is launched. It cannot be started by itself and is always called by another program.
Extension content
			---------------------------------------------------
.exe File that stores the program to be executed
.dll A file that stores programs that can be loaded later
Windows has a core part of the operating system called the kernel, whose programs launch .exe files.
The launched program provides a program in the form of a .dll file for opening windows and displaying characters. Many of these are available as Windows APIs (Win32API), COM components, or independent libraries (such as DirectX and OpenGL).
Some .dll files come pre-loaded with Windows, or you can create your own. This is the mechanism of program extension built into the Windows OS itself.
HSP extension plug-in module
With HSP, it is possible to add functions in the form of extension plug-ins and modules.
This makes it possible to perform processing that cannot be achieved with the HSP itself.
Extension plug-ins are extensions that add functionality to a program in the form of DLL (.dll). In HSP, it is possible to call and use not only the extension DLL prepared exclusively for Windows, but also the DLL (Windows API) provided as standard in Windows and the DLL created for C / C ++.
Alternatively, you can optionally call a COM component (ActiveX) to extend the functionality of Windows.
HSP extension plug-in is a DLL-based extension that is mainly prepared for HSP.

HSP extension module adds HSP function like extension plug-in,
The difference is that it is written in HSP itself without using DLL.
In either case, by writing the description decided on HSP, new instructions / functions will be added and you will be able to use the functions.
Many plug-ins and modules are included in the HSP full set.
See Extension Plug-in Module List for more information.
HSP runtime
"HSP Runtime" is a mechanism to replace the whole HSP operating system.
This is to take advantage of specific uses and system-dependent features.
For example, if you just write "mes" OK "" in the script editor, it's called the standard runtime.
HSP works with the most common instruction set. (This is HSP3.EXE)
The HSP runtime is specified in the script by the preprocessor instruction "#runtime".
The specified runtime is reflected when the script is executed and when the executable file is created.
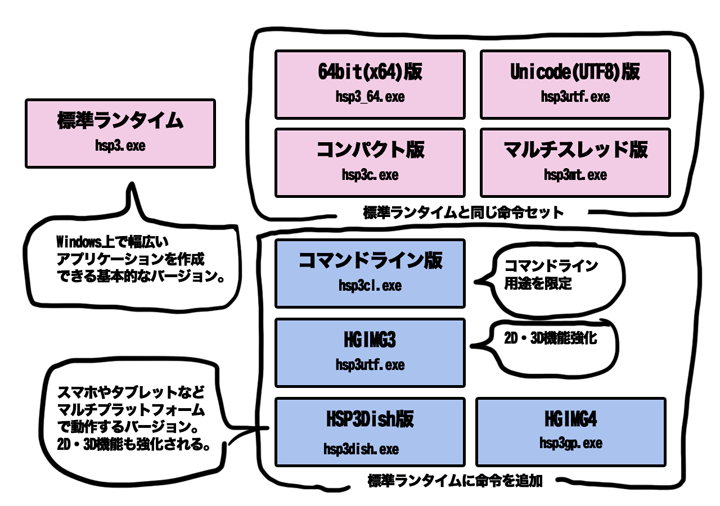
In HSP, there are occasions when you change the "HSP runtime" to suit your needs.
For example, the HSP3Dish runtime only supports multi-platform instructions,
Any other instruction will return an error. As a result, when moving with a smartphone or tablet,
You will be able to confirm the equivalent operation.
Also, unlike the console version HSP (HSPCL) runtime, it does not display a window, but on the command prompt.
You can also choose a system that works.
The HSP runtime is similar to the "HSP extension plugin" in the sense that it extends or modifies the functionality of HSP. Think of the "HSP runtime" as a deeper replacement for the functionality of the entire HSP. The following HSP runtimes are included in the HSP full set. Please refer to it when using it. For details on each runtime, refer to the separate manual.
- Console version HSP runtime (hsp3cl)
-
It is used when creating an executable file dedicated to the console application. Window display and image manipulation are not supported.
- HSP3Dish runtime (hsp3dish)
-
Only commands that can be multi-platform, such as smartphones and tablets, are supported. In addition to the normal drawing commands, extended commands are available. Also, the drawing speed is improved.
- HGIM G4 runtime (hsp3gp)
-
It is used when creating an executable file of an application created by the HGIMG4 runtime. Normal drawing commands cannot be used, and the dedicated commands provided by HGIMG4 are used. HGIMG4 works with upward compatibility with the HSP3 Dish runtime.
- Compact HSP Runtime (hsp3c)
-
The compact HSP runtime was written with an older compiler with a focus on Windows compatibility and supports a wide range of Windows operating systems since Windows 98. Please use when using the past OS and scripts. The compact version is not recommended when using the latest OS. Other runtimes, such as standard HSP3, run more efficiently. The compact version of the HSP runtime has the same functions as the HSP3 standard runtime, and there are no restrictions or restrictions.
- HSP3UTF runtime (hsp3utf)
-
It has the same function as the normal HSP3 runtime, but it is a runtime that processes all strings in Unicode (UTF8) format. In addition to handling Unicode format text, it is possible to display a wide range of character codes.
- 64-bit version HSP3 runtime (hsp3_64)
-
It has the same functions as a normal HSP3 runtime, but it is a runtime that operates as a 64-bit application. Like hsp3utf, all strings are processed in Unicode (UTF8) format. It is not compatible with the 32-bit version of the plug-in. In the future, 64-bit compatible plug-ins will be expanded.
Game development with HSP
HSP can be used for various purposes, but the most used is for easy game development. You can decide whether to use HSP extensions according to the content and purpose of the game by referring to the following.
- General 2D games
-
Even the most popular HSP3 standard runtime (without extensions) can be used to create popular games. Since the HSP3 standard runtime uses only the basic Windows API, it has the advantage of being highly compatible with a wide range of models and easy to create. However, the drawing speed is slow and it is not suitable for games that rewrite a lot of screens.
There are many sample scripts in the sample / game folder, so please refer to them.
For playing sound effects and music, fine control is supported by adding a separate hspogg extension plug-in. You can also add the OBAQ extension plugin as a handy 2D physics engine. - Advanced 2D games
-
There is a HSP3Dish runtime that allows faster screen rewriting than the HSP3 standard runtime.
These runtimes can be run not only on Windows but also in a wide range of environments such as android, iOS, linux, html5. Since it uses GPU-supported APIs such as DirectX and OpenGL for drawing, it has the advantage of not slowing down even when processing a large number of images.
In addition, by using the standard sprite function , you can easily manage 2D objects (sprites), and the man-hours can be greatly reduced.
The HSP3Dish runtime has some features that are not supported (such as multiple window support) compared to the HSP3 standard runtime, and there are some differences in the drawing procedure.
Please refer to the sample scripts in the sample / hsp3dish and sample / sprite folders. - 3D game
-
Games that use 3D display often lack functionality with the HSP3 standard runtime alone. HSP provides HGIMG3 and HGIMG4 as runtimes for 3D display. HGIMG3 uses DirectX8, which has been supported for a long time, and new development is currently finished. Currently, we are constantly expanding the functions of HGIMG4 to replace it. It uses OpenGL and supports android, iOS, linux, html5 platforms as well as HSP3Dish.
If you need 3D features, HGIMG4 gives you a lot of modern features such as FBX 3D data display, animation playback, 3D physics engine, post effects, use of custom shaders and much more. However, not all GPUs and graphics cards are supported. When operating on an older model before Windows 7, there is a possibility that the phenomenon such as not being able to start or the display becoming strange may occur.
Please refer to the sample scripts in the sample / hgimg4 and sample / pronama3d folders.
One Key Help
The function to call the help of HSP instruction from the character string edited by the script editor with one button "One key help function".
To use it, simply align the caret (cursor position in the editor) with the keyword you want to look up and press the [F1] key. The description of the corresponding instruction, the meaning of the parameters, etc. are displayed. If there is no help for the keyword, the keyword search help in alphabetical order will be displayed. This is useful when you want to find out what the sample script is doing, or when you can't remember the details of the instructions.
One-key help can be displayed in several ways. By default, it is set to read help by HSP Help Manager.
By default, Help Manager is in HSP Docs Library (Integrated Document Viewer) Specify keywords to display help. These can be found by selecting the Behavior menu in the Options dialog of the HSP Script Editor. It is possible to set.
The help data is usually called hsphelp under the script editor (HSED3.EXE). It is stored in the directory. If you want to move to another directory, If you get an error when trying to view the help, go to "Directory" in the "Options" dialog. Select the menu and reset the help data directory (For example, "c: \\ hsp36 \\ hsphelp"). If the input is blank, it refers to a directory called HSPHELP under HSED3.EXE.
For more information about HSP Docs Library and help files See HDL_Readme.txt " HS_BIBLE.txt please.
How to create an executable file
In HSP, user-created scripts and data files used there, etc. You can create EXE files all at once. You can also create an SCR file (screen saver module), which is a type of EXE file, by the same procedure.
When converting the file currently being edited from the script editor to an EXE file, Select "HSP"-> "Automatic Executable File" from the menu, or Simply press "CTRL" + "F9" to create an executable file in the current directory. Normally, an executable file called "hsptmp.exe" is generated, but depending on the option specified in the source script, You can make various settings such as the file name.
 #pack "filename" [PACKFILE additional file specification]
#epack "filename" [PACKFILE additional file specification]
The above example specifies a file to be added to the packfile. The specified file is packed together as a resource when the executable file is created. #pack packs in the normal format. #epack is encrypted and packed. If you try to add a duplicate file, it will be ignored. "Start.ax" is automatically added when the executable file is automatically created, so it is not necessary to specify it as an additional file.
The files specified by #pack and #epack can be used from the script, It will not be visible from the outside. This has the following effects:
- Protect the image files used in the game from being retrieved
- Eliminate unnecessary clusters of each file and reduce disk space
- Prevent large amounts of data files from being scattered in the directory
In the following example, the files "a.txt" and "a.bmp" are Pack it with the executable and encrypt "a.bmp".
#pack "a.txt"
#epack "a.bmp"
#packopt keyword name parameter [automatic creation option specification]
Specifies the operation for automatic execution file creation. Parameter with keyword name, followed by space or TAB (In the case of a character string, specify it as "" strings ""). The keywords that can be specified with #packopt are as follows.
| Keywords | Contents | Initial values |
|---|---|---|
| name | Executable file name | "hsptmp" |
| runtime | Runtime to use | "hsprt" |
| type | Executable file type | 0 |
| (0 = EXE file) | ||
| (1 = full screen EXE) | ||
| (2 = screensaver) | ||
| xsize | Initial window X size | 640 |
| ysize | Initial window Y size | 480 |
| hide | Hide initial window SW | 0 |
| orgpath | Disable directory movement at startup SW | 0 |
| icon | Icon file settings | None |
| version | Version resource settings | None |
| manifest | Manifest settings | None |
| lang | Language code settings | None |
| upx | UPX compression settings | None |
The following example creates a screensaver called "test.scr" using a runtime called "hsp3c.hrt".
	#packopt type 2
	#packopt name "test"
	#packopt runtime "hsp3c.hrt"
By default, "start.ax" is encrypted and added to the packfile. Also specified by "#packopt runtime" runtime file name "" The runtime file (with the extension hrt) should be in the same directory as hspcmp.dll Alternatively, the one located in the runtime directory will be used.
If 1 is specified in the "Initial window hiding SW" option, the "Initial window hiding SW" is turned ON. (For more information, see Main window hidden EXE file.)
If 1 is specified in the "Start-up directory move invalidation SW" option, "Start-up directory move invalidation SW" is turned ON. (For more information, see About disabling directory movement.)
The keywords icon, version, manifest, lang, upx are set using the iconins tool after the executable file is generated.
This makes it possible to embed executable file icons, version information, manifests, etc.
For details, refer to the section " Rewriting the executable file ".
Creating a screen saver
HSP allows you to create screen saver modules that can be selected from the Windows Control Panel. This is when you create a full screen screen using special commands and the content drawn there becomes a saver as it is. So, you can create a normal script with a little tweaking. For more information on screen savers, see the directory containing the sample files. Try opening the "arusave.hsp" file in "ssaver". How to write a script, the actual creation procedure, and the sample script itself It is written, so please refer to it.
Standard features allow you to create simple screen savers without password protection.
There are various conventions for creating a screensaver module (SCR file). Please remember while referring to the sample script. The window size of the screen saver setting screen (ID0) is different from the normal HSP execution time. It is fixed to the window size set when the screen saver was created.
parse boot options
With HSP, you can take in startup options and process them accordingly with a script. As a result, an EXE with various functions can be called from a batch file, or on the EXE file icon. It is possible to process such as dropping a file.
To try this feature from the script editor, there is "Startup Options ..." in the HSP menu. If you select this, even when you start it from the script editor, a pseudo start option will be added. can do. If you want to actually check the contents of the startup option with a script, Use a system variable called dir_cmdline. See the list of system variables for more information.
Rewriting the executable file
Normally, when you create an EXE file or SCR file, the icon seen from Windows is the same as HSP3.EXE. By preparing a custom icon file, you can freely rewrite the executable file icon for distribution. You can also apply version information, manifests, language codes, UPX compression, etc. to executable files.
When performing "automatic execution file creation", it is possible to describe the information to be applied by the #packopt command in the source script.
The icons, version, manifest, lang, and upx keywords specified by the #packopt instruction rewrite the executable file using the iconins tool after the executable file is generated.
// Specify the icon file to embed
	#packopt icon "test.ico"
// Specify the file that describes the version information to be embedded
	#packopt version "test.txt"
// Set "1" when compressing using UPX
	#packopt upx "1"
// Specify language Default is Japanese (1041) Described in decimal
	#packopt lang "1041"
In the above example, the icon of the icon file "test.ico" is used to set the version information described in the "test.txt" file.
For the icon file, you need to specify a .ico format file.
Also, set the language code to "1041" (Japanese). It specifies a locale ID written in decimal, such as Japanese (1041) or English (U.S.) (1033). See here for more information on the locale ID.
If "1" is specified for UPX compression, the executable file compression by UPX is enabled.
(If you want to use UPX compression, you need to download upx.exe (Win32 console version) in advance and place it in the same folder as the iconins tool.)
To set the version information, you need to create a separate text file.
	_FILEVERSION=1.0.0.0
	_PRODUCTVERSION=1.0.0.0
Comments = test
	CompanyName=Test!
FileDescription = test
	FileVersion=1.00
	InternalName=test
	LegalCopyright=Copyright (C) 2017 Test!
	OriginalFilename=test.exe
ProductName = test
	ProductVersion=1.00
Describe the contents with "=" in the required items line by line. If you add a ";" (semicolon) at the beginning of a line, that line will be skipped. This file is compatible with the Let's HSPIC! Version information file created by Kpan .
If you want to change resources more extensively, please use tools such as Resource Hacker .
HSP script sample
Select "View Sample Script" from the title of the HSP3 demo, or In the directory where HSP is installed (C: \\ hsp36 \\ etc.), View and execute HSP script sample by executing "sampview.exe" The sample viewer will be launched.
HSP contains many samples that can also be executed from the script editor. It is a good idea to find a reference sample according to the intended use. All the sample scripts included with HSP can be freely modified and reused.
Main window hidden EXE file
When creating an EXE file, it is possible to hide the main window and start it.
Specify #packopt hide 1 as an option set by the #packopt instruction.
When you create an executable file ([ctrl] + [F9]), the executable file will open in the main window (window ID 0) at startup.
It will not be displayed.
This is because the window defaults for a moment even if you change the window size or display position at startup.
This is an option for those who want to prevent it from appearing in position.
When this option is turned ON, the window is activated by an instruction such as gsel 0,1 .
The main window will not be displayed unless is set to.
If you want to change the position and size of the main window without flickering, or if you want to change the position and size of the main window
Please use it when you want to create an application that does not need to display.
Also, even if the main window is hidden, the window still exists, so Drawings and object placements made to the main window have been successfully executed and saved.
Disable directory movement
An option set by the #packopt instruction, specifying #packopt orgpath 1
When you create an executable file, the executable file has the current directory at startup.
It will not move (working directory) to the directory where you are.
This option normally does not need to be turned on. The normal operation when starting an executable file is in the directory containing the started EXE file. The current directory (working directory) is adjusted. That is, system variables dir_cur and dir_exe are in the same location. For special circumstances such as wanting to reflect the working folder specified by starting the shortcut, Turn this switch on only if you do not want to change the current directory at startup.
With directory movement disabled, the system variables dir_cur and dir_exe at startup Please note that it is necessary to create a script on the assumption that it will not be the same.
Debug window

It has a debug window to check the status of HSP and the contents of variables during script execution. This is done by switching on "Debug window display" in the "HSP" menu of the script editor. It is possible to always display it at the time of execution. Also, even if this switch is not turned on, if an error occurs in HSP, it will be automatically popped up.
Select a display category in the upper left tab of the debug window. The selected information is displayed in the window below. The information is as of the time you select the category. Contents, It is not updated automatically, so if you want to know the information at another time, you can do it again. Click on the category window.
- General
-
The line currently being executed, the status of HSP (execution mode), etc. are displayed. It also shows system variables such as gosub and loop nesting levels (depths).
- Variable
-
Displays the contents of the defined variables. If you check the "Show array variables" checkbox, the contents of the array will be displayed. Display in a list. Also, check the "Dump variable" checkbox. By inserting it, the contents of the variable buffer will be displayed in hexadecimal. Variable dumps and array displays are too large If the variable is, not all may be displayed.
A character string that exceeds the capacity of the buffer is assigned to a character string type variable. If so, a warning message will be displayed. In that case, sdim instruction Increase the size of the buffer to be secured by.
If "Show module variables" is checked, It also displays the contents of variables used inside the module. Also, if "Sort display items" is checked, The variable name list is sorted alphabetically, making it easier to search.
- log
-
Displays the messages sent by the logmes instruction. You can check messages for debugging.
- [Execute] button
-
Resume execution of a script that was temporarily stopped by the assert instruction or the Stop button.
- [Next line] button
-
From the state temporarily stopped by the assert command or the [Stop] button Resume script execution for only one line. This makes it possible to perform step operations to check the execution contents line by line.
- [Stop] button
-
Temporarily stop the running script. It can be stopped only at the time wait part such as await or wait instruction.
HSP Extended Macro
HSP extension macros are a standard set of supported macro definitions. The "hspdef.as" file in the common folder is the setting. When compiling the script, "hspdef.as" will be loaded automatically.
Various extension macros and modules are available, so use the "#include" instruction. It can be used explicitly. For example, if you write "#include" hsp261cmp.as "", it will work as HSP2.61 compatible.
Script color coding and tabs
In HSP script editor (HSED3.EXE), you can color-code keywords and edit multiple files by switching tabs. It corresponds. In the initial state, keywords are color-coded under the following conditions.
| Keyword type | Color |
|---|---|
| Comments | Yellow-green |
| Instructions / Functions / System Variables | Light Blue |
| Preprocessor instructions | Light blue |
| string | white |
| Label definition | Yellow |
| Macro | Dark green |
| Others | White |
Keywords and background colors can be changed by the user in the option settings dialog. It is also possible to read multiple files and edit them while switching between tabs. You can click the tab directly or switch the file you are editing in the Window menu.
Easy input
There is a Easy Input item in the right-click menu of the script editor. It is prepared. All you have to do is select the content of the function you want to use, and the parameters and Select options using the user interface in a separate dialog It is an assist function for beginners who can do it.
Easy input can also be called from within the HSP Assistant, which starts at the same time as the script editor. For more information, please refer to HSP Assistant Manual .
For example, if you select the "Specify color" function, you can enter the specified color in R, G, B or hexadecimal. Box or A dialog will appear in which you can specify from the color swatches. By entering the color you want to specify in the dialog and pressing the "OK" button, A script is automatically generated at the cursor position in the script editor. "Easy input" is used when you do not know the keyword of the function you want to use, or It helps you enter non-intuitive parameters such as font names and color codes.
"Easy input" function is based on HSP template tool (AHT) It is made. Dialog displayed by "Easy input" and generated source The contents are all AHT files (files with the extension ".aht") in the "ezinput" folder. Is defined by. By creating this file by the user You can freely customize the items that can be used in "Easy input". For more information on AHT files, see "aht.txt" in the doclib folder.
It will also be the basis for building "Easy Input" and "AHT Manager". The module "mod_aht.as" is included. By using "mod_aht.as", you can easily edit and refer to the contents of the AHT file. You will be able to. For more information on AHT, please refer to the separate document aht.txt.
Peas Editor
Another scripting environment Peas Editor that replaces the script editor It is included. This can be done by selecting "Peas Editor" from the menu or directly Start it from "ahtman.exe" and use it.
In "Peas Editor", select a part from the "Add" button on the main screen and select the part. You can edit the contents of the part by clicking the "Edit" button. This is one AHT template file contained in the aht folder Think of it as an icon (part), just by operating the mouse and adjusting simple parameters. It helps you to create scripts visually.
"Peas Editor" is based on the technology of HSP Template Tool (AHT) Created and all created with HSP with module "mod_aht.as" It has been.
The source code of "Peas Editor" is open to the public, and anyone can freely use it. It can be reorganized, expanded and redistributed.
For details on "Peas Editor", refer to the separate document peas.htm .
About using UTF8 compatible version runtime
To run the standard HSP3 runtime on a unicode (UTF-8) character basis
The HSP3UTF runtime (hsp3utf.exe) is included.
It has the same function as the normal HSP3 runtime, but only handles strings.
It is unicode (UTF-8).
Handles SJIS character codes Can handle characters that cannot be expressed by standard HSP
We plan to continue improving it as the new HSP3.
If you want to use it, specify the following line at the beginning of the script.
#include "hsp3utf.as"
See the documentation hsp3utf.txt for more information.
About using the 64-bit (x64) compatible version runtime
HSP3 standard runtime (hsp3_64.exe) that operates as a 64-bit (x64) application is included. If you want to use it, specify the following line at the beginning of the script.
#include "hsp3_64.as"
The 64-bit (x64) runtime runs only on 64-bit versions of Windows.
Please consider the bundled version as a beta test version for future 64-bit conversion.
Normally, you can use the standard 32-bit version of HSP3 runtime (hsp3.exe) without any problem.
Currently, the 64-bit runtime has the following caveats:
- It is a runtime that runs a conventional HSP script as a 64-bit application. (Conventional specifications such as the range of integer values do not change)
- The maximum memory buffer used by one variable is 2GB (32bit). (The memory size that can be used by the entire script conforms to the 64-bit application)
- Treat the character code as UTF8 (similar to hsp3utf)
- Not compatible with traditional 32-bit plugins
- COM related instructions may not work properly
- Does not support icon rewriting by #packopt command
About script editor extensions
From HSP3.51, the extension function of the modified version HSP3 script editor (implemented by inovia and Tetr @ pod) is incorporated.
The following functions have been added.
- Custom keyword color coding function
- Automatic file backup function
- Support for fonts that could not be set in the past, such as proportional fonts
- Window split function
- Background image display function
- Move by double-clicking the label (link label)
- Color-coding function for user-defined instructions / functions
- Accelerated replacement function
The extended functions can be turned ON / OFF in each item of the "Tools"-> "Options" menu.
If you want to use the link label function, check "Use link label" in the option "Editor"-> "Color" item. After that, the labels in the script are color coded and you can double-click to move to the defined label.
With the background image display function, the specified image can always be displayed in the lower right corner of the editor background. It can be set in the optional "Editor"-> "Color" item.
The automatic file backup function can be set from the options "General"-> "Behavior". By backing up the file you are editing at regular intervals, you will not lose your script in the unlikely event of a forced termination or reset. (The backup will be created in the "backup" folder inside the HSP installation folder.)
Basic grammar
HSP language rules
HSP divides grammar into two main categories.
- Basic grammar
-
The minimum grammar required to create a program. If you are a beginner or want to write a small program, just use the basic grammar. There is no problem using it.
- Extended grammar
-
A grammar that includes a mechanism for extending the functionality of HSP. If you want to provide functionality to other users, or if you have a large program You will need it when you create it. If you are a beginner, you don't have to learn the extended grammar. Intermediate and advanced students should master extended grammar to step up I recommend you to go.
In this document, detailed specifications for both basic grammar and extended grammar are provided. I am explaining.
Instruction format
The script summarizes what to do in what order This is a text file. Instruct what kind of processing to do in it Things are called statements.
As with BASIC and C, the instructions are ordered from the first line of the file to the bottom. It will be executed.
Instructions (statements) control the flow of the program, screens, etc. Input / output files etc. There are many instructions such as program control instructions and input / output control instructions. The script is case insensitive. It doesn't matter which one you write.
; Example:
	randomize
In the above example, we will execute an instruction called randomize. In many cases, parameters are added to the instruction to specify the execution contents in detail. Will be done.
Parameters
In HSP, the basic format is to add a parameter after the instruction. There must be a space between the parameter added to the instruction and the instruction. increase. If there are multiple parameters, separate them with ", (comma)".
For example, the script width 640,480
"Width" is the statement, and the numbers 640 and 480 are the parameters.
This combination means "make the window size 640x480".
In the description of "Instruction Reference" in the document file,
statement p1,p2

p1 = 0 to 3 (1)
p2 = 0 to 65535 (0)
If so, you can specify two parameters, p1 and p2, in this instruction. The value that can be taken for p1 is 0 to 3, and the value when omitted is 1, Indicates that the value that can be taken for p2 is 0 to 65535, and the value when omitted is 0.
You can also omit the parameters. In the above example, the value of p2 is omitted and statement 3
You can also write. In that case, the default value is automatically set and statement 3,0
It will be the same as writing.
statement, 100 to omit only the middle of the parameter
To skip over the omitted parameter and specify another parameter like
I can. In this case, it is the same as writing statement 1,100 .
The default value varies from instruction to instruction.
Even if you just write statement and don't specify any parameters
The value "1,0" is automatically set. Basically the parameters are in the order of importance,
It's rare to omit everything. Also, parameters that specify character strings and
Parameters that must be variable names may not be omitted.
Multi-statement
Multiple instructions can be written on one line by separating the instructions with a: (half-width colon). Is possible. This is called a multi-statement. for example,
; Example:
    mes "Hello": mes "Goodbye"
teeth,
 mes "Hello"
    mes "Goodbye"
It is the same as writing like. In this way, you can write multiple instructions on one line. There is no limit to the length of one line, but it is better to fit it in a text editor so that it is easy to read.
Comment
In one line, after; (half-width semicolon) is regarded as a comment (annotation) and ignored.
; Example
    pos 320,100: mes "(^_^)"; Face mark display
You can write comments in the same way as C and Java. After // (double slash) in one line, it is regarded as a comment and ignored. Between "/ *" and "* /", it is regarded as a comment and ignored.
; Example
    pos 320,100: mes "(^_^;)" // Face mark display
    / * This is a comment * / goto * start
Spaces and tabs can be freely inserted for easy viewing. (In the standard setting, double-byte spaces are also considered as spaces.)
Expression
Where to specify the parameters of the instruction, put an expression containing the following data and operators I can write.
| Data | Type |
|---|---|
| -2147483648 to 2147483647 | Decimal integer (32 bits) |
| -???. ??? ~ ???. ??? | Decimal real numbers (64-bit double precision) |
| $ 0 ~ $ FFFFFFFF | Hexadecimal integer |
| 0x0 ~ 0xffffffff | |
| % 0 to% 111111 ... | binary integer |
| 0b0 to 0b111111 ... | |
| 'A' | Character code (8-bit integer value) |
| "string" | string |
| Variables | Keywords that hold values |
| Function | Keyword to convert value |
| Operator | Type |
|---|---|
| +,-, *, / | Addition, subtraction, multiplication, division |
| & amp;, |, ^ | Logical operation (and, or, xor) |
| \\ | Division remainder |
| =, & lt;, & gt;,! | Conditional expressions (same, small, large, not the same) |
| ==, & lt; =, & gt; =,! = | Conditional expression 2 (same, less, more, not the same) |
| & lt; & lt;, & gt; & gt; | Bit shift to the left and right |
For example, statement 1 + 2 + 3 + 4 is statement 10
It will be the same as writing. This is called a formula .
Formulas are evaluated in order of priority.
For example, 2 + 7 * 2 becomes 16.
When evaluating an expression, the one with the highest priority among the following operators is prioritized.
| Operator | Priority |
|---|---|
| * / | 4 (high) |
| + - | 3 |
| Comparison operator | 2 |
| & amp; | ^ | 1 (low) |
If you want to change the order of calculation, use parentheses (2 + 7) * 2
If you write like, 2 + 7 in parentheses will be calculated first and the result will be 18.
Conditional expressions and logical operations are used in conditional judgment, which will be explained later.
You can use as many parentheses as you like. If you use parentheses If it is incorrect, an error (priority error) will be displayed. You can also use a function in the expression to process the entered value.
It is also possible to write expressions that mix integer values, real numbers, strings, and functions. In that case, the later terms are type-converted to match the first term to be calculated. For example, a calculation like "8 + 4.5" will be treated as 4 (integer), and 4.5 will be treated as 4 (integer) to match the first 8 (integer). On the contrary, in the case of "4.5 + 8", the calculation result is 12.5, which is adjusted to 4.5 (real number).
Whether a number is an integer or a real number is distinguished by the presence or absence of a decimal point. When performing an operation with a real number type, explicitly add a decimal point such as "8.0 + 4.5". You need to put it in. It is also possible to express a real number with a large digit by specifying the exponent part after "e" such as "1.0e + 10". However, be aware that handling real numbers is more costly in terms of memory efficiency and speed than integer values.
Characters enclosed in'(single-byte single quotation marks) are interpreted as integer values indicating the character code. Even if you specify a long character string or double-byte characters, only the first byte is interpreted as a code.
In the case of 'A' , it is the character code (65) indicating "A".
At that time, you can write a special code (such as "\\ n") with a "\\" symbol similar to a character string.
To indicate the character code of "'" itself, specify '\\'' .
To indicate the character code of "\\", specify '\\\\' .
string
In the place where a character string is specified as an instruction parameter, enclose the character string in "(half-width double quotation marks)". You can write a string.
; Example:
    mes "This is test message..."
You can use "+" to combine strings or variables.
For example, "ABCD" + "EFGH" is the same as "ABCDEFGH" .
"VALUE =" + val becomes "VALUE = 5" (when the variable val is 5).
"\\" Is interpreted as a character with a special meaning.
- "\\ n" means to break the line to the next line.
- "\\ t" represents the TAB code.
- "\\ r" represents the return code (0x0d).
- "\\" "represents double quotes (").
- "\\\\" becomes just "\\".
So a string to indicate a directory, such as "C: \\ WINDOWS \\ SYSTEM" , is
It will not be recognized unless you write "C: \\\\ WINDOWS \\\\ SYSTEM" .
It is also possible to write long character strings that do not fit on one line.
    mes {"
    Here is a whole line of direct messages
    You can write it.
"}
In this way, everything from "{" "to" "}" is interpreted as a character string. When it spans multiple lines, a line feed code is inserted at the end of one line.
HSP provides many instructions and functions for handling character strings.
| Keywords | Functions |
|---|---|
| getstr | Read string from buffer |
| strmid | Extract part of the string |
| instr | Search for strings |
| getpath | Get part of the path |
| strf | Convert to formatted string |
| cnvwtos | Convert unicode to regular string |
| cnvstow | Convert normal strings to unicode |
| strtrim | Remove only specified characters |
| split | Substitute the element split from the string |
| noteadd | Add / change specified line |
| notedel | Delete line |
| noteget | Read specified line |
| noteinfo | Memory notepad information acquisition |
| notesel | Memory notepad settings |
| noteunsel | Return target buffer |
| notesave | Save target buffer |
| noteload | Read target buffer |
In addition to this, a lot of support is also provided for extension plug-in modules and so on.
Variables
You can work with variables with any name. Variables are contents by assignment It's like a container that can change.
The variable is a character string of 59 characters (half-width) or less starting with the alphabet or Japanese. Will be identified. Variables can store various information such as numerical values and character strings by assignment. You can also use array variables to index and store multiple pieces of information within a single variable.
The range that can be stored as a numerical value is the same 32-bit integer value from -2147483648 to 2147483647 as the value that can be specified in the formula. Or a real value (64-bit double precision).
Variables cannot have the same name as the label or the same name as the instruction. Variables can be used in assignment instructions and formulas.
The assignment instruction looks like this:
; Example
    x = 100; Substitute the number 100 for the variable x
    y = 200; Substitute the number 200 for the variable y
When used as a numerical specification of an instruction,
; Example
    Go to x = 100: y = 200: pos x, y; (100,200)
It looks like. Assigning a value to a variable erases what was previously stored and is new The value will be retained. Similarly, when assigning a character string to a variable,
; Example
    x = "strings"; Substitute the string "strings" for the variable x
    mes x; Display the contents of variable x on the screen
Substitution is a numerical value if the one after "=" is a numerical value, and a character string if it is a character string. I will remember. Variables include the character string type when what is stored is a character string, There are several states, such as the numeric type when it is a number and the real type when it is a real number (decimal).
Specify a string type variable for an instruction whose parameter requires a numerical value, If you specify a numeric variable for an instruction whose parameter requires a string, Please note that you will get a "Type mismatch" error.
There are some special assignment instructions. With "variable" + "operator" + "=" + "parameter" Calculates the specified operators and parameters for the original variable.
; Example
    a = 10; Substitute 10 for variable a
    a + = 2; Add 2 to the variable a (same as a = a + 2)
In the above example, the variable a has a value of 12. In this way, when "+ =" is used, the variables after "+ =" are added to the variable a itself. You can use all operators such as "-=" and "* =" in the same way. (Also, the same operation can be obtained by omitting "=" and using the format of "variable" + "operator" + "parameter". However, this format is not recommended as it is not compatible with C or Java. )
Simple addition and subtraction can also be done in the following format:
; Example
    a +; Add 1 to variable a
    a-; Subtract 1 from variable a
+1 and -1 are executed by adding "+" or "-" to "variable". (The same result is obtained with formats compatible with C and Java, a ++ and a--, but they cannot be used in expressions.)
You can force a variable type change to determine the variable type. The functions for that are int and str.
; Example
    a = int (a); Make variable a numeric
    b = str (b); Make variable b a string type
    c = double (c); Make variable c a real type
Even if you change the type of a variable, it tries to keep its contents as much as possible.
If you change a variable that contains the string "123" to a number type, it will be a number 123, Conversely, if you change a numeric variable called 123 to a string type, it will be converted to a string called "123".
Array variable
Array variables allow you to number and manage large numbers of things that are stored in variables.
Normally, the variable a can store only one number or string. But you can use array variables to store multiple numbers or strings. Array variables are used as follows:
; Example
    a (0) = 10; Substitute 10 for element 0 of variable a
    a (1) = 20; Substitute 20 for element 1 of variable a
    a (2) = 30; Substitute 30 for element 2 of variable a
Put parentheses after the variable, followed by a numeric number. This number is called an "array element" and identifies where it is stored in a variable. The element usually specifies an integer value starting from 0.
The elements of the array variable are automatically allocated at the time of assignment.
For example, if you write a (2) = 5 , a (2) will be automatically allocated.
The value 5 is assigned. However, if you write a (1000) = 0 ,
Since all the elements from a (0) to a (1000) are allocated in the memory,
Be careful to use the element numbers starting from 0.
Also, since array elements are reserved only at the time of assignment,
If you write a = b (10) and element 10 is not allocated in the array variable b,
Please note that an error will occur.
Note that the dimensions cannot be expanded by automatically allocating array elements.
If you want to reserve the array elements in advance, use the dim instruction.
; Example
    dim a, 20; The element of variable a can be used from 0 to 19
It is also possible to create a multidimensional array using the dim instruction.
; Example
    dim a, 10,5; Variable a can be a two-dimensional array
    a (0,0) = 1; Substitute 1 for element (0,0)
    a (1,0) = 2; Substitute 2 for element (1,0)
    a (0,1) = 3; Substitute 3 for element (0,1)
In this case, use two "," (commas) to specify the element, such as "variable name (first element, second element)". Similarly, you can use the dim instruction to create an array up to 4 dimensions.
; Example
    a ("test") = 10; Substitute 10 for element "test" in variable a
    a (5.5) = 20; Substitute 20 for element 5.5 of variable a
Since the variables are the same even if the elements change, it is not possible to mix variable types for each element. If the variable a is a string type, then all elements are also a string type. The same applies to numeric types.
; Example
    a(0)=0
    a (10) = "string"; An error will occur
There is another format that indicates an array variable.
; Example
    a.5 = 123; Assign 123 to element 5 of variable a
This format is compatible with the formats up to HSP ver2. "A.5" has the same meaning as "a (5)". For multidimensional arrays, separate them with a "." (Period), such as "a.1.0".
This format recognizes only one item following a "." (Period) as an element.
If you want to use an expression for an element, you need to enclose it in parentheses like a. (A + 5) = 10 .
If you want to use an array for a string type variable, use the sdim instruction. In the sdim instruction, first specify the initial number of characters in the character string to be handled, and then set the number of elements. Specify. for example,
; Example
    sdim a, 32,5; Variable a can handle strings up to 32 characters with 5 elements
    a(0)="test"
    a(1)="message"
Specify two parameters next to the variable name, such as. You can also use the sdim instruction to secure the initial number of characters in the string.
; Example
    sdim a, 200; Variable a can handle strings up to 200 characters
This is a regular variable, not an array variable. If the data assigned to the string type variable exceeds the initial number of characters Most of the time you don't have to worry about the initial number of characters, as it will be re-allocated automatically. There is no case.
By adding "," to the parameter to be assigned, the assignment to the array variable is continuous. You can also do it.
; Example
tmp = 1,5,10; Subsequent assignment to the array
In the above example, it is the same as tmp (0) = 1: tmp (1) = 5: tmp (2) = 10 .
To start the assignment from the middle of the array
; Example
tmp (2) = 10,20,50; Subsequent assignment from element 2
In this example, it is the same as tmp (2) = 10: tmp (3) = 20: tmp (4) = 50 .
You can also substitute strings in succession, such as tmp = "ABC", "DEF", "GHI" .
Function
The function is used to get the converted value based on the value in the parameter expression. Returns the result by specifying the parameter in parentheses after the name that indicates the function.
; Example
	x=sin(3.141592)
In the above example, the sine value of 3.141592 is calculated and assigned to the variable x. There are various types of functions, from arithmetic functions such as trigonometric functions to those that handle character strings. Functions must always be used in expressions. It cannot be used as an instruction (statement).
The following functions are provided as standard in HSP3.
| Function name | Return value | Contents |
|---|---|---|
| int | integer | Convert parameters to integers |
| rnd | Integer | Generate random numbers from 0 to (parameter -1) |
| strlen | integer | return the length of the string |
| length | integer | Returns the number of array elements of the variable (1D) |
| length2 | integer | Returns the number of array elements of the variable (2D) |
| length3 | integer | Returns the number of array elements of the variable (3D) |
| length4 | integer | Returns the number of array elements of the variable (4 dimensions) |
| vartype | integer | return variable type |
| varptr | integer | Returns the address that indicates the data of the variable |
| varuse | integer | Returns variable usage |
| gettime | integer | return date / time |
| str | String | Convert parameters to strings |
| dirinfo | string | return specific directory information |
| peek | integer | fetch value from buffer |
| wpeek | integer | fetch value from buffer |
| lpeek | integer | fetch value from buffer |
| double | real | Convert parameters to real |
| sin | real number | returns a sine value (parameter unit is radians) |
| cos | Real number | Returns a cosine value (parameter unit is radians) |
| tan | Real number | Returns tangent value (parameter unit is radian) |
| atan | real number | return arctangent value |
| sqrt | real number | return root (square root) value |
| logf | real number | return logarithmic value |
| expf | real number | return exponential value |
| abs | integer | return the absolute value of an integer |
| absf | real number | return the absolute value of the real number |
| limit | integer | Keep integer values within range |
| limitf | real numbers | keep real numbers within range |
| sysinfo | integer | Get system information |
| ginfo | integer | Get information about the window |
| objinfo | Integer | Get information about window objects |
Label
You can name it as a label to indicate its position in the program. The label is indicated by a character string of 59 characters (half-width) or less following * (asterisk).
; Example

*label
    mes "Wait.":wait 100
    goto * label; Create an infinite loop
Labels are primarily used to specify where to jump to a goto, gosub, or button instruction. Label names cannot be duplicated in a single source script. Also, it cannot be duplicated with the variable name.
"Label List" ([F11]) in the "Cursor" menu of the script editor If you select, a list box will list the labels contained in the script you are currently editing. It is displayed in, and you can jump directly to the corresponding line by selecting any label. When the script becomes large and it is inconvenient to move, or where you put the label This is convenient when you have forgotten it.
It is also possible to assign the label position to a variable.
; Example
	a=*test
In this case, assign the position "* test" to the variable a. After that, the variable a is treated as a label type variable, and in the place where the label is specified for the parameter, You will be able to specify a label type variable.
The following is an example of a sample script using the label type.
; Testing labeled variables
;
    ldim a,2
    mes "TYPE="+vartype(a)
    mes "USE(0)="+varuse(a(0))
    a(0)=*test
    a(1)=*test2
    mes "USE(0)="+varuse(a(0))
    gosub a(0)
    gosub a(1)
    mes "OK"
    stop
*test
    mes "JUMP OK"
    return
*test2
    mes "JUMP OK2"
    return
The label type variable gets the type value "1" by the vartype function.
You can also use the varuse function to determine if a valid label has been assigned.
An array of label variables can be reserved by specifying ldim a, 20 .
Labeled variables make it difficult to see where the script jumps and make it difficult to understand the whole thing. On the other hand, you can efficiently manage a large number of jump destinations that cannot be processed by on ~ goto.
HSP supports the local label function. This is a feature that allows you to use labels with special names as many times as you like. This is useful when there is nothing to do or when it is troublesome to give a name.
; Example
    mes "GO!"
*@
    mes "A="+a
    a+
    if a & lt; 5: goto * @ back; go back to the previous local label
    stop
The local label is defined with the name "* @". This is the other Unlike labels, you can place them as many times as you like in a single source script.
When referring to this local label with the goto command etc. Use "* @ back" and "* @ forward". "* @ Back" refers to the closest local label above that location. "* @ Forward" refers to the nearest local label below that location It will be a thing.
"* @ Back" can be abbreviated as "* @ b". "* @ Forward" can be abbreviated as "* @ f".
Local labels become hard-to-read scripts when used a lot. There is a possibility that it will end up, so please use it after considering the ease of viewing later.
Conditional judgment
Use the if instruction to determine the condition. the if instruction is a parameter If the indicated conditions are met, the subsequent instructions are executed, otherwise Continue execution from the next line.
; Example
    a=10
    if a = 10: mes "a is 10."
In the above example, the part "a = 10" is the conditional expression. Mainly for conditional expressions
| Conditional expression | Meaning |
|---|---|
| a = b | a and b are equal |
| a! b | a and b are not equal |
| a & lt; b | a is less than b |
| a & gt; b | a is greater than b |
| a & lt; = b | a is less than or equal to b |
| a & gt; = b | a is greater than or equal to b |
Is used. After the if + conditional expression, separate it with a: (colon), followed by Write the part that will be executed when the condition is met. (Similar to C language and Java, "=" and "!" Can be described as "==" and "! =")
You can also use logical expressions to make complex conditional decisions.
| Conditional expression | Meaning |
|---|---|
| a & amp; b | a and b are both correct (and) |
| a | b | Either a or b is correct (or) |
This allows you to write multiple conditions at once.
; Example
    a=10:b=20
    if a = 10 | b = 10: mes "either a or b is 10."
In the above example, connect the conditional expressions "a = 10" and "b = 10" with | (or), If either is correct, the result is correct. Logical operations can be described by the strings "or" and "and" in addition to the symbols "|" and "& amp;".
; Example
            if (a = 10) or (b = 10): mes "either a or b is 10."
If you write it as above, the result will be the same.
In HSP, logical operations are treated as bit-by-bit operations, so Please note that it is not equivalent to logical operators such as "& amp; & amp;" and "||" used in C language and Java.
If you want to change the program flow depending on the conditions,
; Example
    a=10
    if a>10 : goto *over10
    mes "a is less than or equal to 10."
    stop
*over10
    mes "a is greater than 10."
    stop
As shown above, it is also possible to skip to another label with the goto command. It is also possible to write the processing when the condition is not satisfied by using the else instruction.
; Example
    a=10
    mes "a is"
    if a = 10: mes "10.": else: mes "not 10."
    stop
In this case, up to a certain part of the else instruction is executed when the conditions are met, After the else instruction, it is executed when the condition is not met. The following lines will be executed normally regardless of the conditions.
It is also possible to execute the conditional judgment in multiple lines. If you want to write a script that is executed when the conditions of the if instruction are correct over multiple lines,
; Example
    a=10
    if a>5 {
        mes "TRUE"
        mes "(MULTILINE IF)"
    }
    stop
Specify the part that starts with "{" and ends with "}" like. (In the above example, TAB is inserted at the beginning of the line in C language style for easy viewing, It is not particularly necessary. Please describe it so that it is easy for the user to see)
You can also specify multiple lines with the else command.
; Example
    a=10
    if a>5 {
        mes "TRUE"
        mes "(MULTILINE IF)"
    } else {
        mes "  FALSE"
        mes "  (MULTILINE IF)"
    }
    return
However, please note that if you do not write "{" after else, it will not be multiple lines.
; Example
    if a>5 {
        mes "TRUE"
    }
    else; & lt;-wrong
    {
        mes "false"
    }
The above example is incorrect. An error will occur. Like the if instruction, the else instruction has only one line in scope unless there is a "{".
It is also possible to execute multiple if instructions.
; Example
    a=10
    b=10
    c=10
    if a>5 {
        if b>5 {
            if c>5 { mes "--3" } else { mes "--2" }
        } else {
            mes "--1"
        }
    }
In the above example, if the variable a is greater than 5, then "--1", if the variables a and b are greater than 5, then "--2". If the variables a, b, and c are greater than 5, "--3" is displayed. Be careful when using if instruction multiplexing, as the script becomes more and more complex. With HSP, multiplexing up to 128 layers is possible.
Repeat instruction
The repeat ~ loop instruction is an important instruction that is indispensable for repeating operation with HSP.
; Example
    repeat 5
    mes "Repeat [" + cnt + "]"
    loop
If you specify the number of times after the repeat instruction, the loop instruction is repeated the specified number of times. During the iteration, the system variable cnt is automatically counted up as 0, 1, 2, 3 ...
If 0 is specified for the number of repetitions, the range from repeat to loop is passed without being executed. Also, if you omit the repetition count specification or specify a negative value, an infinite loop will occur. By combining the repeat ~ loop instruction with the break and continue instructions, more advanced processing becomes possible.
The break instruction is to forcibly escape the repetition of the repeat ~ loop instruction in the middle.
; Example
    repeat 5
    if cnt=2 : break
    mes "Repeat [" + cnt + "]"
    loop
    stop
In the above example, when the system variable becomes 2, that is, when it becomes the third loop, it depends on the judgment of the if instruction. The break instruction is executed. When the break instruction is executed, even if the number of repetitions still remains, it forcibly breaks out of the repetition and Execution continues from the instruction following the loop instruction. After the break instruction (mes instruction in the above example) is not executed.
Using this instruction, you can create the following script, for example.
; Example
    repeat
        getkey a,1
        if a>0 : break
        await 10
    loop
    stop
In the script above, it's a loop that waits until you press the left mouse button. If you omit the number of repeat instructions or specify a negative value, an infinite loop occurs. By using it, the same place is repeated all the time until the button state becomes 1.
When the button is pressed, the break instruction is executed to break out of the repetition. In the past, such scripts had to use the goto instruction to describe the iterative structure, By using the repeat ~ loop and break instructions, you can easily realize a conditional infinite loop without preparing a label.
On the contrary, the continue instruction is an instruction to repeat the process again.
; Example
    repeat 5
        if cnt=2 : continue
        mes "cnt="+cnt
    loop
    stop
In the above example, the continue instruction is executed when the system variable cnt becomes 2. When the continue instruction is executed, it returns to the repeat instruction and executes the next iteration.
When the above script is executed,
; Display example
    cnt=0
    cnt=1
    cnt=3
    cnt=4
You can see that the mes instruction is not executed only when the system variable cnt is 2. It may be confusing at first, but the continue instruction is not the location of the loop instruction, but it works the same as the loop instruction. I can say. The repeat counter is incremented by 1 when the continue instruction is executed, just like the loop instruction. If the continue instruction is executed at the last iteration, the repeat ~ loop is finished, that is, from the instruction following the loop instruction. Continue running.
There is another way to specify parameters in the continue instruction. Repeat counter by specifying a number or numeric variable after continue You can change the contents of the system variable cnt that indicates.
For example, if you specify "continue 1", the content of the system variable cnt will be 1. It repeats from the next of the repeat instruction with that value. If the parameter is omitted and only "continue" is used, the same processing as the loop instruction, If you specify a number, you will have to change the value of the counter and start over. So
; Example
    repeat 1
        await 10
        getkey a,1
        if a=0 : continue 0
    loop
    stop
In such a script, repeat ~ loop, which should normally be executed only once Again, if the left mouse button is not pressed, the counter is set back to 0. It will be in an infinite loop. Now you have to wait until you press the button.
Both the break instruction and the continue instruction must be used in the repeat ~ loop instruction. It will not be. You can use any number of repeat ~ loop instructions.
It should be noted that the repeat ~ loop instruction is a program flow. Must be connected in order. If there is a repeat instruction, there must be no loop instruction on the line below it It means that you shouldn't. Only the repeat instruction can be executed in the subroutine jumped by gosub, You can use the goto command to jump to another location on the script and execute the loop command. If the order of repeat ~ loop instructions is out of order, the compiler will give an error.
The repeat ~ loop instruction can be used multiple times.
; Example
    repeat 5
        if cnt=2 : continue
        repeat 2
            Loop in mes "cnt =" + cnt
        loop
        mes "Outer loop cnt =" + cnt
    loop
    stop
In the above example, TAB is inserted for easy understanding, but the structure is repeated 5 times. There is a repeat ~ loop instruction that repeats twice more. The break and continue instructions work for the corresponding loop, even if the iterations are multiple. This is similar to the system variable cnt, which also indicates the value for the corresponding loop.
When the program control moves to another place by the goto instruction etc. from the repeat ~ loop instruction, The next time you execute the repeat instruction again, it will be repeated multiple times. Be sure to end the loop normally or exit the repeat ~ loop instruction with the break instruction. please. If you escape with the goto instruction, a multiple loop will occur and an error will occur. The repeat to loop instructions can normally be repeated up to 32 in multiples.
Memory Notepad Instructions
The memory notepad instruction set is unique and can handle strings line by line. This is a convenient function. This makes it easier to read, parse, and process text files. In addition, instructions for displaying combo boxes and list boxes (combox, listbox instructions) The dirlist command that checks the contents of the directory and the character string used to specify the parameters The returned character string can be processed simply by using the memory notepad instruction.
Memory Notepad instructions are simply text like Windows "Notepad" An instruction set for handling character strings containing multiple lines, just like using an editor. A normal character string is a collection of arbitrary characters such as "ABCDEFG". A character string containing multiple lines has a line break (\\ n) between them, such as "ABCD \\ nEFGH". The first line is "ABCD" and the second line is "EFGH", which is a character string with a slightly complicated structure. Text files that can be loaded and saved with a text editor, etc. It can be said that it is a character string containing such multiple lines. It is possible to extract and modify these character strings line by line with the memory notepad instruction.
| Instructions | Main Functions | Remarks |
|---|---|---|
| notesel | Specify variables to be treated as memory notepads | |
| noteadd | Add content to specified line | Insert / overwrite mode available |
| noteget | Read the contents of the specified line | |
| notedel | Delete specified line | |
| noteload | Load content from file | |
| notesave | Export content to file | |
| noteunsel | Revert to previously selected variable | |
| noteinfo | Get information about memory notepads | |
| notemax | Get the total number of lines | Use as a macro |
| notesize | Get the total size (in bytes) | Use as a macro |
| notefind | Find lines containing a specific string | Used as a function |
The basic usage is to first specify a string type variable with the notesel instruction. From then on, all memory notepad instructions are for the variables specified there.
The specified variable must be of type string. After specifying the variable with the notesel instruction, freely use the noteinfo, noteadd, noteget, notedel instructions. You will be able to access the contents (string) of the variable.
; Example
    a="ONION\nTOMATO\nCARROT"
    notesel a
    noteget b,0
    mes "index0="+b
    noteget b,1
    mes "index1="+b
    noteget b,2
    mes "index2="+b
    stop
In the above example, the variable a is assigned the three lines "ONION", "TOMATO", and "CARROT". First, the notesel instruction is used to specify the variable a, and then the noteget instruction is used to retrieve and display the contents of each line.
The Memory Notepad instruction uses a unit called an "index" to specify a row. The first row is index 0, then index 1, then index 2, and so on. If it is the number of rows, it will be the first row at first, but please note that the index starts from 0. In other words, "note get b, 0" means to read the first line into the variable b ...
; Example
    a="ONION\nTOMATO\nCARROT"
    notesel a
    noteadd "POTATO"
    mes a
    stop
In the above example, the three elements "ONION", "TOMATO", and "CARROT" assigned to the variable a are I'm adding a line called "POTATO". You can check the result by displaying the result in "mes a" on the 4th line. Use the noteadd instruction to add content. "Note add" POTATO "" adds "POTATO" to the last line.
noteadd "POTATO",1
If you specify, it will be added to the position of index 1. Contents that were in index 1 or later will be shifted downward. also,
noteadd "POTATO",1,0
Is also added at index 1 position, but overwritten on the same line. The content that was previously in index 1 will be erased and replaced with the specified content. There is also an instruction to delete the row at the specified index.
notedel 1
Deletes index 1. These memory notepad instructions are great when combined with other instructions. Memory notepad instructions are text files, multiple lines entered with the mesbox instruction Text, the result of the dirlist instruction, the parameters specified in the combox and listbox instructions Can be used for processing. In addition, the character string extracted in units of one line can be handled in units of one character with the poke, peek command, etc. Is possible.
; Example
    notesel a
    noteload "aaa.txt"
    idx=0
    repeat notemax
        noteget b,idx
        mes "index"+idx+"="+b
        idx++
    loop
    stop
In the above example, read a text file named "aaa.txt" and read all its lines Displayed with the index number. By using the noteload instruction, the size of the memory buffer allocated to the variable can be set. Adjust according to the read file. If you don't know the total number of lines, use the noteinfo function or notemax. notemax is assigned the number of lines of text that is the target of the memory notepad You can use it in macros just like system variables.
; Example
    sdim list,32000
    sdim tmem,32000
    tmem=""
    fid=""
    ;
    notesel list
    dirlist list,"*.*"
    sel=0
    objsize 160,24
    listbox sel,150,list    ; ID=0
    button "SELECT",*ok    ; ID=1
    pos 180,0
    mesbox tmem,450,200    ; ID=2
    stop
*ok
    noteget fname,sel
    exist fname
    if (strsize<=0)or(32000<strsize) : goto *lderr
    bload fname,tmem
    objprm 2,tmem
    stop
*lderr
    dialog "LOAD ERROR!"
    stop
This is a sample that combines the memory notepad instructions with other instructions. Display the list of files in the current directory in the list box, and there The contents of the selected file are displayed in the message box on the right.
The character strings used in the dirlist and listbox instructions are both memory notepads. A multi-line text that can be handled by an instruction. It may seem complicated at first, but you can handle a lot of data at once, The range of applications will expand further depending on how you use it.
Sort instruction
The sort instruction set is a group of instructions for sorting numbers and character strings. It makes it easy to process multiple data and character strings efficiently.
| Instructions | Main Functions | Remarks |
|---|---|---|
| sortval | Sort array variables numerically | |
| sortstr | Sort array variables by string | |
| sortnote | Sort memory note strings | |
| sort get | Get index of sort source | Get after sorting |
Numbers are sorted for integer values or real numbers assigned to array variables.
		dim n,10
		sortval n,0
In the above example, the range n (0) to n (9) of the one-dimensional array of the variable n is sorted in ascending numerical order.
When the instruction is executed, the entire contents of the array variable are sorted.
The sort order can be specified with the second parameter. If it is 0, it will be sorted in ascending order, and if it is 1, it will be sorted in descending order.
		sdim n,64,10
		sortstr n,0
In the above example, the range n (0) to n (9) of the one-dimensional array of the character string type variable n is sorted in ascending order of the character code.
When the instruction is executed, the entire contents of the array variable are sorted.
The sort order can be specified with the second parameter. If it is 0, it is sorted in ascending order of character code, and if it is 1, it is sorted in descending order of character code.
In addition, the sortnote command for sorting the character string with line breaks specified by the memory notepad command (notesel) is prepared and can be used properly according to the purpose.
After the sort instruction is executed, you can use the noteget instruction to find out the original position.
This is to find out in which position (index) the item of the sort result executed immediately before was originally located.
sortget a,0
In the above example, the variable a gets where the index 0 (first item) was originally located.
(The index value will be the same as the element value of the array)
For example, if the value of variable a is 5, it means that the items that were in index 5 have been sorted to index 0.
System variables
System variables are automatically set when the system boots or when a specific instruction is executed. The variable to which the value is assigned. You can refer to it like a normal variable, You cannot assign a value with an assignment statement (=). It is possible to assign values to some system variables with the return instruction.
| Variable name | Contents to be set |
|---|---|
| system | undefined |
| hspstat | Get HSP runtime information ( * 1 ) |
| hspver | HSP version number ( * 2 ) |
| cnt | repeat ~ loop loop counter |
| err | Error code |
| stat | General-purpose system variable to assign the status of various instructions |
| mousex | Mouse cursor X coordinate |
| mousey | Mouse cursor Y coordinate |
| mousew | mouse wheel value |
| strsize | Number of bytes read by getstr instruction |
| refstr | General-purpose system variable that stores strings |
| refdval | General-purpose system variables that store real numbers |
| looplev | repeat ~ loop nesting level |
| sublev | Subroutine (module) nesting level |
| wparam | Windows system values saved on interrupt (wParam) |
| lparam | Windows system values saved on interrupt (lParam) |
| iparam | Value indicating interrupt factor |
| thismod | Currently valid module variables |
| notemax | Number of memory notepad lines |
| notesize | Number of characters in memory notepad |
| hwnd | Current window handle |
| hdc | current device context |
| hintstance | current instance handle |
| ginfo_mx | On-screen mouse cursor X coordinates |
| ginfo_my | On-screen mouse cursor Y coordinate |
| ginfo_act | Active window ID |
| ginfo_sel | Operation destination window ID |
| ginfo_wx1 | Upper left X coordinate of the window |
| ginfo_wy1 | Upper left Y coordinate of the window |
| ginfo_wx2 | Lower right X coordinate of the window |
| ginfo_wy2 | Lower right Y coordinate of the window |
| ginfo_vx | Window scroll X coordinates |
| ginfo_vy | Window scroll Y coordinate |
| ginfo_sizex | X size of the entire window |
| ginfo_sizey | Y size of the entire window |
| ginfo_winx | Screen client X size |
| ginfo_winy | Screen client Y size |
| ginfo_sx | Screen initialization X size |
| ginfo_sy | Screen initialization Y size |
| ginfo_mesx | Message output X size |
| ginfo_mesy | Message output Y size |
| ginfo_r | Currently set color code (R) |
| ginfo_g | Currently set color code (G) |
| ginfo_b | Currently set color code (B) |
| ginfo_paluse | Desktop color mode |
| ginfo_dispx | X size of the entire desktop |
| ginfo_dispy | Y size of the entire desktop |
| ginfo_cx | X coordinate of current position |
| ginfo_cy | Y coordinate of current position |
| ginfo_intid | Window ID at message interrupt |
| ginfo_newid | Unused window ID |
| dir_cur | Current directory (folder) |
| dir_exe | Directory (folder) where the executable file is located |
| dir_win | Windows directory (folder) |
| dir_sys | Windows system directory (folder) |
| dir_cmdline | command line string |
| dir_desktop | Desktop directory (folder) |
| dir_mydoc | My Documents Directory (Folder) |
| dir_tv | HSPTV directory (folder) |
- *1
-
The following information is the total value.
- Debug mode = 1
- When the screen saver starts = 2
- Console mode = 16
- HSP for Macintosh = $ 80
- HSP3Dish = $100
- Linux version HSP = $ 1000
- UTF8 string runtime = $ 20000
- 64-bit runtime = $ 40000
- *2
-
It is the value of version code (8bit) + minor version code (8bit). For example, 3.5 is $ 3500.
Extended grammar
Module
The module function is a mechanism for organizing scripts and making them reusable. For intermediate and advanced users who have learned HSP to some extent, the module function will be convenient. must. Module variables that store all the variables handled in the module, Various applications such as local variables are possible.
Also, even if you don't use the module function, other people can use the module function. It is possible to use the new instructions added using. This is a DLL extension It is the same as the mechanism of the plug-in.
For example, let's say you have a source script called "test1.as". Suppose you are using variables a and b in this source script. If another person created a source script called "test2.as", there What if you had a very useful subroutine? If you don't use the names variable a and variable b in "test2.as", there is no problem. You may be able to bring just the subroutine as it is. However, if "test2.as" also uses variable a and variable b for different purposes, It's very troublesome.
If you use the HSP module function, you can create a script from "test1.as" to "test2.as". It will be possible to call it, but it is used in "test1.as" and "test2.as" Variables that are present are treated as independent (even if they have the same name). Also, register the subroutine in this independent script as a new instruction. It is possible to pass and receive parameters.
Reuse modules created in the past, publish them for people to use, Wider application of HSP scripts, such as using modules created by someone else It will be possible to do.
To master the HSP module, module specification instruction, user extension instruction You need to remember about such things. These are useful functions even by themselves It is an instruction to provide. Don't try to remember all at once, one by one from what you know Let's master it.
User-defined instructions are one of the instructions added with the HSP module function. The user can add an instruction with a new name at will. This is very powerful even if it is used alone apart from the HSP module function. Will be.
User-defined instructions
User-defined instructions are used as follows.
; Example
    goto *main

#deffunc routine
    mes "sub-routine"
    return

*main
    routine
    stop
There is no "routine" in HSP instructions, so until now it was an error However, when I actually execute this script, it says "sub-routine". Is displayed and the command "routine" is executed. User-defined instructions can be defined by the instruction "#deffunc".
#deffunc instruction name
Will add an instruction with a new name. After that, if a new command comes out, go to the place where "#deffunc" is. Subroutine jump.
That is,
; Example
    goto *main

*routine
    mes "sub-routine"
    return

*main
    gosub *routine
Even scripts like
; Example
    goto *main

#deffunc routine
    mes "sub-routine"
    return

*main
    routine
"#Deffunc" can be placed before or after the position where the instruction is actually used. User-defined instructions also allow you to pass parameters to subroutines.
; Example
goto *main
#deffunc routine int prm1, int prm2
mes "Parameter 1 is" + prm1 + "."
mes "Parameter 2 is" + prm2 + "."
return
*main
routine 10, 20
In the conventional gosub instruction, when passing a value to a subroutine, it is done in advance. I had no choice but to put a value in a fixed variable and call it. User-defined instructions instead pass values in a smart way It is possible.
Also, the parameters to be passed are not only numerical values, but also character strings, variables (arrays), etc. There are many variations. With the #deffunc instruction
#deffunc Name of new instruction Parameter type 1 Alias name 1,…
Specify the parameter information in the format. The parameter type can be selected from the following.
| Type | Content |
|---|---|
| int | integer value |
| var | Variables (no array) |
| array | Variables (with array) |
| str | string |
| double | real number |
| label | label |
| local | local variables |
The alias name indicates the contents of the passed parameters, and is a variable. You can use it with almost the same feeling. However, be careful when using var and array properly.
; Example
#deffunc routine1 var prm
    mes "The content of the variable is" + prm
    return

#deffunc routine2 array prm
    mes "The content of the variable is" + prm
    return
In the above example, if you call it like "routine1 a (1)", it will be "a (1)". Is passed as a parameter as it is. On the other hand, in the case of "routine2 a (1)", only "a" is a parameter. Passed as. Therefore, in routine2, the contents of a (0) are displayed. Will be done. Also, prm as an alias is routine1 In that case, it is not possible to specify "prm.1" (an error will occur). On the other hand, routine2 can be specified as "prm.1". As you can see, there are two types of passing variable parameters. Please remember.
The parameter type "local" is a slightly special specification. This is strictly It specifies the behavior of the new instruction, not the parameter.
; Example
#deffunc routine1 int prm,local a
    mes "local variable =" + a
    a=prm
    return
As shown above, local should be specified by adding it to the end of the parameter description. It is recommended. The name specified after local is a local variable It is initialized when a new instruction is executed. HSP variables are usually global It always holds some value as a local variable, but in the case of a local variable It is created when this instruction is executed and is destroyed at the end of the instruction. Local variables are used when recursing instructions (calling themselves), etc. This is useful when you want to keep the value of a variable independently. In addition, localization of variable names It is also useful for organizing programs such as, but it makes heavy use of local variables. That is, when you want execution efficiency and speed, there is overhead for initialization. Keep in mind that there is.
As a special use, by writing "onexit" instead of the parameter type, It can be registered as a cleanup instruction. The cleanup instruction is automatically called at the end of HSP script execution.
; Example
#deffunc name onexit
When the function is expanded by a module, the system and memory are released afterwards. Can be used to do.
User-defined function
User-defined functions, like user-defined instructions, create new functions.
#defcfunc Name of new function Parameter type 1 Alias name 1,…
It can be defined in the same format as a user-defined instruction. Script the behavior of the function evaluated in the expression with #defcfunc can do.
; Example
#defcfunc half int a
    return a/2
In the above example, we are registering a function named half. half is created as a function that returns half the value of a parameter. For example, by using something like "half (4)" in an expression, you get the value "2". It will be processed. The value returned by the function is specified by the parameter of the return instruction. The value and type specified in the return value are reflected in the expression as they are.
Differences between functions and instructions
Two function calling methods, function and instruction, are provided as standard. Both of these can be selected by the user as needed, It is recommended to operate according to the following rules.
- Instruction = Provide function that operates based on parameters
- Function = A parameter that is processed according to a certain rule and returns a value
Many of the functions provided by the system are provided as instructions, and function support is provided. Arithmetic functions are kept within the range that does not cause unnecessary confusion. Especially for scripts that are open to beginners, if you use a lot of functions It can be difficult to understand.
Module definition command
A module is a source unit that can handle variable names and label names independently.
; Example
#module
#deffunc test1
    a=a+1
    mes "test1 was called" + a + "times."
    return
#global
Modules always start with "#module" and end with "#global" Think of it as a promise. In this example, every time we call a new instruction called test1, the variable a The number of saved times will be counted up. As an example of the caller, let's create the following script.
; Example
    a=5
    repeat a
        test1
    loop
    mes "content of a =" + a
    stop
Think of it as a normal subroutine call, even if the name of variable a is in test1 It is being used and should not work properly. However, because the sources are separated using module definition instructions The variable a inside the module and the variable a outside are treated as different things. So the above script works fine.
In this way, the section separated by "#module" to "#global" Even if the names of variables and labels are duplicated, the other sections are completely different spaces. The point that each script works without any problems, The basic concept of a module. Subroutines with independent functions, By completely separating with user-defined instructions, script reuse and You can proceed with encapsulation.
You can also add a name when defining the module.
; Example
#module mo
#deffunc test1
    a=a+1
    mes "test1 was called" + a + "times."
    return
#global
In the above example, a module named "mo" is defined. Even if you omit the name and just use "#module", do not duplicate it with others. The module name "_m number" is automatically assigned by the system. If multiple modules are defined, they are identified by this module name. It has been.
If you want to refer to the variables inside the module from outside the module You can use the format "variable name @ module name". vice versa, When referencing variables outside the module (#global part) from inside the module It can be referenced by the format "variable name @". However, this format creates dependencies inside and outside the module. It is not recommended as it will no longer be a complete source separation.
Definition of module variables
Module variables can manage multiple variables and data together Provides a data storage method. To hide multiple variables in a module This is a convenient function that allows you to simply organize a large amount of data.
Variables used inside a module are called module variables, and they are called modules. Since it is saved in units, you can create variables with module types. Make the following definitions in preparation for creating module variables is needed.
#module a x,y,z
In the above example, a module called a has three variables, x, y, and z. The #module instruction defines a space with the name "a" as before. In 3.0, it is possible to define a variable corresponding to the name "a". You can do it. In the sense of the variables x, y, z used by the module "a" These x, y, z are called module variables.
To use a module variable, create a variable with the module type is needed.
newmod v,a
The above example initializes the variable v for module "a". Now the variable v is called the module variables x, y, z that the module "a" has. The entire contents will be stored. The variable is initially initialized with an integer value of 0. However, for each module It is also possible to prepare an instruction for initialization.
#modinit
    x=1:y=2:z=3
    return
The above example defines a routine (constructor) for module variable initialization is. Initialization routines defined by #modinit are per module You can write only one. Modules with #modinit defined automatically when using the newmod instruction The initialization routine is called. #modinit can specify arguments like #deffunc.
#module a x,y,z
#modinit int p1,int p2,int p3
    x=p1:y=p2:z=p3
    return
#global
    newmod v,a,1,2,3
If the newmod instruction is executed when defined as above, The parameters described in newmod are passed as they are.
It may be confusing at first, but variable v is a collection of multiple variables. It is a container that can be stored. Multiple files in one folder It is an image similar to the one stored.
To access the contents of stored variables, that is, module variables, Instructions for processing within the module must be defined specifically.
#modfunc viewxyz
    mes "x="+x+"/y="+y+"/z="+z
    return
The above example is an instruction definition for displaying the module variables x, y, z. Arguments can be specified in the same way as #deffunc, but this instruction can be used. To call, first specify a modular variable as an instruction argument is needed.
In other words, in order to call the command viewxyz,
#module a x,y,z
#modinit int p1,int p2,int p3
    x=p1:y=p2:z=p3
    return
#modfunc viewxyz
    mes "x="+x+"/y="+y+"/z="+z
    return
#global
    newmod v, a, 1,2,3; Now we need to initialize the module variables
    viewxyz v
    stop
Must be stated. Now, the contents of x, y, z stored in the modular variable v are called viewxyz. It can be displayed in a user-defined instruction. Apparently, one variable called v can contain three elements, x, y, and z. It is now possible, and it is effective in situations where data is handled as a set.
In the routine defined by #modfunc, it represents its own module variable You can use the system variable thismod. Thismod is another instruction / function from within the routine that processes module variables. Used to specify as a module variable to call.
#modfunc is defined as an instruction, but also #modcfunc to define it as a function It is prepared. Even if it is defined as a function, it will be the first parameter as well as the instruction. You must specify a modular variable.
Modular variables can also use arrays. There are several special uses for this case.
The newmod instruction mentioned earlier is an instruction for assigning a new value to a modular array variable.
newmod v,a
Is assigned to an array called v (0), but if executed again, it is assigned to v (1).
Will be done. In other words, the newmod instruction automatically finds an empty space in the array of variables v.
It is an instruction to secure and store data.
Conversely, you can also delete the array element stored by the newmod instruction.
delmod v(0)
In the above example, the content corresponding to element 0 of the variable v is deleted. The deleted element can no longer be used, and a new newmod instruction is executed. It will be reused when it is done. Also, if necessary, when the module variable is destroyed by the delmod instruction It is also possible to define routines (destructors) that are called automatically.
#modterm
    mes "BYEBYE"
    return
In the above example, "BYEBYE" is displayed when the module variable is destroyed. Use a function called varuse to check if the specified element is in use can do.
if varuse (v (0)) = 0: mes "v (0) is not used"
Also, how much the elements of the array can be used can be obtained with the length function. can.
mes "Maximum array element =" + length (v)
In addition, iterate over all available elements in modular variables Foreach instruction is provided for. The foreach instruction can be used in the same way as the repeat instruction, but for the number of loops. Specify the modular variable name instead. After that, it repeats as many times as all the elements until the loop instruction.
During the iteration, the system variable cnt changes as the value of the element. The system variable cnt skips elements deleted by the delmod instruction.
in short,
    foreach v
        viewxyz v(cnt)
    loop
If you write like, for all the valid elements in the modular variable v, It means to execute the command viewxyz.
If you assign a modular variable to another variable, it will be a clone of the original variable. (Not all the contents assigned to the original variable are copied) In that case, the return value of the varuse function will be "2", which indicates that it is a clone. A clone of a modular variable can be referenced in the same way as the original variable, Module variables cannot be destroyed. Also, be careful not to refer to the contents of module variables that have already been destroyed.
The explanation of modules is also given in the separate document Module Function Guide .
Preprocessor instructions
Preprocessor instructions are interpreted at compile time, not at program execution time The instruction to be executed. Preprocessor instructions are distinguishable from other instructions As you can see, it must be written after the "#" at the beginning of the line.
Customize the script description itself with preprocessor instructions It will also be possible. However, if you use it too much, you will understand the program itself. It may be difficult, so it is recommended for advanced users who have used HSP all over. To do.
Preprocessor instructions are usually for one line starting with "#", Preprocessor lines ending in "\\" continue to the next line. It can be used when defining a definition that does not fit on one line.
; Example
#define aaa mes "AAA"\
    :mes "BBB"\
    :mes "CCC"

    aaa
    stop
In the above example, all three lines are interpreted as #define preprocessor instructions. The instructions provided as preprocessor instructions are as follows.
#include "filename" [Combine another file]
The file specified by "filename" is also compiled at the same time. Scripts that cannot fit in the script editor can be included in a separate file. If you split it, you will be able to compile it.
#define new name Original name [Register new name]
It is for adding a new alias. You can use the name of the traditional instruction of HSP with another name. The new name must be 20 characters or less that does not overlap with the reserved command word or variable name. Must be an alphabetic string with no spaces.
; Example
#define pr print
    pr "message..."
    stop
After #define as above, separate the new name and the original name with a space. To do. Then, the command "pr" is newly registered, and the command "print" is displayed. You will be able to use it in exactly the same way.
The original name does not have to be the name of the instruction. Numerical values and symbols It is possible to register as a new name.
; Example
#define is =
#define plus +
    a is 5 plus 10
    mes "A="+a
    stop
In the above example, the symbol "=" is replaced by the word "is" and the symbol "+". It is defined to be replaced with the word "plus" respectively. Then the line "a is 5 plus 10" is the same as "a = 5 + 10".
It can also be expanded using parameters.
; Example
#define reset(%1) %1=10
    reset a
    mes "A="+a
    stop
The above example converts "reset a" to a script called "a = 10".
Many other options are available, including special expansion parameters. For more information, see the #define macro section.
#const Macro name Numerical expression [Constant definition of macro name]
Sets the replacement character string with the specified macro name. Similar to #define, but #const is for replacing constants (numeric values) Replaces the result of the pre-calculation.
; Example
#const KAZU 100+50
    a=KAZU
; ↓ (after deployment)
;    a=150
If the value to be used in the source is determined in advance, the source It is effective for speeding up. It is also possible to include macros that have already been defined, so
; Example
#const ALL 50
#const KAZU 100*ALL
    a=KAZU
; ↓ (after deployment)
;    a=5000
Can be used like. Calculation formula is only integer, operator and numerical description style is script You can use the same formula as you are using.
; Example
#const KAZU $5+3*10
    a=KAZU
; ↓ (after deployment)
;    a=35
#undef macro name [cancel macro name]
Cancels the macro name that has already been registered. No error occurs even if specified for an unregistered macro name It will be ignored.
 #if Numerical expression [Compile control from numerical value]
#ifdef Macro name [Compile control from macro definition]
#ifndef Macro name [Compile control from macro definition]
#else [Invert compile control]]
#endif [Compile control block end]
Specifies compile ON / OFF. #if turns off the subsequent compilation output if the specified number is 0. Ignore the compilation result. If the value is other than 0, the output will be ON. This compile control targets the period until #endif appears. #Endif exists as a pair in any of #if, #ifdef, and #ifndef is needed.
; Example
#if 0
    mes "ABC"; This part is ignored
    a = 111; This part is ignored
    mes "DEF"; This part is ignored
#endif
You can also use an expression to specify #if, so
; Example
#define VER 5
#if VER<3
    mes "abc"; This part is ignored
    a = 111; This part is ignored
    mes "def"; This part is ignored
#endif
You can also use it like this. The description of the calculation formula is the same as the #const instruction.
#ifdef turns output on if the specified macro name is defined, otherwise If so, turn off the output. The macro name will be the one defined by #define or #const.
; Example
#define SW
#ifdef SW
    mes "ABC"; This part will be compiled
    a = 111; This part will be compiled
    mes "DEF"; This part will be compiled
#endif
#ifndef turns off the output if the specified macro name is defined, which is the opposite of #ifdef. If not, turn on the output. Also, by putting #else in the block, describe the operation when the conditions are reversed. can.
; Example
#ifdef SW
    mes "AAA"; If SW is defined
#else
    mes "BBB"; If SW is not defined
#endif
You can also nest #if, #ifdef, #ifndef ~ #endif blocks. Is possible.
; Example
#ifdef SW
    #ifdef SW2
        mes "AAA"; if SW and SW2 are defined
    #else
        mes "BBB"; If SW is defined
    #endif
#endif
 #uselib "filename" Specifying an external DLL
#func New name Function name Type External DLL call instruction registration
You can increase the number of instructions to call a program in an external DLL. As a result, it was created in C language, Delphi, etc. from the HSP main program. It is possible to call functions in the DLL.
With the func instruction, external functions can also be defined as HSP instructions, so It is possible to freely extend the functions of HSP. How to create an external DLL, For details on passing parameters with HSP, refer to "Extension Plug-in Creation Reference Manual".
If you use it normally, it is an instruction that you do not need at all, so remember it in particular It doesn't matter if you don't have it.
About #define macro
I want to customize the #define macro so that it is easy for individuals to write scripts. It is used in cases and is not suitable for beginners. The functions described here are also It is not used frequently, so please refer to it only when necessary.
The #define macro basically registers a replacement string.
; Example
#define hyouji mes
    hyouji "AAAAA..."
; ↓ (after deployment)
;    mes "AAAAA..."
By inserting "global" immediately after the #define and #const instructions, all modules You can create macros that can be used permanently.
; Example
#module
#define global test 0x1234
#global
    a = test; 0x1234 is assigned to a
Normally, if #define is defined in a module, other modules And in global areas, the same name is not recognized. By entering the global specification, the name defined everywhere after that You will be able to replace it with a macro.
In addition to simple replacement macros, expansion with arguments is possible. The argument is specified by the argument name of% 1,% 2,% 3 ... enclosed in parentheses after the macro name. I will do it. Arguments must always be specified as "% numerical value", and the numerical values are described in order from 1. please. Specified by symbol name like C or C ++ preprocessor Please note that you cannot.
; Example
#define hyouji(%1) mes "prm="+%1
    hyouji "AAAAA..."
; ↓ (after deployment)
;    mes "prm="+"AAAAA..."
You can also set the initial (default) value for the argument.
; Example
#define hyouji(%1="PRM=",%2=123) mes %1+%2
    hyouji "AAA",a
    hyouji "BBB"
    hyouji ,b
; ↓ (after deployment)
;    mes "AAA"+a
;    mes "BBB"+123
;    mes "PRM="+b
The initial (default) value is if omitted when using the macro A value that is automatically completed. If the initial value is omitted, it will not be completed. When specifying macro arguments, enclose them in parentheses on the side specified by #define. However, please specify without parentheses when actually using it.
; Example
#define hyouji(%1) mes "prm="+%1
    hyouji("AAAAA...")
Please note that a description like this will result in an error. However, by using the ctype option, the following parenthesized description can be obtained. It will be possible.
; Example
#define ctype kansu(%1) (%1*5+1)
    a=kansu(5)
This option is used when you want to use a macro other than the instruction part such as a calculation formula. valid. At first glance, it behaves like a function in C language, but it is actually a macro. Please note that the range of application is narrow because it is only replaced. This description method is different from the original HSP grammar, so I want to write it in my own style We do not recommend using it for purposes other than customization.
It is possible to set keywords that perform special actions when expanding macros. This special keyword mainly shares parameters between different macros, It is for realizing the nested structure by the stack.
; Example
#define start(%1) %tstart %s1 mes "START"
#define owari %tstart mes %o
The "% s1" and "% o" specified here are special expansion macros. A sample using this will be expanded as follows.
start "OK"    -> mes "START"
owari         -> mes "OK"
In this way, it is possible to share data between different macros. The special expansion macro has the following types and functions.
| Macro | Features |
|---|---|
| % t | Set tag name |
| % n | Generate a unique label name |
| % i | Generate a unique label name and put it on the stack |
| % o | Extract the string on the stack |
| % p | Extract the character string on the stack (maintain the stack) |
| % s | Put argument parameters on the stack |
| % c | Line breaks |
The special expansion macro is expressed by "%" followed by one alphabetic character + parameter. A half-width space is added after the special expansion macro to distinguish it from subsequent keywords. Please put it in. Special expansion macro up to the part including spaces such as "% tabc aaa" Is judged.
The special expansion macro has a general stack (First In Last Out). This stack can be shared by macros with the same tag name. Specify the tag name within 16 single-byte alphabetic characters after "% t" such as "% t tag name". To do. In the previous example, "start" specified as "% tstart" corresponds to the tag name.
"% S" is a special expansion macro for stacking argument parameters. If you specify "% s1", the parameter of "% 1" is pushed on the stack.
Use "% o" to get the string on the stack. "% O" takes out the character string on the stack and expands it. Because it's a stack The last one is taken out first. If you specify "% o0", Ejects the stack, but does not expand the string (stack eject only).
"% P" retrieves only the contents without returning the stack. "% P0" is next Expands the contents of the stacked stack that is retrieved. "% P1" is a deeper stack Take out. After that, it is possible to specify from "% p0" to "% p9".
An example of label generation is shown below.
; Example
#define start %tstart *%i
#define owari %tstart await 20:stick a:if a=0 : goto *%o
A sample using this will be expanded as follows.
    start  -> *_start_0000
    owari  -> await 20:stick a:if a=0 : goto *_start_0000
"% I" creates a unique label name that does not overlap with others and puts it on the stack Stack one level. If you specify "% i0", the label name will be pushed one stack on the stack. It will not be expanded. Also, "% n" generates and expands a unique label name. Just do it, not stack it.
In the above example, a new label is created by label name generation to create a loop structure. It has been realized. If you use this method, the label names will overlap even if they are nested. You can build a loop structure that never happens. Also, all stacks are pulled out in one source script file Macros (tag names) that are missing will report an error at compile time. Be sure to configure the macro instruction so that all the stacks are fetched and finished. Please keep it.
* While-wend, do-until, and for-next of standard definition macros are created by special expansion macros.
In special situations, it is possible to expand with a line break by "% c". The line is split and expanded at the "% c" part. Mainly for multiple preprocess statements It can be used to define macros that are expanded. However, not all preprocessors currently support macro expansion. There is none. If you use it too much, it may be difficult to see. Please use it after understanding it well.
; Example
    goto *@f
#define def(%1,%2) #deffunc %1 %c mes %2 %c return
    def test, a
*@
    a = 10
    test
    a = 20
    test
    stop
Standard macro definition file
In the preprocessor, "hspdef.as" in the common directory is standard. Always load first as a macro definition. "Hspdef.as" contains system-defined symbol names, macros, and basics. Modules etc. will be added.
Users should be careful not to edit "hspdef.as". If you want to customize individually, prepare "userdef.as" It will be loaded automatically like "hspdef.as". The "userdef.as" file If it does not exist, it does not apply.
The standard macro definition files are searched in the following order. If the file is not found, it will be ignored.
- "hspdef.as" in the directory containing the source files
- "hspdef.as" in the common directory
There are also macros that the preprocessor adds automatically. The following macros are added automatically and these are added with #ifdef, #ifndef instructions, etc. It is possible to discriminate macros and branch them.
| Instructions | Contents |
|---|---|
| _debug | in debug mode |
| __hsp30__ | When using ver3.0 or later |
| __file__ | File name analyzed at the time of use |
| __line__ | Line number analyzed at the time of use |
| __date__ | Date of use |
| __time__ | Time of use |
| __hspver__ | HSP version number (*) |
| __runtime__ | HSP runtime name |
* The upper 8 bits and lower 8 bits indicate the major and minor versions, respectively.
Standard macros are designed to make writing easier for individuals. Use this when you want to write a script in a format you are already familiar with, such as C language. It looks like an instruction and defines a new similar macro It is also possible. For details, refer to the separate section " #define macro ".
When running the old script, the newly added macro name is already a variable name or An error will occur if it is used as a label name. Short words such as do, for, and next Please note that there is a high possibility of collision. Have collided In that case, you can operate it by replacing the variable name and label name with something else.
do ~ until macro
Repeat the part from do to until until the conditions following until are met. Execute in do ~ until at least once even if the conditions are met. If the condition following until is omitted, the process will not be repeated. You can also restart from the beginning of the repeat with _continue and escape the repeat with _break.
; Example
    a=0
    do
        a=a+1
        mes "A="+a
    until a & gt; 5; repeat do or less until a is 5 or more
while ~ wend macro
Repeats from while to end only as long as the conditions following while are met. If the condition is not met, it will not execute from while to wend. If the condition following while is omitted, it will be repeated infinitely. You can restart from the beginning of the repeat with _continue and escape the repeat with _break.
; Example
    a=0
    while a<5
        a=a+1
        mes "a="+a
    wend; repeat while and below only while a is 5 or less
for ~ next macro
for variable name, initial value (0), closing price (0), increment (1)
If is specified as a parameter, it repeats between for and next a specified number of times. Values in parentheses are omitted. The variable name cannot be omitted. Using the specified variable as a counter, starting from the initial value, The increment is added each time it is repeated. When the closing price is reached, Exit the iteration (close price is not included in the loop).
If the closing price condition is met from the beginning, the iteration will not be executed. You can also restart from the beginning of the repeat with _continue and escape the repeat with _break.
; Example
    for a,0,5,1
        mes "A="+a
    next; a repeats between 0 and 4 (5 times)
In this example, the variable a repeats 0,1,2,3,4 5 times to end the loop. You can also specify a negative value for the increment.
; Example
    for a,5,0,-1
        mes "A="+a
    next; a repeats between 5 and 1 (5 times)
In this case, the variable a repeats 5,4,3,2,1 5 times to end the loop. The for macro internally generates a special new instruction exgoto after expanding the macro. The exgoto instruction is an auxiliary instruction for the for macro and it is recommended to use it alone. I have not.
switch ~ case ~ swend macro
For switch ~ case ~ swend, multiple conditional judgments and processes can be written together in a block.
It is a syntax that can be done. Start the switch block at the switch comparison source .
The parameter to be compared can be a variable or an expression.
case comparison value after switch
By putting, if the "comparison source" is the same as the "comparison value" after this, it will be processed.
You can describe the content.
Multiple cases can be described in the block, and the processing for each comparison value can be performed.
You can specify it.
If the case comparison is correct, execute subsequent instructions until swbreak exists.
Also, if you put default instead of case,
If the condition does not apply to any of the comparison values specified in case, the following will be executed.
When the switch block is finished, be sure to put swend at the end.
You need to write it down. The following is an example script using the switch macro.
; Example
    a=0
    switch a; compare a
    case 0; if a is 0
        mes "A=0"
        swbreak; Condition execution end of case0
    case 1; if a is 1
        mes "A=1"
    default; if a is non-zero
        mes "A!=0"
        swbreak
    swend
In this example, conditional branching is performed depending on whether the content of variable a is 0, 1 or something else. After "case 0", up to "swbreak" is executed, but in the case of "case 1", Since "swbreak" does not exist, "mes" A! = 0 "" executed after "default" is also Please note that it will be executed including.
API call
With HSP3, you can take advantage of the ability to call functions exported by external DLLs. This is a function to call the DLL with the arguments specified in advance. Flexible usage is possible including HSP extension plug-in of ver2.5 or later.
The outline of the DLL call is as follows.
#uselib "filename" External DLL specification
Specify the file name of the external DLL to be called from HSP. The DLL file name must be written completely, including the extension. If the file name is omitted, specify the DLL name from the script at runtime. And link.
#func New name Function name Type External DLL call instruction registration
Register a new instruction to call the external DLL. Write the new name, function name, and type separated by a space. The full DLL name should be enclosed in double quotes, such as "function name". You can write the export name. If not enclosed in double quotes, VC ++ "_function name @ 16" It will be converted to a name based on the export convention.
The type describes the details of the argument. As with #deffunc, specify the argument types separated by ",". There is no limit to the number of arguments or the order of the types. The character strings that can be used as the argument type are as follows.
| Type | Contents |
|---|---|
| int | Integer value (32bit) |
| var | Variable data pointer (32bit) |
| str | String pointer (32bit) |
| wstr | unicode string pointer (32bit) |
| sptr | Pointer Integer value or string pointer (32bit) |
| wptr | Pointer Pointer of integer value or unicode string (32bit) |
| double | Real value (64bit) |
| label | Label pointer (32bit) |
| float | real value (32bit) |
| pval | PVal structure pointer (32bit) |
| bmscr | Pointer of BMSCR structure (32bit) |
| comobj | COMOBJ type variable data pointer (32bit) |
| prefstr | Pointer (32bit) of system variable refstr |
| pexinfo | EXINFO structure pointer (32bit) |
| nullptr | Null pointer (32bit) |
The following is an example of executing with four arguments.
; Example
#uselib "test.dll"
#func test "_func@16" var,int,int,int
    test a,1,2,3; func (& amp; a,1,2,3) in test.dll is called
The function import from the DLL is done when the instruction is first executed. If the function name to be imported is not found, at the time of executing the instruction An error will occur. (No error at startup) The return value of the external API call is assigned to the system variable stat as a 32-bit integer. Will be done.
When a numerical value is specified for the type, it is compatible with the DLL type specification of ver2.5 or later. The arguments are set automatically. As a result, the extension plug-in up to HSP2.61 can be used as it is. However, you need to be careful about compatibility with ver2.5 in the following points.
- BMSCR structure can only reference fields from flag to color
- PVal structure is compatible with ver2.5 PVAL2 structure
- The flag field (type type value) and len field (array information) of the PVal structure cannot be rewritten on the DLL side
- You cannot access string type array variables from PVal structure
In other respects, the same information as HSP ver2.5 will be passed.
Also, by putting "onexit" before the function name, it can be used as an end call function. You can register.
; Example
#func test onexit "_func@16" str,int,int
In the above example, "_func @ 16" is automatically called when the application is closed.
Like #func, it can also be registered as a function with the #cfunc command.
#cfunc New name "function name" Type name 1,… External DLL call function registration
You can use the same argument parameters as the #func instruction. The new name registered by the #cfunc instruction can be described in the expression as a function. Is possible.
; Example
#uselib "test.dll"
#cfunc test "_func@16" var,int,int.int
    res = test (a,1,2,3); func (& amp; a,1,2,3) in test.dll is called
As the return value of the registered function, the integer value (32bit int) obtained as a result of the external call is returned as it is. For HSP2.5 compatible calls, the value returned in the system variable stat is the return value of the function.
COM component call
In HSP3, COM object type variables, COM interface definitions and You can use the function to make a call.
To use the functionality of COM components, create COM object type variables is needed. Normally, the newcom instruction is executed to execute the specified COM class or Create a COM object type variable corresponding to the interface. from, You will be able to call the method through the created variable. A COM object type variable can be an interface pointer to a COM object. It is stored and the creation and destruction of objects is managed inside HSP. (There is also a delcom command that explicitly destroys it.)
Access via automation is the easiest way to use COM Is possible. This method provides the IDispatch interface It can be used when using automation objects.
; Example
    newcom ie, "InternetExplorer.Application"
In the above example, an object with a program ID (ProgID) called "InternetExplorer.Application" Create and store the object's interface pointer in the variable ie. The program ID is the same as the class ID definition character string used in VBScript, JavaScript, etc.
Instead of the program ID, use the GUID class ID (a string in the format "{0002DF01-0000-0000-C000-000000000046}") It is also possible to specify. After the COM object type variable is created, you can browse and set properties and call methods.
In a COM object type variable, a character string indicating a property as an array element By specifying, you can refer to and set the property.
; Example
    ie("Visible")=1
The above example is called "Visible" of the variable ie initialized as a COM object. It sets the name property to an integer value of 1.
; Example
    mes "Window position (" + ie (" Left") + "," + ie (" Top") + ")"
    mes "Window size (" + ie (" Width") + "," + ie (" Height") + ")"
In the above example, the display is performed by referring to the contents of the property. Property values returned by COM objects are properly typed inside HSP You will be able to use it as it is.
If you want to execute a method of a COM object, use the mcall instruction.
; Example
    mcall ie,"Navigate","http://www.onionsoft.net/"
In the above example, the method "Navigate" is called "http://www.onionsoft.net/" Execute by passing a string type argument. The number of arguments and the type will be passed to the method as they are. The return value of the executed method is assigned to the variable set by the results instruction. Also, if the method execution is successful, the system variable stat will be 0 and If an error occurs, the result code (HRESULT value) is displayed in the system variable stat. It will be substituted.
As a special description method of the mcall instruction, it is also possible to write as follows.
; Example
    ie->"Navigate" "http://www.onionsoft.net/"
After the variable, write "-& gt;" and the method name, and specify the parameter. This is for those who want to use a description method similar to C ++ etc. The compiler automatically replaces it with the mcall instruction.
By specifying "$ coclass", "$ interface" in the property of COM object It is possible to get the coclass name and interface name of the object.
 pobj ("$ coclass"): coclass name
    pobj ("$ interface"): interface name
Direct COM interface without automation (IDispatch) It is also possible to call a method of (custom interface).
#usecom interface name "IID string" ["CLSID string"] COM interface registration
Because it uses a custom interface, the interface name Make a definition. In "IID character string", enter the interface ID in character string format. With a GUID (a string like "{000214EE-0000-0000-C000-000000000046}") Specify. For "CLSID string", enter the class ID in string format GUID. You can specify it, but you can omit it.
If "CLSID string" is specified, it will be the second parameter of the newcom instruction. You can specify the interface name. In this case Create an object with the class ID of the #usecom instruction and specify it Gets the interface and stores it in a COM object type variable.
#comfunc new name method index type name 1,… COM method registration
Immediately after defining the interface with the #usecom instruction, use the #comfunc instruction. COM methods and argument parameters can be registered. Specifying the type name is the same as for the #func instruction. If you specify wstr for the type name, You can pass a unicode (OLESTR) string as a method argument. (You can use the cnvwtos function to convert unicode to HSP strings)
; Example
    Create a shortcut shortcut.lnk to hsp3.exe
    ;
    #define CLSID_ShellLink   "{00021401-0000-0000-C000-000000000046}"
    #define IID_IShellLinkA   "{000214EE-0000-0000-C000-000000000046}"
    #define IID_IPersistFile  "{0000010b-0000-0000-C000-000000000046}"

    #usecom IShellLinkA IID_IShellLinkA
    #comfunc IShellLink_SetPath 20 str

    #usecom IPersistFile IID_IPersistFile
    #comfunc IPersistFile_Save 6 wstr,int

    newcom slink, CLSID_ShellLink
    IShellLink_SetPath slink, dirinfo(1)+"\\hsp3.exe"
    IPersistFile_Save  slink, dirinfo(0)+"\\shortcut.lnk", 1

    mes "I created a shortcut."
    delcom slink
    stop
Also query another interface from the generated interface A querycom instruction is provided. However, when executing the mcall instruction It automatically queries the required interface, so Preliminarily that the COM object provides the desired interface If you know, you don't have to dare to execute the querycom instruction.
Another way to create COM object type variables The axobj instruction for placing the ActiveX control is provided.
The axobj instruction starts from the specified class ID (CLSID) or program ID (ProgID). Place the ActiveX control inside the HSP window. The variable specified by the axobj instruction is initialized as a COM object type variable.
; Example
    axobj ie, "Shell.Explorer.2",640,480
    ie->"Navigate" "www.onionsoft.net"
The window generated by the axobj instruction is a placement object managed by HSP. You will be registered. After executing the axobj instruction, the object ID becomes the system variable stat. It will be substituted.
To destroy the window generated by the axobj command, initialize the screen with the cls command etc. It will be done when it is done. It can also be explicitly destroyed with the clrobj command, etc. Is possible. However, variables initialized as COM object type variables are It will be left untouched and should be destroyed by the user. Destruction of COM object type variable is done when another value is assigned or when HSP ends. Since it is done automatically, there is no memory leak etc., but Since the pointer of COM that became unusable remains, consciously discard it It is recommended to keep it.
To use the axobj instruction, Atl.dll or Atl71.dll must be installed in the execution environment. Must be installed. If you don't have these DLLs An error will occur.
In addition, the function for managing COM events is available. This will Get the notification of the event notified from the COM object with a script can do.
comevent p1,p2,p3,*label

    p1: Variable name to store the event management object
    p2: Variable name of the event acquisition source
    p3: Connection point GUID
    * label: Event subroutine label
To get an arbitrary event from the variable (COM object type) specified by p2 Make preparations. The COM object specified by p2 has already been specified by the newcom instruction. Must be initialized. Performs event processing on the variable specified by p1 Initialize as a special COM object type for.
Specify the connection point GUID in string format with p3. If you omit the specification of p3, the default obtained by IProvideClassInfo2 Search for a connection point.
Specify the label of the event processing subroutine with * label. If the preparation for event acquisition fails, an error will occur. If successful, it will go to the location specified by * label each time an event occurs. A subroutine jump interrupt occurs.
In the event subroutine specified by * label, the comevdisp function and comevarg instruction It is possible to get the details of the event.
For variables for which event acquisition has already started If you execute the come event instruction again, the previous event queue settings will be invalid. Event retrieval continues until the delcom instruction destroys the COM object.
; Example
    #define IID_DWebBrowserEvents2 "{34A715A0-6587-11D0-924A-0020AFC7AC5D}"

    axobj ie, "Shell.Explorer.2", 640, 480
    comevent ie_event, ie, IID_DWebBrowserEvents2, *event
    stop
*event
    COM event processing
    title "EVENT="+comevdisp(ie_event)
    return
In the above example, get the event DWebBrowserEvents2 of the IE component And then call the * event subroutine. To get a dispatch ID (DISPID) that identifies the type of event that occurred Use the comevdisp function.
You can get the event parameters by executing the comevarg instruction.
comevarg p1,p2,p3,*label

    p1: Variable name to which the result is assigned
    p2: Event management COM object variable name
    p3: Parameter index (0 to)
    p4: Acquisition mode (0 = normal conversion, 1 = conversion to character string, 2 = Variant type)
Variable specified by p2 (COM object type variable that stores event management objects) Event parameters (arguments) are acquired in the event processing subroutine of The result is assigned to p1. p3 is the index of the argument, the first argument Specify 0 to get it and 1 to get the second argument. p3 is the acquisition mode, and if omitted or 0 is specified, it will be the HSP standard variable type. It will be converted. If 1 is specified, it will be acquired in the state of being converted to a character string. If you get 2, it will be obtained as the following Variant type variable.
In HSP3, you can use Variant type variables as variable types for COM. Variant variables contain various types of data used in COM automation. The variable to be stored. A reference type (ByRef) variable is used as a parameter of the COM event. In HSP3 so that the reference destination can be rewritten when specified It has been introduced. Also, non-reference type parameters are also Variant type variables. It is possible to get it.
Variant type variable executes comevarg instruction in COM event processing subroutine You can get it by specifying 2 for the 4th parameter. Variant variables can be specified by specifying a property name, as in the case of COM type variables. You can refer to the following values respectively. Property name is case sensitive It will not be.
The following are special properties that can be referenced when the variable v is a Variant type variable.
v ("value"): Value stored in Variant
Refers to the value stored in v. For example, of integer type (VT_I4) For Variant, if a = v ("value"), the variable a becomes an integer type, The value is assigned. You can also assign to v ("value"). It can also be referenced by v ("val") or v ("").
v ("isbyref"): Value indicating whether it is a reference
Returns 1 if Variant is a reference type (byRef).
v ("isarray"): Value indicating whether it is SafeArray
Returns 1 if the Variant is an array (SafeArray).
v ("vartype"): Variant VARTYPE value
Set VARTYPE values such as 2 (VT_I2), 3 (VT_I4), 8 (VT_BSTR), etc. Refer to. At the time of assignment (for example, v ("vartype") = 2), it will try to convert the type. If the type conversion fails, an error will occur. It can also be specified with v ("vt").
v ("vtmask"): Mask value of Variant's VARTYPE value
Returns the VARTYPE value with VT_BYREF and VT_ARRAY removed.
v ("refptr"): Variant VARTYPE value
Returns a reference pointer when v is a reference type (VT_BYREF). An error will occur if v is not a reference type (VT_BYREF).
In addition, Variant type variables can handle SafeArray to some extent. The following properties are valid for Variant variables that store SafeArray.
v ("value", n): Value of element n of SafeArray
Refers to the value of element n of SafeArray. This example is a one-dimensional SafeArray In the case of, for example, v ("value", m, n) in a two-dimensional array. simply v ("value") returns a Variant type containing SafeArray.
 v ("arraylbound", n): Lower limit of element of dimension n of SafeArray
v ("arrayubound", n): Upper bound of elements of dimension n of SafeArray
v ("array count", n): Number of elements in dimension n of SafeArray
Returns the lower bound, upper bound, and number of elements for the specified dimension, respectively. If n is omitted, 1 is specified.
v ("arrayptr"): SafeArray pointer
Gets the stored SafeArray (return value is an integer type). When you make an assignment, it stores the given SafeArray.
v ("bstrptr"): BSTR string pointer
Gets the stored string (BSTR) pointer.
When retrieving a COM object property, put a period before the property name If attached, the property will be returned as a Variant type. (When calling a method The same is true for the returned value. )
 vname = pDoc (". Title"); vname is a Variant type
    name = vname ("value"); name is a string type
The above example is
name = pDoc ("Title"); name is a string type
It is the same as writing. also,
dimtype a, vartype("variant"), 20
You can also explicitly allocate a Variant type array as such.
The sarrayconv instruction for converting Variant type and HSP arrays to each other Has been added.
sarrayconv p1, p2, p3, [p4]
p1: Variable to store the result
p2: Conversion source variable
p3 (0): Conversion mode
p4 (0): Binary data size
p3 = 0: Create a SafeArray from the entire array variable p2 and set it to the Variant type variable p1.
Store
p3 = 1: SafeArray stored in Variant type variable p2 is changed to array variable p1
Store The area of p1 is reclaimed.
p3 = 2: SafeArray from binary data of only p4 bytes from variable p2
Create (VT_UI1 type) and store it in p1.
p3 = 3: One-dimensional SafeArray (VT_UI1 type) stored in Variant type variable p2
Or VT_I1 type) binary data is stored in the variable p1.
The area for variable p1 must be reserved in advance.
HSP template (AHT) function
The HSP template (AHT) function was added in HSP3.1 or later. It provides various mechanisms for automatic source generation and linkage with external data.
AHT has various roles.
- Arrange rules for automatically generating new HSP source scripts
- Define interdependencies between reusable HSP source scripts
- Determine the data formats that can be used by HSP and the dependencies of the tools
In other words, a method for anyone to easily generate HSP source scripts, A mechanism for easily using template scripts and tools Think of it as supporting.
In HSP, modules and We have provided macros, plugins, etc. But these are Each user has created and published it according to their own rules. AHT formats this according to a set rule, and various standard forms. Reuse and link scripts more easily in a common way I am aiming.
Templates are a new concept introduced in HSP3.1. The concept of templates used in common programming languages is Often refers to advanced mechanisms for code abstraction, In the case of HSP, the focus is on providing a simpler "template", It will be used to reuse scripts more easily.
AHT manages and information about reusable HSP source scripts It is a general term for the mechanism including tools. The definition file used by AHT is called "AHT file" with the extension ".aht".
AHT files are compatible with HSP3 source script files (.hsp). It is possible to compile the AHT file as it is as the source of HSP3. The AHT file uses preprocessor instructions to specify definition information called the AHT header. It also uses specially formatted comments to define the dialog interface. The AHT file is a format that allows you to easily reuse a conventional HSP3 source script as a template. You can treat a traditional script as an AHT file with minimal modifications.
For more information on AHT, please refer to the separate document aht.txt .
HSP basic operation concept
HSP Tasks
HSP is a single-tasking interpreter with intermediate language processing. HSP and other Windows applications can be multitasked and run at the same time.
However, there is a promise to make only one HSP script for that. In HSP, "In the part where there is a possibility of infinite loop such as not proceeding unless you press a key, Remember the convention that you must always include a wait or await instruction. "
The wait and await instructions play an important role in freeing up other Windows tasks. If you don't follow this, you'll end up robbing almost every Windows task in an infinite loop. Affects multitasking behavior. As a result, the window cannot be dragged normally, It will be in a strange state if you can not switch tasks. (Windows itself will not be in a fatal state such as getting stuck. If you accidentally create an infinite loop with HSP, press [Ctrl] + [Alt] + [Del] at the same time. If you finish the HSP task, it will return to the original state) But don't worry too much about this promise. It will definitely finish within 1 second If it is a loop, there is no need to put wait. Processing speed is further increased by inserting wait It will be late.
The most problematic part is, for example, "wait until you press the mouse button".
; Example
*mwait
    getkey a,0
    if a=0 : goto *mwait
If you write like this, you will end up in an infinite loop. this,
; Example
*mwait
    getkey a,0
    await 5
    if a=0 : goto *mwait
With this fix, the infinite loop is avoided and the task runs normally. "Await 5" is a weight in very short units, so this allows button input It doesn't get harder.
The await instruction is an instruction to keep the passage of time in the loop constant. Use the wait instruction to wait for the specified amount of time. The burden on the CPU (Windows) is the same for both the await and wait instructions.
Screens and windows
The core function of HSP is to draw characters, images, dots, lines, etc. on the screen. Thing. HSP has multiple drawing buffers, each of which It is possible to assign windows and operate multiple window screens.
HSP can have multiple virtual screens to be drawn. These virtual screens are managed by a number called the window ID.
Window ID 0 refers to the first screen to appear. Two or more windows If it never opens, you can use the window ID without being aware of it.
Open a new window separate from the main screen of HSP, or virtual in memory When creating a screen, window ID 1 or later will be used. There is no limit to the value of the window ID, but use it in order from ID1. please.
The new virtual screen must be initialized before use. For that The instructions are the screen instruction and the buffer instruction. When initialized with the screen instruction, The screen will appear on the display as a new window. (This window can be resized by default.) On the other hand, if you initialize it with the buffer instruction, the screen will exist in memory. You can only do it, and you cannot see the contents from the display. like this The screen is temporary for copying part of the image to another screen, It can also be used as a temporary storage location for images.
After initializing the window ID with the screen or buffer command, the screen will be displayed. On the other hand, you can draw freely. Display characters by mes command Or, fill with the boxf command, draw a straight line with the line command, etc. Various instructions are available. If you are using multiple window IDs, use the gsel instruction to draw. It can be changed. Also, another window by gcopy command or gzoom command It is possible to copy the image drawn on the ID screen.
The screen can be reinitialized with the cls command. It is also initialized when the image is loaded by the picload command. If you want to switch the entire screen at high speed and perform animation etc. Turn off the redraw switch with the redraw command to rewrite the screen. After doing this, turn on the redraw switch. This will cause the screen The result of rewriting is not reflected on the screen, and smooth and fast rewriting Will be done. Also, when rewriting, do not use the cls instruction Please clear the screen with the boxf command.
Font and character display
The most basic and simple instruction for displaying characters is mes (print).
Both the mes and print instructions have the same function. (Although the keyword print is also available to match the traditional BASIC grammar, HSP3 recommends the mes instruction.)
Following the mes command, specify the character string you want to display on the screen by enclosing it in "" (double quotation marks).
; Example
mes "Hello!"
In the above example, "Hello!" Is displayed. For the display position, the current position specified by the pos instruction is referenced.
After displaying the character, the current position automatically moves to the next line. However, it is possible to move it after the last character by setting an option.
The displayed characters use the standard typeface, but you can switch the typeface with the font command.
; Example
			font msgothic,20,1
In the above example, the typeface is changed to MS Gothic, which has a 20-point size and is set in bold.
If the characters are displayed by the mes command after this, it will be in the specified typeface.
The font instruction has the following parameters.
			font "fontname",p1,p2,p3
"fontname": font name
p1 = 1 ~ (12): Font size
p2 = 0 to (0): Font style
p3 = 1 ~ (1): Width of font modification
In the font name, you can specify the name of the installed font.
In Windows, it is possible to specify the standard installed font by macro name. If you write msmincho, "MS Mincho" will be selected, and if you write msgothic, "MS Gothic" will be selected.
The font size is specified by the logical size proportional to the number of dots.
The larger the number, the larger the letters. The font style is
Style 1: Bold
Style 2: Italics
Style 4: Underline
Style 8: Strikethrough
Style 16: Antialiasing
You can specify the value of. It is also possible to specify multiple styles at the same time by summing the numbers. If you omit the p2 parameter, it will be 0 (normal style).
The parameters of the mes instruction are as follows.
			mes "strings",sw
"strings": Messages or variables to display
sw (0): Optional
The first parameter of the mes instruction can be a string or a variable name. If you specify a variable name, the contents assigned to the variable are displayed.
The second optional parameter allows you to qualify characters and set behavior.
Value: Macro name: Behavior
			 -----------------------------------------------------
1: mesopt_nocr: No line break at the end
2: mesopt_shadow: Draw shadowed characters
4: mesopt_outline: Draw border characters
16: mesopt_gmode: Reflect the gmode setting (HSP3Dish only)
If 2 or mesopt_shadow is specified for the option, the shadowed characters will be drawn. If 4 or mesopt_outline is specified for the option, the bordered characters will be drawn. For shadows and borders, the color specified by the objcolor command is used. Also, the width of the shadow and border can be specified by the 4th parameter of the font instruction.

In the above example, the left is the shaded character, the center is the border character, and the right is the normal character.
When 16 or mesopt_gmode is specified as an option, drawing that reflects the settings such as translucency and color addition specified in gmode is performed.
(This option is only valid for HSP3Dish and HGIMG4, ignored by normal HSP3 runtime)
Multiple option values can be specified at the same time by adding them.
If "mesopt_nocr + mesopt_shadow" is specified, the display will be shaded and will not break.
Use of image files
A file in a standard image format as image data to be displayed on the screen Can be read and used.
| Extension | Format |
|---|---|
| bmp | Windows standard bitmap image data |
| png | PNG format image compression data |
| jpg | JPEG format image compression data |
| gif | GIF format image compression data (excluding animation) |
| ico | Windows standard icon image data |
The image is loaded by the picload command or the celload command. By specifying the file name, the format is automatically determined and read. Also, by using the memory stream function, it exists in the memory. It is also possible to read images from file data. The png format can be read using the COM function. For more information, see HSP3 Support Module.
Current position
Message output, graphic data copy, button layout, etc. It is performed for the coordinates called the current position.
The current position is like a text editor cursor, After the message is output, the current position is also on the next line with a line break. It will move automatically. The current position can be changed by the pos command. also, The amount of movement of the current position can be adjusted with the objsize command. When the screen is initialized by the cls command etc., the current position is also reset to (0,0).
Placement object
In HSP, parts such as push buttons and input boxes are called placement objects, and they are displayed on the screen. It can be arranged freely. In HSP, the following objects can be used as standard.
| Object name | Placement command | Contents |
|---|---|---|
| Button | button | When pressed, the program with the specified label is executed |
| Input box | input | Enter numbers and strings |
| Message box | mesbox | Enter a multi-line string |
| Checkbox | chkbox | ON / OFF checkmark switching |
| Combo box | combo box | Frame that can be selected from multiple elements |
| Listbox | listbox | Frame that can be selected from multiple elements |
| Layer object | layerobj | User-defined drawing object |
Each object is assigned a number called the object ID and managed. The object ID is an integer value starting from 0 and is set to the system variable stat after the placement instruction is executed. It will be substituted. Normally, numbers such as 0,1,2,3 ... are automatically assigned in the order in which they are placed on the screen.
When you need the object ID, you want to change the state when you want to delete a part of the object later. Time and so on. Also, when the push button is pressed, the button pressed by the system variable stat The object ID is assigned.
Objects can be easily placed and used, but if you master the deeper usage, It also makes it possible to write more advanced scripts. Objprm instruction to change the contents of the object later, or Win32 message to the object The sendmsg instruction sent directly is an instruction prepared for such advanced use.
In addition to the placement objects listed here, there are other controls that Windows supports. In addition to being able to add with the winobj command, the ActiveX control can be added directly with the axobj command. It is also possible to add.
Layer object
Layer objects are user-defined placement objects. By registering a subroutine that draws on the screen in advance, drawing can be executed at the specified timing (layer).
 example :
				layerobj 320,240,objlayer_normal,*laysub,100
				stop
			*laysub
				return
Layer objects have no function on their own.
A specific area on the screen is managed as a layer object, and the user's program (callback routine) is called at each drawing timing.
There are various ways to use it, but you can manage only the drawing part independently with modules that will be added later.
In addition, parameters can be received with the objprm instruction, and it is also possible to set or create your own placement object.
The layerobj instruction is described in the following format.
			layerobj p1,p2,p3,*label,p4
p1, p2; XY size of layer object (in dots)
p3 (0): Layer ID
* label: Layer object processing subroutine
p4 = 0 to (0): Option value
In order to notify the layer object of the drawing area, it is necessary to specify the X and Y sizes in dots in p1 and p2. If p1 and p2 are omitted, the size of the entire screen will be used. Now, the current positions X and Y are treated as the upper left coordinates, and the size specified by p1 and p2 is treated as a layer object. The p3 parameter specifies the layer to draw.
p3: Layer to draw
			 --------------------------------------------------------------
0: Do not draw (objlayer_min)
1: Background layer (objlayer_bg)
2: Normal drawing layer (objlayer_normal)
3: GUI layer (objlayer_posteff)
4: Foreground drawing layer (objlayer_max)
+256: Allow duplicate registration of layer objects (objlayer_multi)
The * label parameter specifies the processing subroutine for the layer object.
This subroutine must be provided by the user.
The p4 parameter can be set to any integer value set on the layer object.
The layer object processing subroutine specified by the * label parameter is
It is called at various timings. This subroutine must adhere to a specification called callback routine . (Instructions that wait for time such as wait, await, stop cannot be described)
When calling the processing subroutine, the necessary information is assigned to the system variables iparam, wparam, and lparam, so describe the processing according to this content.
System variables: Contents
			---------------------------------------------------------------
iparam: Parameters to be passed
wparam: Placement object ID
lparam: Calling factor
In the processing subroutine, first check the calling factor assigned to lparam and perform the processing accordingly. The call factor can be one of the following values:
Value: Call factor (macro name)
			 --------------------------------------------------------------
1: Newly installed (objlayer_cmdinit)
2: Before the object is deleted (objlayer_cmdterm)
3: The int value was passed in the objprm instruction (objlayer_cmdprmi)
4: A character string was passed by the objprm instruction (objlayer_cmdprms)
5: A double value was passed in the objprm instruction (objlayer_cmdprmd)
6: Draw timing (objlayer_cmddraw)
7: A certain amount of time has passed (not implemented) (objlayer_cmdtime)
It is not always necessary to handle all call factors.
Process only the necessary factors and quickly return the processing to the system with the return instruction.
1 is called immediately after the layerobj instruction is executed, and 2 is called just before the object is destroyed by the clrobj instruction or the like.
3 to 5 are called when a value is passed in the objprm instruction. Since the value changes depending on the value type, it is necessary to take appropriate measures.
For int values, iparam. In the case of a character string, the value passed to refstr is assigned, and in the case of a double value, the value passed to refdval is assigned.
6 is called at the appropriate time when the redraw instruction is executed.
This is the timing to draw the layer specified in advance as the layer to be drawn with the layerobj command.
Use the drawing command to draw on a valid drawing screen. (It is not always necessary to draw)
No redraw instruction is required when drawing. You can use any drawing command such as the boxf command or the mes command.
The drawing area assigned to the layer object must be obtained by the user from the object information and the range must be considered.
You can get the drawing range with the following script using the objinfo function.
Get the upper left X, Y coordinates (x, y) of the drawing
			i=objinfo(wparam,objlayer_info_axis):x=i&0xffff:y=i>>16
Get the X, Y size (sx, sy) of the drawing
			i=objinfo(wparam,objlayer_info_size):sx=i&0xffff:sy=i>>16
In the above example, the variables x and y are assigned the upper left X and Y coordinates, and the variables sx and sy are assigned the X and Y sizes.
Layer objects are available in the HSP3 standard runtime, HSP3Dish and HGIM G4 runtimes.
In the HSP3 standard runtime, other placement objects cannot be affected because they are drawn by the Windows system.
The HSP3Dish and HGIM G4 runtimes draw all placement objects on the main screen, giving you more freedom to control your drawing priorities.
It can be used for various purposes such as fade-in / out, post-effects, and processing of drawn screens.
Current color
The current color is the color used for message output, drawing points, lines, rectangles, etc. is. This can be changed with the color, rgbcolor, hsvcolor, and palcolor instructions.
 example :
color 100,200,300; set R = 300, G = 200, B = 300
hsvcolor 10,20,30; Set colors in HSV format
rgbcolor $ 112233; Set the color in 32bit RGB format
palcolor 20; Color setting by palette color
When the screen is initialized by the cls command etc., the current color is reset to black. You can also set the color of the coordinates specified by the pget command to the current color.
You can refer to the RGB of the current color with the system variables ginfo_r, ginfo_g, and ginfo_b, respectively.
About CEL related instructions
Cell drawing commands for 2D character display are provided.
It has a straightforward description and structure that replaces the traditional gcopy instruction.
The cell drawing command reduces the drawing cost of the character and makes the material clear.
Can be divided. Of course, the display by the same gcopy command as before is also the same.
You can use it like this.
Cell-related instructions consist of a celload instruction, a celdiv instruction, and a celput instruction.
The celload command is a command to load an image (texture) for display from a file.
Like the picload command, it expands the specified image file into memory,
The read destination buffer can be specified.
 example :
			celload "a.bmp",1
In the above example, the image "a.bmp" is loaded into window ID1. This initializes window ID1 with the buffer instruction and prints the image with the picload instruction. The process of reading is performed at once. Also, with the celload command, it is possible to read for an empty window ID. It is possible.
 example :
			celload "a.bmp"
			id = stat
In the above example, the loaded window ID is assigned to the variable id. If the window ID parameter is omitted in this way, the unused ID will be used. It is used and its number is assigned to the system variable stat.
The loaded image can be drawn in whole or in part by the celput command. can. The celput instruction provides a drawing method similar to a 2D sprite.
 example :
			celload "a.bmp",1
			pos 100,100
			gmode 2
			celput 1
In the above example, the image in window ID1 (the image of "a.bmp") is placed at position (100,100). Draw in copy mode 2. The drawing position will be the current position set by the pos command. The size of the drawn image will be the entire image (the size of window ID1). To change this, use the celdiv instruction (discussed below).
The celput instruction has several other parameters.
			celput id,no,zoomx,zoomy,angle

id = 0 ~ (1): Window ID with image material
no = 0 ~ (0): Divided image No.
zoomx = 0.0 ~ (1.0): Horizontal display magnification (real number)
zoomy = 0.0 ~ (1.0): Vertical display magnification (real number)
angle = 0.0 ~ (0.0): Rotation angle (unit is radian)
Use zoomx, zoomy, angle to set processing such as scaling and rotation for the original image material. can. If zoomx, zoomy, angle are omitted or the same size is set (1,1,0), A fast copy is automatically performed internally. On the contrary, when drawing that is not the same size, The same drawing process as the grotate command is executed.
At the time of drawing, the copy mode and transmittance can be specified by the gmode command. You can specify the same options as the gcopy and grottate instructions. However, the copy size specified by the gmode instruction is not reflected at the time of celput. be careful.
After drawing is completed, the current position is moved to the right according to the drawn size.
 example :
			repeat 5
			celput 1
			loop
In the above example, the same image is drawn side by side five times.
The material of the original image can be divided into multiple parts with a fixed size. The celdiv command is a command for setting the size division of parts for each window ID.
 example :
			celload "a.bmp",1
			celdiv 1,64,64
In the above example, the image with window ID1 is divided into 64x64 image parts. The celput command draws in divided sizes. For example, if you divide an image of 256 x 256 dots into 64 x 64 dots, It is treated as 16 images (the whole is divided into 4x4). The split image is specified by the second parameter of the celput instruction. The "divided image No." specified here is a numerical value of 0, 1, 2 ... for the divided area. I am expressing. When divided into 4x4, they are numbered in the following order.
| 0 | 1 | 2 | 3 |
|---|---|---|---|
| 4 | 5 | 6 | 7 |
| 8 | 9 | 10 | 11 |
| 12 | 13 | 14 | 15 |
The celdiv command also has a function to set the drawing base position. Normally, like the gcopy instruction, the celput instruction also starts from the drawing position (coordinates specified by the pos instruction). Draw a rectangle in the lower right direction. However, by setting the drawing base point position, the drawing position will be in the center of the original image, or You can make any changes such as lower right. The rotation is also centered around this base point.
 example :
			celload "a.bmp",1
			celdiv 1,64,64,32,32
In the above example, the image of window ID1 is divided into 64x64 parts, and The base point (center) of the drawing is set to (32,32), that is, the center.
The image material division settings are saved for each window ID and initialized by the cls command, etc. At this point, it is set to no split (specify the entire screen as the size). Be sure to set the division with the image material loaded in the specified window ID. If you load the image material after setting the division, the division setting will be reset.
Get input
HSP offers various ways to receive input from users. It is possible to capture basic GUI parts (placement objects), input from the mouse, and information on the keyboard and connected devices. The following is an example of a script that uses a GUI part (placement object) to allow you to enter numbers and display the contents.
 Example:
				a=1
				input a
				button "OK",*ok
				stop
			*ok
				mes a
				stop
By using the placement object, you can easily get the input from the user.
There are also commands to directly check the status of the keyboard and mouse.
Command to get input: Content
			-------------------------------------------------------
getkey: Get the information that a specific key on the keyboard was pressed
stick: Get information on keyboards that are often used in games, etc.
onkey: Receives input each time a key is pressed
onclick: Receives input each time a mouse button is pressed
mousex: Get the X coordinate of the mouse (system variable)
mousey: Get the Y coordinate of the mouse (system variable)
In addition to this, various functions such as acquiring the connected device and the result of communication are provided. The game pad (joystick) used in games, etc. is an expansion module. You can get it using mod_joystick.as and mod_joystick2.as. See the jstick instruction help for more information.
Use memory buffer
The memory space held by the variable is used as a memory buffer for handling data. It can be operated. This includes character strings and binary data with indefinite data length. It can be used when processing various formats.
The size of the memory buffer managed by the variable is variable, as long as Windows allows. It can handle memory and has no upper limit. The memory buffer can usually be allocated with the sdim or alloc instruction. (If you want to increase the size in the middle, use the memexpand instruction.) File input / output of the memory buffer is usually performed by the bload instruction and bsave instruction.
Also, noteload and notesave instructions to handle text files Is prepared. See the Memory Notepad Instructions section for more information. Basically, whether the target is a text file or binary data The handling of the memory buffer does not change.
For the data in the memory buffer, directly use the poke command, wpoke command, lpoke command, etc. In addition to being accessible, the contents can be read by the peek function, wpeek function, and lpeek function. It is possible. In addition, memcpy instruction and memset instruction are prepared to copy and fill the data at once.
When handling with an external DLL or program, it is possible to get the pointer of the memory buffer handled by the variable with the varptr function. You can also get the size of the memory buffer handled by the variable with the varsize function.
Multimedia playback
For HSP3, WAV format PCM audio files, SMF (MID) format standard MIDI files, CD audio track playback, compressed audio such as AVI / MPEG video files and MP3 / WMA You can easily handle files. Also, control of devices registered as MCI control devices. Is also possible.
The file to be played is registered in HSP by the mmload command, and by the mmplay command. Playback can be started (playback is interrupted by the mmstop command). For each sound, you can select the loop playback and the weight until the end of playback.
However, there is a problem with MIDI loop playback, and it will not be a complete loop performance. The Windows MIDI sequencer takes a long time to start playing, and the MIDI data Because it often takes time to specify the chords and timbres that initialize the sound source first. This is because there are many cases where the loop from the end of the performance does not connect well.
Therefore, please note that this function is just a simple loop. Since the loop pointer cannot be specified in the first place, it is strange to return to the prelude, Use it diligently to avoid being lonely when the BGM ends during the game You may be able to do that.
Depending on the MIDI device driver, MIDI again immediately after stopping MIDI performance. It seems that Windows freezes or does not play when I start playing. In such a case, wait 1 to 2 seconds (wait 20 etc.) after the MIDI performance is finished. Try to put it in and then start the next performance.
All WAV PCM audio is first loaded into memory and then played. Loop playback is also performed without any problem. However, only the size of the WAV file is in memory Make sure to play files that are too large with the mci instruction, as they occupy.
By handling compressed audio files in ogg format from the hspogg plug-in It is memory efficient and can achieve a perfect loop performance.
Uninitialized variable detection
You can detect uninitialized variable references when compiling your script. An uninitialized variable reference is to read the contents of a variable for which no value has been set. It points.
a = 1: b = 2; Initialize variables a and b
c = a * b + x; variable x is uninitialized
For example, in the above example, the variables a and b are populated by assignment, The variable x has not yet been assigned a value at the time of the calculation "c = a * b + x". HSP treats the content as 0 in such a case, even if it is not assigned. I was able to use variables comfortably. However, this also has disadvantages I have.
hensu = 1; initialize variable hensu
kotae = hensuu * 2; Calculate doubled
In the above example, we are trying to calculate a value that doubles the variable hensu, I accidentally typed "hensuu". Even in such a case, the calculation is It will be executed, but the variable hensuu is 0, so the calculation result will not be as expected. It is difficult to find mistakes caused by such typos. It may cause defects.
The HSP compiler finds these references at compile time. In the script above, if you press F7 to view the report, The following warning will be displayed.
#There is an uninitialized variable (hensuu)
In the standard state, it only warns in the report, but this is an error You can also change it to handle it.
#cmpopt varinit 1; error uninitialized variable reference
Use the preprocessor instruction #comopt as above to make an uninitialized variable reference You can control the settings that are treated as errors. If it is not treated as an error, write as follows.
#cmpopt varinit 0; Do not error uninitialized variable references
The setting by #comopt is reflected in the subsequent lines. In the above script, putting it in the first line will cause an error can do.
#cmpopt varinit 1; error uninitialized variable reference
hensu = 1; initialize variable hensu
kotae = hensuu * 2; Calculate doubled
In this case, the following error message will be displayed and execution will not be performed.
??? (3): error 39: An attempt was made to use an uninitialized variable (line 3)
		--> kotae=hensuu*2
If you want all uninitialized variable references to be error-standard, Add the #cmpopt setting to hspdef.as in the common folder. The detection that a variable has been initialized is determined by one of the following conditions:
-Direct assignment to a variable (variable = value)
-Initialization by dim, sdim, dimtype, ddim, ldim, alloc
・ Initialization by dup and dupptr
Any other state is considered uninitialized. For example, it is not considered when returning a value directly to a specified variable such as the stick instruction. Therefore, when using this function, first select the variables to be used as much as possible. We recommend that you consciously initialize it.
Console version HSP
HSP3 has a text-only runtime that runs on the command prompt It is included as standard. The console version of HSP (HSPCL) can be used in the following situations.
- Perform simple processing as a substitute for a batch file
- Run CGI on a Windows-based web server
- Execute HSP script with less memory and CPU load
When using HSPCL, add the following line to the beginning of the script.
#runtime "hsp3cl"
The runtime will switch and it will automatically be ready to run on the command line. Instructions related to windows, objects, and multimedia cannot be used. The sample / hspcl folder contains samples for HSPCL, as well as There is a sample to operate as CGI in the sample / hspcl / cgi folder.
HSPCL implements a dedicated input instruction. The format is as follows.
 input p1, p2, p3 Get standard input

p1 = variable name: variable name to store information
p2 = 1 ~: Maximum number of characters assigned to variable
p3 = 0 to (0): Line feed code recognition flag (0 = none / 1,2 = recognition)

·explanation

    Assigns the contents of standard input to the variable specified by p1.
    The variable specified by p1 is changed to a string type and the result is assigned.
    In this case, the size of the string is up to the number of characters specified in p2.
    If p2 is omitted, it will be the maximum value that can be assigned to the variable.
    If p3 is omitted or 0 is specified, all standard inputs (up to EOF) are entered.
    Get it as it is. If 1 is specified for p3, the line feed code (13) is set.
    Recognize as the end. Keyboard input (console) as standard input
    When using, enter by pressing the [Enter] key by setting p3 to 1 or 2.
    It will be possible to confirm.
    (If p3 is 1, LF is recognized as a line feed, and if p3 is 2, CR + LF is recognized as a line feed.)
    Normally, you get up to the end of the string (character code 0), but to the value of p3
    By adding 16, all the contents of the standard input buffer including the character code 0
    Populate the variable buffer. Code containing 0 such as binary data
    Please specify when you get it.
The number of characters in the input result is saved in the system variable strsize.
Other functions can be used as equivalent to HSP3. Extension plug-ins and COM related instructions can also be used. (However, the plug-in side An operation error may occur when the BMSCR structure is acquired and used. ) It also supports executable file creation, PACKFILE embedding, and encryption.
Interrupt
Interrupt handling due to various factors is supported. The following instructions are provided for interrupt processing.
onkey goto / gosub * label Key interrupt execution specification
onclick goto / gosub * label Mouse click interrupt execution specification
oncmd goto / gosub * label, p1 Window message interrupt execution specification
onexit goto / gosub * label Interrupt at program end
onerror goto / gosub * label Interrupt when an error occurs

button goto / gosub "name", * label Interrupt when the button is pressed
If you specify a label with the onkey instruction, the HSP window will be active after that. Jump to the label specified by * label every time a key input occurs (Or a subroutine jump). If you specify a label with the onclick command, you can use the mouse on the HSP window after that. Jump to the label specified by * label each time a click is made (Or a subroutine jump). The oncmd instruction handles when a specific message is notified to the window. It is for setting. (See the reference for more information.)
The button instruction can also be considered as one of the interrupt settings. You can set the processing when the placed button is pressed.
The onexit instruction can be programmed by closing box or [Alt] + [F4]. Set the processing when interrupted.
The onerror instruction is for when an error occurs inside HSP due to a script. Set the process. Even if you specify post-error processing with the onerror instruction When the necessary processing is completed, the application execution will resume. Please end it with the end instruction as much as possible. The onerror instruction does not recover from an error. Depending on the cause of the error, the HSP system itself may become unstable. It is possible that a failure will occur. When using the onerror instruction, an error occurs when creating an executable file. I want to display my own error on the application side when it occurs Show for debugging only if or when certain errors occur You can think of doing it.
An interrupt jump (interrupt without on ??? gosub) occurred In that case, all subroutines and nests of repeat ~ loop are set to 0 (initial state). Will be returned. When an interrupt jump is performed at the subroutine destination, etc. Make sure to return the program control to the main side.
Interrupts by key or mouse input can be performed with the stop instruction, wait, and await instructions. It accepts interrupts only when it is stopped. In addition, the following system variables are displayed after jumping by interrupt. It will be set.
| Interrupt factor | iparam | wparam | lparam |
|---|---|---|---|
| onkey | Character code | wParam | lParam |
| onclick | Mouse Button ID | wParam | lParam |
| oncmd | Message ID | wParam | lParam |
| onexit | Termination factor | Window ID | lParam |
| onerror | 0 (none) | Error number | Error line number |
Parameters for each interrupt factor are assigned to the system variable iparam. Also, wparam and lparam have the parameters passed as Windows messages. It is stored as it is.
It is also possible to temporarily turn ON / OFF the execution of event interrupts.
onkey 0
Temporarily stops the key interrupt with.
onkey 1
You can resume the key interrupt that was paused with. Similarly
onclick 0 / onclick 1 / onerror 0 / onerror 1 / onexit 0 / onexit 1
Etc. can also be used.
The onexit instruction is also used when shutting down Windows (restarting, turning off the power, etc.) Interrupt processing is executed. This allows even if a shutdown occurs during script execution It became possible to detect it and perform appropriate termination processing, Since there are the following restrictions, create a script to judge the end time If you do, keep this in mind.
Immediately after jumping with onexit, the termination factor is set as the value in the system variable iparam. It has been saved. If iparam = 0, the program is terminated at the user's will. If iparam = 1, it is terminated by shutting down Windows.
Await, wait, stop instructions for termination processing when Windows shuts down If the system causes idle time (waiting time) due to such reasons, Cancels the shutdown process (it will not be shut down). If the end instruction is used without using the await, wait, and stop instructions, The shutdown process will continue as it is.
If you want to perform the termination process without stopping the shutdown process, Instructions that cause a wait time (await, wait, stop instructions, etc.) cannot be used. (However, common dialog (dialog command) etc. can be used) Perform only the minimum termination processing and end as it is.
Standard module name
The standard keyword used by HSP in the system is the module name "@hsp" It is assigned to space. This means that the name "mes @ hsp" is the official name for the mes instruction, for example. Means However, there is no "@hsp" so that it can be used in normal global space. Since the name is also registered as an alias, you can use it as it is with the same instruction name as before can.
For example, for the mes instruction, "#define global mes mes @ hsp" is defined from the beginning. It is the same as. (After preprocessor processing, the standard keyword was "@hsp" Expands to the canonical name. When I open "hsptmp.i" that is output at compile time You can see. )
As a result, the name itself registered as a standard keyword can be used as an alias. Allows the user to redefine. The following is an example of replacing the mes instruction with a macro.
; Example
#undef mes
#define mes(%1) mes@hsp "MES->"+%1
    mes "Message."
    stop
The keyword "mes" is redefined after being canceled by the #undef command. All standard keywords used by HSP can be canceled and redefined as well. The following is an example of replacing the mes instruction with a user-defined instruction.
; Example
#undef mes
#module
#deffunc mes str _p1
    _x = ginfo_cx : _y = ginfo_cy
    pos _x+1,_y+1
    color 0,0,0
    mes@hsp _p1
    pos _x,_y
    color 0,192,255
    mes@hsp _p1
    return
#global
    mes "I tried to make the mes instruction a shadow character."
    stop
Redefining standard keywords affects all subsequent keywords Please use with caution.
Common directory
The file inserted by the "#include" command is usually the source file. The one in the same (current) directory will be used, but if it is not there, Use the one in the common directory.
The common directory is in the same directory as HSED3.EXE and HSP3.EXE It will be named "common". For example, there is HSED3.EXE in the directory "c: \\ hsp" Edit the script "test.as" in the directory "c: \\ script" If so, the order in which files are searched with the "#include" command is
- Search for files in "c: \\ script"
- If not, search for files in "c: \\ hsp \\ common"
- Otherwise an error
It looks like. All files (such as hspext.as) for using the extension plugin It is located in the common directory. It also contains commonly used files such as hsp3util.as.
Error message
Error during HSP execution due to script writing error or specification error When it is found, the error code and error line number are displayed. See Error message list for details.
HSP system tolerance
The allowable range of system resources in the current version is as follows. If this value is exceeded, normal operation cannot be guaranteed.
| Maximum source file (.AS) size | Unlimited |
| Maximum object file (.AX) size | Unlimited |
| Maximum number of labels that can be declared | Unlimited |
| Maximum number of variables that can be declared | Unlimited |
| Maximum number of characters for identified label / variable | 59 characters (half-width) |
| Maximum number of strings that can be used in an instruction | Unlimited |
| Maximum number of strings that can be stored in a variable | Unlimited (as long as memory allows) |
| Maximum number of arrays that can be held in a variable | Unlimited (but up to 4 dimensions) |
| Maximum number of defineable plugins | Up to 8192 types in total |
| Maximum number of instructions that can be extended by the plugin | Up to 65536 per type |
| Maximum number of modules that can be defined | Unlimited |
| Maximum number of user-defined instructions in a module | Unlimited |
| Maximum number of interrupts that can be defined with the oncmd instruction | Unlimited |
| Maximum number of window IDs | Unlimited |
| Number of objects in one screen | 16384 (1024 warnings) |
| Maximum size of window that can be displayed | Unlimited (as long as memory allows) |
| Maximum size of image that can be displayed | Unlimited |
PACKFILE and encryption
In HSP, when creating an executable file, the files that are read together It can be embedded in one executable file. This is called a file pack, and the information of the file list to be put together is The recorded file is called a PACK FILE.
You can specify an unlimited number of multiple files for a pack file. Hierarchy cannot be represented in a pack file. The file name can be identified up to 15 characters including the extension. (It also recognizes long file names.)
Also, instead of packing them into one executable file, they are in separate files. It is also possible to pack. This independent file is called a DPM file. The extension will be ".dpm".
If you created an executable file, the order in which the files are searched for reading is: It is as follows.
- Files packed in executables
- Files packed in "data.dpm" located in the same location as the executable
- Files in the current directory
You can apply encryption when packing. This makes it difficult to parse executables and DPM files. There are several ways to work with encrypted files: The difficulty of analysis is also different.
- Encrypt to executable file and pack
-
Similar to HSP2.61, using the encryption key generated based on the packed contents, Perform encryption. This is the standard method.
- Encrypt to DPM file and pack (1)
-
Create it using the "Create DPM File" function from the menu of the script editor. If the created DPM file is encrypted, you can check the data with an editor etc. It will be difficult, but it is possible to take out the contents easily using HSP. It is less secure than packing it into an executable file.
- Encrypt to DPM file and pack (2)
-
Create a DPM file with individual encryption keys added from HSP3.0. The created DPM file has the key code (32bit value) used for encryption from the script. Unless specified, it cannot be opened correctly. Difficult to parse because the encryption key is in the script It is more secure than packing it into an executable file.
To create a DPM file by setting the encryption key, select the "Tools"-> "Create DPM from specified folder" menu in the script editor. You can call the tool by selecting it. With this tool, the files contained in the specified folder can be encrypted and stored in the DPM file. For more information, see the sample script "mkpack.hsp".
When reading a file encrypted by the #epack instruction with the bload instruction, Please note that you cannot specify the offset value for the file.
The encryption function provided by HSP does not necessarily guarantee complete security. If a problem is discovered or a security hole is discovered, we will continue to take appropriate action in the future. I want to go. Also, how to deal with file analysis and falsification We plan to continue this in the future.
Convert to C source
You can convert HSP3 scripts into a compilable form as source code for the C / C ++ language.
This is done by calling the HSP3 source converter (hsp3cnv).
Normally, select the "Tools"-> "Convert Specified File to C Source" menu in the HSP Script Editor to call the support tool (cnvsrc).
Knowledge of the C / C ++ language is required to operate the converted C source code. See the HSP3 Source Converter Manual for more information.
About using boot setting #bootopt
A new preprocessor instruction, #bootopt, has been added. This is for making detailed runtime settings. You can change the settings in the following format.
#bootopt option name setting switch

Option name: Option type
Setting switch: 1 or 0 number
Make detailed operation settings for the script runtime. Enter the value of the setting switch 1 or 0 by inserting a space or TAB after the option name. #bootopt can be written anywhere in the script. If there are multiple specifications, the last one set will be the overall setting. The option names that can be specified with #bootopt are as follows.
Options | Contents | Initial value
		 -----------------------------------------------------------
notimer | Use high precision timer | Automatic setting
| (0 = use / 1 = not use) |
utf8 | Use UTF-8 format strings | Automatic setting
| (0 = use / 1 = not use) |
hsp64 | Using 64-bit runtime | Automatic configuration
| (0 = use / 1 = not use) |
		 -----------------------------------------------------------
Normally, these settings are done automatically.
"Use High Precision Timer" is a setting for using the high precision timer (multimedia timer) in the standard HSP runtime.
In HSP3.4, the high precision timer was used to adjust the waiting time such as the await instruction when executing all scripts.
CPU load could increase for tools and resident applications that did not require very tight timer control.
In HSP3.5 and later, it has been modified to use the high precision timer only when the await instruction is used in the script.
If you want to explicitly turn on / off the use of the precision timer, you can use the #bootopt instruction.
If "#bootopt notimer 1" is written in the script, the high precision timer will not be used.
Callback Routine
Callback routines are those that need to be immediately terminated by the return instruction in limited situations such as interrupts.
Labels or user-defined instructions that are called in the following situations are treated as callback routines.
-When executing the cleanup instruction defined by the #deffunc instruction
-When executing modular variable constructors and destructors
-User interrupt by placement object (objlayer)
-Sprite display interrupt by es_setgosub instruction (HSP3Dish)
Callback routines can be written like regular subroutines, You cannot wait for a time or stop. The following instructions cannot be used in callback routines.
Instructions that wait for a time such as wait, await, stop, etc.
Run instruction to transfer processing to another program
Instructions to execute system tasks such as screen, bgscr
When executing a callback routine, the task is unusually assigned to another system.
This constraint arises because of the condition that needs to be returned.
Callback routines do only what they need to do,
Immediately end the task with the return instruction.
If there are instructions that cannot be used during the execution of the callback routine,
I get the error 42 (instruction not available in the callback).