HSP : Hot Soup Processor ver3.6 / onion software 1997-2021(c)

Peas Editor Manual
- What is the Peas Editor
- Parts placement
- Easy program execution
- Parts management
- Label parts
- Variable parts
- What the Peas editor can do
- About creating parts
- Copyright and license
What is the Peas editor?
"Peas Editor" visually arranges the elements (parts) that are the basis of the program, It is a tool for automatically generating HSP scripts.
Start it from the shortcut icon of "Peas", or select "ahtman.exe" in the folder where HSP3 is installed. You can use the Peas editor by starting it.
The "Peas Editor" makes the basic script flow visually understandable, as well as You can modify only certain elements without using a script editor, It's a new option for those who haven't touched programming before or for beginners.
Parts placement
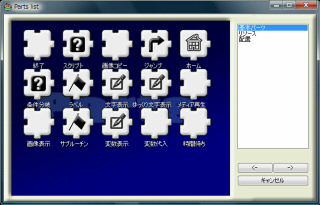
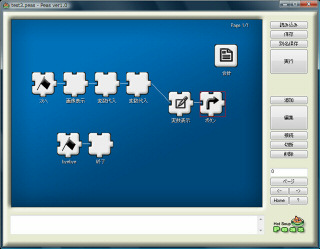
In the Peas editor, the program is created according to the parts placed on the screen. Press the "Add" button to place the part on the screen. The parts list screen that can be placed is displayed. If you right-click and select a part from this, it will be placed on the main screen.
Placed parts can be moved by dragging while holding down the left mouse button. It doesn't matter where the parts are placed.
There are several types of parts. The uneven jigsaw puzzle-like parts are used for the flow of the program. You can connect the parts with a line. The contents of the parts connected by the line are executed in order. For details, refer to "Program flow".
Clean parts with no irregularities are called resource parts and cannot be connected by lines. Instead, resource parts are always available from other parts. For example, by arranging music resource parts, you can specify it from the program at any time. You will be able to play music. It ’s like reserving the materials used in the program. It's a good idea to think about it.
Running a simple program
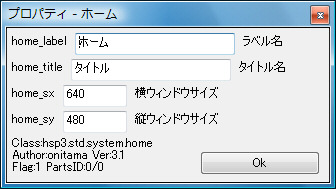
Let's actually create a simple program and run it. First, use the "Add" button to place the "Home" parts. The "home" part is the starting point for starting the program. Must be placed first. When you open the "Home" part, you will see a "property edit window" that looks like a screen. This is a screen for editing the contents related to the "Home" part. You can change it to suit what you want to make. For example, changing the "Title Name" changes the title displayed in the title bar on the window. When you have finished editing the content, press "OK" to confirm the edited content. Please note that other operations cannot be performed on the main screen while the "property edit window" is displayed.
Then press the "Save As" button to save the project. If you want the program to work, you need to name and save the project. The Peas editor uses the "My Documents" folder by default. Here, save the project with a name such as "Test" on "My Documents" for easy understanding.
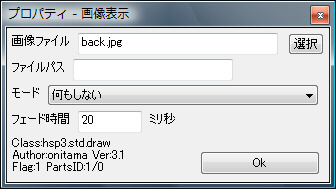
Next, let's put a picture on the screen. Place the image file in bmp or jpeg format in the "My Documents" folder where you saved the project in advance. Please make a copy of one. Here, as an example, "back.jpg" in the peas sample folder of HSP3.1 is used.
Select the "Image display" part with the main "Add" button. The "Image Display" part is placed so that it is connected to the "Home" that has already been placed. The "Properties Edit Window" will appear, and you should see an item for entering an image to display. Here, specify the image file prepared earlier. You can specify the file in the file selection dialog by pressing the "Select" button. Once you have made your selection, press "OK" to confirm.
This completes the flow of the program that displays the image. Make sure that the placed "Home" and "Image display" are connected by a line. This indicates that the "image display" will be executed after the home, which is the starting point of the program. You can move the parts placed on the screen to any position you like. You can freely move it to a shape that is easy for you to see. However, the connecting line will come out of the protrusion on the right side of the part and connect to the left side of the next part. In other words, please note that it is basic to arrange the parts so that they flow from left to right.
At this point, you can actually run the program with the main "Run" button. If the window with the title you specified is displayed and the image file you specified appears in it, it is successful.
If you want to change or check the contents, click the part to select it and then press the "Edit" button. At any time, the "Property Edit Window" will appear and you can modify the contents.
The style of "Peas Editor" is to complete your program by repeating this process. You can save all the positions and contents of the parts you placed in the project file and recall them at any time. I can do it. Also, if you press the "Run" button, it will be in the same folder as the project file. A script file with the same name as the project file and the extension ".hsp" will be generated. This file is an HSP script converted from the content edited with "Peas Editor". You can run it directly from the HSP script editor or create an executable file.
There are also some project files in the HSP3.1 peas sample folder (sample / peas) It is prepared as a sample, so please refer to it.
Parts management
You can freely change the state of the parts placed on the screen. Any number of parts can be placed on the screen with the "Add" button, You can delete the selected part with the "Delete" button.
The screen to be placed is page-managed. "Page 1/3" displayed in the upper right Shows page information. For page information, "current page number / maximum page number" It is displayed in the form of. The content and execution of the part has nothing to do with the page. It just changes where the parts are placed.
Pages can be moved with the main "<-" and "->" buttons, and the number of pages can be specified. You can also jump directly by pressing the "Page" button. (The maximum number of pages can be increased by directly specifying the number of pages.) You can also return to page 0 at any time with the "Home" button.
You can connect and disconnect parts at any time. Basically, the parts connected by a line are executed in order and stop at the place where the line breaks. If you press the "Disconnect" button with a part selected, the connection with the next part will be disconnected. Also, with the unconnected parts selected, press the "Connect" button to When the dialog "Connect the selected parts. Are you sure?" Is displayed. Select the part you want to connect again and press "OK" to connect the two parts.
Label parts
The "label" part is like a marker used to indicate the location of a program. By placing the "Label" part from the "Add" button, You can make a mark when jumping from another place.
"Label" parts include "jump" parts and parts such as "conditional branch" or "button". Can be specified. If a jump is made at run time, execution will continue from the specified label.
The "subroutine" part has a function similar to the label part. This part can be named and marked like a "label", As a subroutine to return to the caller after finishing the execution of the part connected to this part You can make it work. (When branching or jumping, by setting the type to "Subroutine call", the "Subroutine" part can be changed. You can call it. )
Variable parts
The "variable" part is a "container" whose contents can be changed in the program. By selecting the "Resources" category from Add Parts and selecting "Variables", You can place "variable" parts on the screen.
Variable parts hold numbers, strings, etc. during program execution The contents can be changed by parts such as "variable assignment". In addition, "conditional branching" and "variable display" that perform processing based on the contents held by the variable are provided.
What the Peas editor can do
The Peas editor allows you to visually place parts and generate scripts, while For those who enter scripts directly with HSP script editor etc., there may be some parts that may be troublesome.
The Peas editor is intended to assist the HSP scripting environment. We do not expect to do all the work in the Peas editor. However, routine work, creating very simple scripts, learning programs, etc. I think that there are many situations where the Peas editor is used effectively.
Changing the source of an HSP script that is already running to an AHT file that supports the Peas editor is not possible. It's not that difficult. For example, an adventure game script that allows you to edit user-modifiable parts Publish as an AHT file and create a mechanism for the general public to create a game using only the Peas editor It is also possible to provide.
Those who can build HSP scripts will provide it in the form of AHT, which makes it easier to modify the content. If you can't write an HSP script, you can start from this editor and level up. Building such an environment is the goal of the Peas editor, and we will continue to update for it. It's a schedule.
About creating parts
Parts that can be added with the Peas editor can be freely created by the user according to the specifications of the AHT file. Parts are searched under the "AHT" folder in the same location as ahtman.exe. By adding the aht file to this folder, it will be recognized as an additional part.
AHT files are basically in the same format as HSP source script files. By matching the comment description to the aht specifications, it is possible to set parameter editing items. For more information on AHT files, see AHT Manual (aht.txt) .
Copyright and license
The Peas editor is copyrighted by onion software.
"Peas Editor" is distributed in the form of being bundled with "HSP3". The rules for redistribution are the same as for "HSP3". As long as it is done free of charge, you are free to do it.
The source script for the "Peas Editor" is included in the HSPSDK Anyone can freely modify, reorganize, and redistribute it. Redistribution can be in the form of a source script or an executable file.