HSP : HSP3Dish / onion software 2021(c)

HSP3 Dish android (NDK) version programming guide
- Android version HSP3Dish overview
- Preparing the environment
- Platform API installation
- HSP3Dish Helper settings
- Create a new project
- About the library folder
- Project build
- Sample project
- Transfer and execution to the actual machine
- Data file preparation
- Get system information
- Task (activity) call
- About the hsp3dish.ini configuration file
- About manual setting items
- About network communication
- Release build
- About the HGIMG4 project
- About device control
- AdMob ad serving
- mes, print command
- Notes and restrictions for android version
- Android version will be updated
Android version HSP3Dish overview
The android version of HSP3Dish is a runtime of HSP3Dish that runs on android OS-equipped models (smartphones, tablets, etc.).
It is possible to reproduce the functions supported by HSP3Dish for Windows on android OS.
(The android version of HSP3Dish is intended to execute the Windows version of the script, and does not reproduce the HSP3 development system itself on android.)
In this manual, we will explain how to use the android version and points to note.
Currently, in order to build a file that can be executed on android, it is necessary to set the environment for development. There is no cost to build a development environment. All can be prepared for free.
These work on Windows and you can check the operation on the connected android device.
The HSP3Dish Helper tool is included to assist you in building with HSP3Dish.
This makes it possible to build for android relatively smoothly.
In order to operate on the actual android machine, the following is required.
- android development environment (SDK)-> [Download site]
You only need to get the command line tools from Download Options I have. However, after SDK Tools, Revision 25.3.0 (March 2017 version), the command line tools (android command) required for build are no longer included. You can download the latest version of the previous version from the following URL, so please use that. (In future versions, we plan to switch to builds with Android Studio instead of command line tools.)
Install the contents of the zip archive in any folder. The recommended folder is "c: \\ android \\ android-sdk".
(You should be able to retrieve the "tools" folder from the SDK Tools. Make sure it looks like "c: \\ android \\ android-sdk \\ tools") - JDK (Java Development Kit)-> [Download Site]
Please install the JDK (Java Development Kit). JRE8 + JDK8 is recommended.
* JDK7 (ver1.7) is not recommended because the apk file is not signed correctly. * If you are in a 64-bit environment, please use the 64-bit version. The 32-bit version is recommended only if the SDK Tools are for a 32-bit environment. - Android NDK (Native Development Kit) Development Environment-> [Download Site]
Unzip the latest version of the Windows zip archive to any folder. The recommended folder is "c: \\ android \\ android-ndk ~".
(The confirmed operation versions are r12b, r14, r17c. Versions older than r10 are not supported.)
* If you are in a 64-bit environment, please use the 64-bit version. The 32-bit version is recommended only if the SDK Tools are for a 32-bit environment. - Apache Ant (development aid tool)-> [Download site]
Unzip the latest version of the zip archive to any folder. The recommended folder is "c: \\ android \\ apache-ant ~".
The recommended version of ant is 1.9.4 or later.
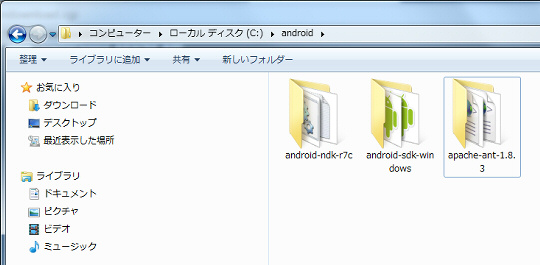
If you unzip the archive to the recommended folder, you will see something like the above. (Use alphabetic characters only, folder names without spaces)
HSP3 Dish Helper settings
Launch HSP3Dish Helper (hsp3dh.exe) in the HSP installation folder (must be updated with the latest version of the HSP3Dish development set).
On the screen displayed by pressing the "Option" button, set the location of the installed folder such as android development environment (SDK).
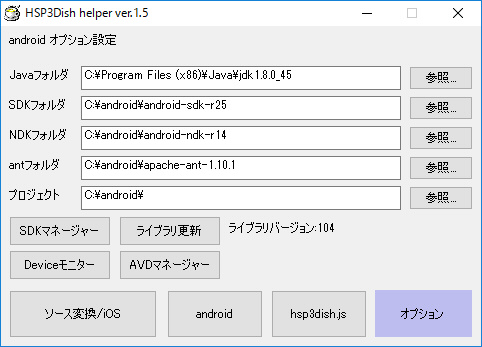
If it is installed in the recommended folder, it will have the above settings.
The final "Project" folder setting indicates the starting point of the project folder created when building the app for android. The recommended folder is "c: \\ android".
Platform API installation
First, install the Platform API required for the build. You can start HSP3Dish Helper (hsp3dh.exe) and start it from the "SDK Manager" button on the "Options" tab.
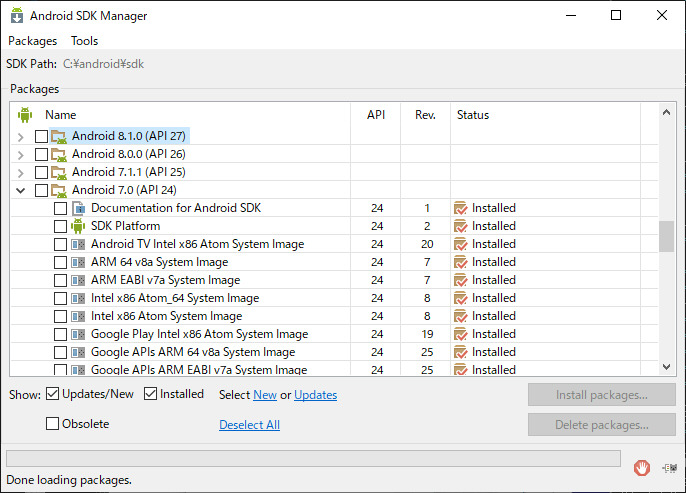
This tool allows you to install the required APIs. (Must be connected to the net)
A checkbox for the API corresponding to each version is displayed in the form of "Android 10 (API 29)".
Be sure to check "Android SDK Tools", "Android SDK Platform-tools", "Android SDK Build-tools" (latest Rev.) and "Android 10 (API 29)".
(The API version indicates the level of API that can be used in the program, and it has nothing to do with the version of the device to install. Normally, if you install "Android 10 (API 29)", it can be operated on most devices. increase.)
Click the "Install packages ..." button to download and install.
"Installed" is added to the installed items.
(If you use it in an environment where you cannot connect to the Internet for some reason, use a place where you can temporarily connect to the Internet.
After installation, if you prepare the android development environment (SDK) folder itself, there is no problem with the build. )
* New apps for publishing on Google Play must be registered in android 11 (API30) and AAB (Android App Bundle) formats from August 2021.
Build in AAB format will be supported at an early stage, so β test version Be sure to check for updates .
Create a new project
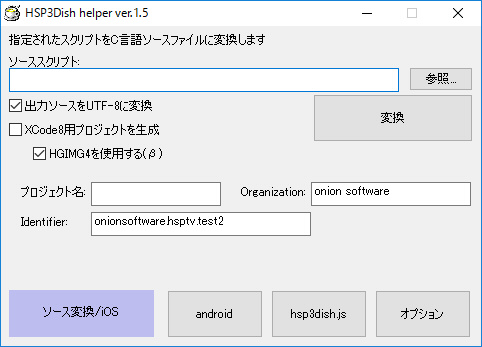
Launch HSP3Dish Helper (hsp3dh.exe) and press the "android" button at the bottom center to enter android build mode.

The above dialog for creating a new project is displayed. (If it is not a new project, click the "New project" button)
By setting the following items and clicking the "New" button, the folder of the specified project will be created and you will be ready to build for android.
When developing an app for android, you must always create one project file for each app. The project folder is created starting from the location set in the setting menu.
- Project name
- ID
- Package name
- Use AdMob
- Do not build ARM64
- Don't build x86
- Use HGIM G4
- Use sensors
It will be the title name of the project. Specify only alphabetic characters that do not include spaces.
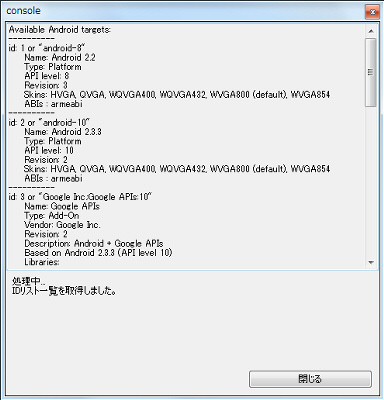
Set the target ID of the build. The target ID is a number that specifies the API version of the SDK. By default, "" android-29 "" (10) is specified. Normally, you do not need to change it. Use the defaults unless you have a specific reason to do so.
If you need another target ID, select the ID from the field displayed by pressing without including the "ID ..." button and enter it.
It will be the information to identify the application. The package name is required to be unique with other package names.
It is usually recommended to use the reverse ordering of domains from top-level domains. For example, specify it hierarchically, such as "net.onionsoft.testapp".
Specify only English characters that do not include spaces in the name. Java package naming convention .
If you omit the package name, the string automatically generated from the date and project name will be applied.
Please check when creating an ad distribution application by AdMob. Google Play Services and Android Support Library are required. For more information, see AdMob Ad Delivery.
Check this to disable code generation for 64-bit ARM processors. Normally, use it without checking it (ARM64 build enabled). If you want to run it on an old Android device that is not 64bit, you can shorten the build time by checking it.
Check to disable code generation for x86 processors. Normally, use it without checking it (x86 build enabled). If you want to run on android device with android simulator and x86 processor, please enable x86 build. If not, you can shorten the build time by checking it.
Check this if you want to use a script written for HGIM G4. For information on creating an HGIMG4 project, refer to the "About the HGIMG4 Project" section.
Enable device acceleration and gyro sensor reading. If you do not use the sensor, you can reduce battery consumption by unchecking it.
About the library folder
When creating a new project, the library folder required for build is created. The library folder is created in the project's base (root) folder, which is set as an option.
The ones created as library folders are as follows.
- hsplib36 ~ Folder
- gameplay folder
- extlib folder
Contains the runtime sources needed to build HSP3Dish. Different HSP versions use different folder names, such as "hsplib36b1" to avoid conflicts with older libraries.
Contains the source for the gameplay runtime needed to build HGIMG4.
Contains the sources for the various libraries needed to build HGIMG4.
By starting HSP3Dish Helper (hsp3dh.exe) and pressing the "Update Library" button on the "Options" tab, the contents of the project folder will be overwritten. Please do this when you update or replace the HSP.
The sources in the hsplib36 ~ folder contain the HSP3Dish runtime sources shared by each project. The user can change the source by himself, but please note that the source may be overwritten and updated by updating HSP3Dish helper.
Build project
Launch HSP3Dish Helper (hsp3dh.exe) and press the "android" button at the bottom center to enter android build mode.
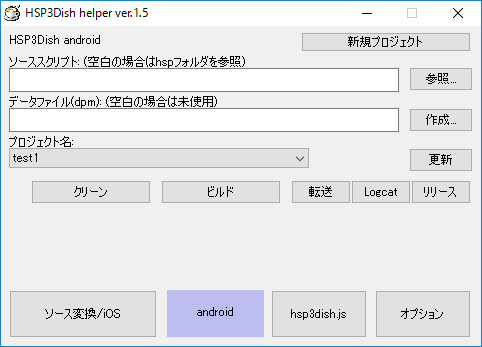
The above project build dialog will be displayed. (If it is not a build, press the "Existing project" button)
By building the project, the specified HSP script and data file will be output as a format (apk file) that can be executed by android.
In the development of the android application, the final output result is the apk file that summarizes all the programs and data for execution.
The items to be set in the dialog are as follows.
- Source script
- Data file (dpm)
- Project name
Normally, leave this item blank and place the HSP script (.hsp) used by the project in the "hsp" folder under the project folder.
(If there are multiple HSP scripts, the file named "main.hsp" has priority.)
If you want to specify the script file directly without using the "hsp" folder, you can select the file by pressing the "Browse" button of the source script item.
In either case, the HSP script (.hsp) must always be a script written for HSP3Dish.
If the target script does not exist, the source script will not be converted.
If the "hsp3dish.ini" file exists in the folder, the settings such as screen size and scaling will be reflected. For more information, see the section About the hsp3dish.ini configuration file.
Specifies the dpm file that contains the data referenced by the script. The dpm file is the format used by HSP, and multiple files are packed into one dpm file. (By pressing the "Create ..." button, you can pack all the files in the specified folder into a file called data.dpm and specify that file.)
* It has been confirmed that the dpm file is not recognized correctly on android9 or later OS. We plan to support it in future versions, but currently it is recommended to use the assets folder instead of the dpm file.
If the data file specification is blank, the dpm file will not be referenced.
See Preparing Datafiles for more information.
Select the project you want to build. A folder for your project will be created and you can choose one of the ones that are ready to build. (Pressing the "Update" button will search the project folder again.)
After specifying items such as the project name, click the "Build" button to start the build. It automatically converts HSP source scripts, compiles NDK, and generates packages.
The result of the build is displayed in the console window.
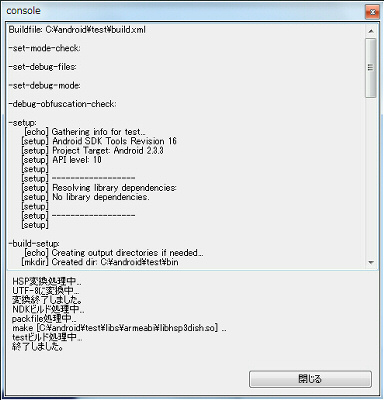
When it ends normally, the message "Completed" is displayed, and the apk file is generated in the bin under the project folder.
By pressing the "Clean" button, you can discard the built data and initialize the project folder. If you want to build the whole thing again, please discard the data by "cleaning" once.
Sample project
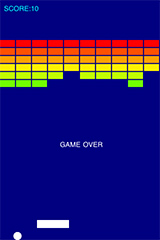 The sample / hsp3dish folder contains sample scripts for using HSP3Dish.
Specify the HSP3Dish sample (block3.hsp) of breakout in the source script,
You can run the build leaving the data file (dpm) blank.
The sample / hsp3dish folder contains sample scripts for using HSP3Dish.
Specify the HSP3Dish sample (block3.hsp) of breakout in the source script,
You can run the build leaving the data file (dpm) blank.
Transfer and execution to the actual machine
After the project build is completed, you can transfer it to the actual android machine or simulator and check it.
(When running on the simulator, start "AVD Manager" from the "Options" tab of HSP3Dish helper, and set and start the simulator to use it.)
Transfer (install) the pre-built apk file by connecting the actual android device via USB and pressing the "Transfer" button while it is recognized by the OS.
After that, execute the transferred application from the application list.
The connection settings of the actual android device differ depending on the device model. Please refer to the following sites.
Even if you cannot transfer to the actual machine, you can transfer the apk file generated by the build via the net or USB memory, install it, and check the execution.
You can display the execution log by pressing the "Logcat" button. You can check the error and initialization message from HSP when transferring to the actual machine and executing.
Data file preparation
The data file referenced by the script can be prepared in two ways.
One is to copy the files to the assets folder in your project directory. Basically, use this method.
The assets folder can contain all the files used for reading, including image files.
However, please note that unlike Windows, the file name is case-sensitive, so you need to write the file name correctly.
The other method is to copy the file to the data folder (generate data.dpm) set in the "Data file (dpm)" item and use it.
* It has been confirmed that the dpm file is not recognized correctly on android9 or later OS. We plan to support it in future versions, but currently it is recommended to use the assets folder instead of the dpm file.
If you want to use data or encryption that you don't want people to see, make sure to use the data folder in data.dpm.
However, please note that sound files (wav, mp3, etc.) are not recognized.
Also, please note that reading from a file pack by data.dpm has the same restrictions as the HSP packfile specification (file name length is 12 characters or less).
Be sure to put the sound files in the assets folder.
Get system information
It is now possible to get the OS version and device name using the sysinfo function.
You can get a string like "android 2.3.3" with sysinfo (0). This makes it possible to determine the OS and version currently running in the source.
You can also get the device name with sysinfo (2).
Task (activity) call
Other tasks (activities) can be called by the exec command.
exec "package name", 0, "class name"
If the second parameter (execution mode) is 0, it depends on the "package name" and "class name".
Specifies the task to perform.
If you need to unlock the security, describe the class to be started in
An easier way to do this is to call the app by specifying the URI.
exec "URI string", 16
For example, if "http://hsp.tv" is specified for the URI, the default web browser will be opened and displayed as the URL. Start the dialer with "tel: 123456789". There are various other calling methods supported by the OS.
About the hsp3dish.ini configuration file
If there is a setting file "hsp3dish.ini" in the "hsp" folder (folder where HSP scripts are installed) in the project folder, the setting will be reflected at build time.
"Hsp3dish.ini" is a file to refer to the settings such as screen size when executing on Windows. See the HSP3Dish Programming Manual for more information.
By writing like "parameter name = setting value", the setting will be reflected when building android.
Parameter name Setting contents
		----------------------------------------
wx screen X (horizontal) size
wy screen Y (vertical) size
autoscale autoscale value
If you want to adjust the screen scaling automatically, set the auto scaling value like "autoscale = 0".
You can scale the drawn screen size appropriately and display it on the current screen.
The details of the automatic scaling value are as follows.
0: Optimal size that fits on the entire screen (aspect ratio is maintained)
1: Scale based on the size in the X direction (aspect ratio is maintained)
2: Scale based on the size in the Y direction (aspect ratio is maintained)
3: Ignore the aspect ratio and display it on the entire screen
The orientation of portrait (vertical screen) and landscape (horizontal screen) is automatically set according to the specified screen size.
If "hsp3dish.ini" does not exist, or if the settings are not written, no particular changes will be made.
If you want to set manually without using the "hsp3dish.ini" file, read the item "About manual setting items".
About manual setting items
By editing the main.cpp source in the jni folder, you can make various settings related to HSP3Dish.
Normally, prepare the setting file "hsp3dish.ini" in the "hsp" folder and configure the settings. This section describes how to modify the source code and set it manually.
Modify the following line in the source code (near 160 lines) that starts with "static void engine_handle_cmd".
		//hgio_view( 480, 320 );
		//hgio_scale( 1.0f, 1.0f );
		//hgio_autoscale( 0 );
Items that start with "//" are commented out and do not work.
By default, scaling is not set, so it should look like the above.
hgio_view( 480, 320 );
First, delete the "//" to enable the hgio_view line. Please set the original screen size (resolution at which the script operates) with hgio_view. The above example shows that the horizontal size is 480 and the vertical size is 320.
hgio_scale( 2.0f, 2.0f );
If you want to display at the specified magnification, enable the hgio_scale line. With hgio_scale, the original screen size is displayed at the specified magnification. Use this if you want to fix the magnification. In general, we recommend using hgio_autoscale.
hgio_autoscale( 0 );
If you want the screen scaling to be adjusted automatically, enable the hgio_autoscale line. With hgio_autoscale, the drawn screen size is scaled appropriately and displayed on the current screen.
The numbers in parentheses allow you to specify several scaling methods.
0: Optimal size that fits on the entire screen (aspect ratio is maintained)
1: Scale based on the size in the X direction (aspect ratio is maintained)
2: Scale based on the size in the Y direction (aspect ratio is maintained)
3: Ignore the aspect ratio and display it on the entire screen
Scaling settings are made at startup. It cannot be changed while the script is running.
hgio_uvfix( 1 );
Corrects the phenomenon that adjacent pixels are blended when the texture is enlarged.
Normally, it is not necessary to specify this option, but please try it when the texture is not displayed correctly due to screen scaling etc.
If the number in parentheses is other than 0, the correction will be ON. If it is 0, the correction will be OFF.
About network communication
It is possible to perform network communication using commands such as httpload and httpinfo on android.
However, in android8.0 or later, due to the OS specifications, only https access (encrypted communication) is allowed.
http access is basically prohibited.
For example, if you want to access "http://www.onionsoft.net", go to "https://www.onionsoft.net"
By changing it, communication becomes possible.
(Please think that access to an unspecified http server is basically impossible)
Access via https is possible depending on the specifications on the server side.
There are things you can't do. In that case, add the "network_security_config.xml" file
It is possible to communicate by allowing http access only to a specific URL (domain).
You can register the domain of http communication destination for each project.
First, create a new "network_security_config.xml" file and under the project folder
Place it in res / xml. Here, please describe the following contents.
- Contents of "network_security_config.xml"
	<?xml version="1.0" encoding="utf-8"?>
	<network-security-config>
	    <domain-config cleartextTrafficPermitted="true">
        	<domain includeSubdomains="true">www.onionsoft.net</domain>
	    </domain-config>
	</network-security-config>
In the above example, "www.onionsoft.net" is specified as an accessible domain.
Describe the required domain here. You can configure multiple domains if you wish.
Next, edit "AndroidManifest.xml" in the project folder and add the "& lt; application ~" line.
Please rewrite as follows.
	<application android:label="@string/app_name" android:icon="@drawable/ic_launcher"

	 android:networkSecurityConfig="@xml/network_security_config">
With the above, http access is possible only for the registered domain.
Since it is an auxiliary method to the last, it is desirable to access https as much as possible.
Please remember.
Release build
You can generate a signed apk file by doing a release build from HSP3Dish Helper. This makes it possible to register the created application on Google Play (Android Market). The general procedure for publishing is as follows.
* After 2019/08/01, API28 (android9) is required for SDK for apps registered on Google Play. Please note that the application to be released and built must be built by installing the SDK of API 28 or later.
- Register as a developer on Google (paid registration is required to distribute the app)
- Create a certificate (keystore) for signing
- Perform a release build with HSP3Dish Helper
- Upload from Android Developer Console
I will explain step by step.
- Register as a developer with Google
http://developer.android.com/
Open the android developer page and select the publish details page.
Sign in with your Google account and enter the developer information appropriately to register.
(Enter the phone number including the country code. In Japan, it is a rule to add "81" at the beginning and omit the "0" at the beginning of the area code. "03-1234-5678" In that case, it will be "+ 81-3-1234-5678".)
Next, use Google Checkout to settle your registration. You can make payments using a credit card, etc.
When all is done, you will be able to access the Android Developer Console page.
If you want to register a paid app, you need to set up account information such as a bank account.
First, start HSP3Dish Helper and open the new project page on the android tab.
Then press the "Create KEY" button. (The key name can be left as "hspapp")
A command prompt screen will open, asking for information on the following items. Enter them from the keyboard. It is recommended to enter all in half-width English characters.
 ・ Password
·Re-enter password
・ First and last name
・ Organizational unit name (department / department name)
・ Organization name (company / organization name)
・ City name or area name (city name)
・ State name or local name (prefecture name)
・ Country code (Enter 81 for Japan)
・ Are you sure? (Enter "y")
・ Key password (enter Enter)
This will create a "hspapp.keystore" file in the root of your project folder. Please do not delete this file and keep it in a safe place as it is necessary for signing the app.
Open the existing project page in the android tab of HSP3Dish Helper.
Select the project you want to build and perform a normal build to confirm that it works properly.
Then press the "Release" button. Run the release build of your app and sign it.
At this time, a command prompt screen will open and you will be asked for a password. Enter the password you entered when you created "hspapp.keystore".
With the above, the file of "project name.apk" is generated in the bin folder of the project.
On the Android Developer Console page, add a new app and upload the generated "project name.apk" file.
(The files with project name-debug.apk and project name-release.apk are unsigned and will be invalid.)
When registering on Google Play, you need to set introductory text, screenshots, support information, etc.
Publish the app to the public by activating the uploaded apk file and pressing the publish button. (There is a delay of several hours before it is actually released)
The published information can be modified at any time from the Android Developer Console.
If you want to update the file, please do a release build again, replace the apk file and then activate it.
However, you need to increase the version number in order to update. Please update the values of the android: versionCode and android: versionName items in the "AndroidManifest.xml" file used by the project before performing the release build.
* In the new android SDK, the zipalign tool used for signing is included in a different folder. If you get the error "No zipalign tools" when you press the "Release" button, copy the latest "zipalign.exe" file under build-tools in the SDK folder under tools in the SDK folder. please.
About the HGIMG4 project
Basically, you can use HGIM G4 script with the same specifications as the Windows version.
Kei Kurui (Professional student) (C) Pronama LLC
The HGIMG4 project takes a very long time to build for the first time.
Also, because it uses the OpenGL / ES2 function, it may not work or may be slow depending on the environment and model of the android terminal.
In HGIMG4, files such as res folder and shader are always required at startup.
From the "res folder" in the "sample / hgimg4" folder of HSP, to the HGIMG4 project folder for android
Copy it under "assets". (The folder structure is "assets / res / ...")
The minimum required files are as follows.
		res/font.gpb
Shader files in the res / shaders folder
Please note that the following functions are not supported. It will be supported in a future version.
- Screen size specification and scaling are not supported (manual setting items such as hgio_view / hgio_scale do not work)
- AdMob display is not supported
About device control
It is possible to access Android device-specific functions with commands such as devcontrol.
devcontrol "control command", parameter 1, parameter 2, parameter 3
Perform device control in the above format.
On Android devices, the control command specified as a character string recognizes the following.
(The control command string must match exactly, including case.)
Note that an error does not occur even if you write a control command that is not recognized.
Control command content
	-------------------------------------------
vibrate Vibrate operation (parameter 1)
AdMob Displaying ads with AdMob
for example,
devcontrol "vibrate",400
Instructs the device to perform a vibrate operation.
The length of vibration (in milliseconds) can be changed by changing the value of the parameter.
You can also get system information with the devinfo command.
devinfo variable name, "information name"
Perform device control in the above format.
On Android devices, the control command specified as a character string recognizes the following.
(The control command string must match exactly, including case.)
Note that an error does not occur even if you write a control command that is not recognized.
Information name Contents
	-------------------------------------------
name Terminal type name (terminal name can be obtained by sysinfo (2))
locale Locale information
for example,
devinfo a,"locale"
Assigns the information of Loril to the variable a.
AdMob ad serving
- About updating from conventional AdMob
HSP3Dish 3.5 version does not have this limitation as we are switching to the new AdMob library using Google Firebase. If you want to update a project that uses the old AdMob library, recreate the new project.
- Preparation for ad delivery
With HSP3Dish, it is possible to create an ad distribution model application using AdMob.
With proper settings, you will be able to serve ads and earn money from the HSP3Dish app.
AdMob is a mobile ad distribution mechanism provided by Google. By incorporating this into the app, you can get advertising fees even if it is a free app.
In order to install AdMob, you need to prepare according to the following procedure.
1. Create an AdMob account
Register an account and fill in the required information such as payment information.
https://www.google.co.jp/admob/
2. Get unit ID
Log in to the AdMob web page and perform "Register new app".
(It is possible even when the app has not been published on Google Play yet)
You can get the unit ID by filling in the required items.
3. Create a project using AdMob
Create a new project. At that time, be sure to check the "Use AdMob" check box.
Other settings are the same as when creating a normal new project.
4. Unit ID registration
Edit the "src / tv / hsp / HspActivity.java" file under the project folder.
static final String APP_ID = "ca-app-pub-???????????????????????????";
Look for the line. Replace this APP_ID part with the app ID string you got on your AdMob web page. This app ID identifies the publisher of your ad.
		static final String BANNER_AD_UNIT_ID = "ca-app-pub-???????????????????????????";
		static final String INTERSTITIAL_AD_UNIT_ID = "ca-app-pub-???????????????????????????";
Look for the line. For BANNER_AD_UNIT_ID and INTERSTITIAL_AD_UNIT_ID, specify the ad unit ID.
BANNER_AD_UNIT_ID specifies the ad unit ID used in banner ads.
INTERSTITIAL_AD_UNIT_ID specifies the ad unit ID used in interstitial ads.
Use these IDs in your production app.
5. Add AdMob display script
Make sure to enable AdMob at the right time when you run the script.
It is recommended to enable it after the loading of image and audio resources such as the title screen and game menu has settled down.
(AdMob tasks may be delayed when the CPU load is high)
If you enable AdMob,
devcontrol "AdMob", 0; Enable AdMob
Please write in the script. (The "AdMob" string correctly identifies the case) In Windows and iOS, this description is ignored, but if you want to execute it only on Android when executing multiple models, you can describe it as follows.
		getreq v_platform,SYSREQ_PLATFORM
		if ( v_platform = PLATFORM_ANDROID ) {
devcontrol "AdMob", 0; Enable AdMob
		}
"Devcontrol" AdMob "" starts displaying AdMob at the first execution, and even if it is executed after that
Since it is ignored, there is no problem even if it is executed many times when the title screen is displayed.
By default, your ad will appear as a banner at the bottom of the screen.
(At this time, make sure that the device is connected to the Internet)
With the above preparation, you can build an application using AdMob.
- Build AdMob project
After the project update is completed, the rest is from the HSP3Dish helper, just like a normal HSP3Dish.
You can build the project.
If an error occurs during build, refer to the error message etc.
Check if there are any problems with the project settings.
If the build is successful, you can transfer it to your device to see it run.
If you want to check the execution many times, please register the test terminal.
The registration of the test terminal is specified in the source of the src / tv / hsp / HspActivity.java file.
Make sure you have the following line:
Google also recommends using a test ad unit ID.
https://firebase.google.com/docs/admob/android/quick-start?hl=ja
static final String TestDeviceID = "********************************";
In the operation check on the device, it is necessary to enter the device ID in the "**** ~" part.
(For emulators, specify AdRequest.DEVICE_ID_EMULATOR instead of "**** ~".)
The device ID of the terminal is displayed in the log in the device monitor when AdMob is displayed.
"To get test ads on this device, call adRequest.addTestDevice ("******************************** "); "
Message will be played, so you can check it there. The device monitor can be started by pressing the "Device monitor" button on the "Options" tab of HSP3Dish Helper. You can see more detailed logs than LogCat. (You will also see ads display errors and messages about problems)
- About interstitial advertising
You can display interstitial ads using the full screen.
devcontrol "AdMob", 16; Show interstitial ads
Interstitial ads will be displayed once each time you request a display. It can also be used in combination with regular banner ads, allowing for a wider range of uses.
- App release
Apps that support AdMob display can be built in the same way as regular HSP3Dish apps and distributed from Google Play. Don't forget to remove the test device registration code at the time of release.
.addTestDevice(TestDeviceID)
This line is for registering the test terminal.
It is described in two places in the source of the src / tv / hsp / HspActivity.java file.
If the test is over and you want to release it as a production app,
//.addTestDevice(TestDeviceID)
Don't forget to modify the code to invalidate the registration by putting "//" at the beginning like.
About mes, print command
HSP3Dish supports character string drawing of mes and print instructions using the built-in font. (HGIM G4 is not applicable because it draws with font data)
The font name specified by the font command is ignored and the font size is reflected. Also, the font style only supports standard (0) and bold (1).
Since the process of acquiring fonts on android is a heavy burden on the system, the content (texture) once drawn is cached on the HSP3Dish side to speed up the process.
Normally, you should be able to use it without being aware of this mechanism.
If you want to control the cache function, describe the setting with the setreq command. (It does not affect Windows and iOS versions)
setreq SYSREQ_MESCACHE_MAX, 64; Specifies the maximum number of cache registrationsThe internal operation of the cache is that if there is a character string with exactly the same content as the message once displayed, The previous data will be reused and displayed. However, the cache that was not displayed for 8 frames will be discarded.
The maximum number of caches that can be retained is 64 by default. The cache setting range is 0 to 128 as a guide, and even if the value is large, it does not necessarily mean that the speed will be increased. Please understand that message display is a costly process for the purpose of suppressing a noticeable slowdown.
If the maximum number of cache registrations is set to 0, the cache will not speed up.
Notes and restrictions for android version
- Information that can be entered
- About image format
- JPEG baseline (progressive JPEG is not supported)
- PNG (1bit, 2bit, 4bit, 8bit, 24bit, 24bit + alpha channel format supported)
- TGA (subset)
- BMP (black and white, RLE compression not supported)
- PSD (read only RGB 24bit)
- GIF
- HDR (radiance rgbE format)
- PIC (Softimage PIC)
- About gmode constraints
- About image size
- About playable sound files
- About screen rotation
In addition to reflecting the tapped coordinates in mousex and mousey, you can get the ON / OFF of the click (tap) by the stick command. In addition, advanced touch information (multi-touch, etc.) can be acquired by using the mtlist and mtinfo commands. Multi-point touch information (multi-touch) can only be obtained if the device supports it. Please note that some Android devices may not support multi-touch on your hardware.
The following formats can be used for images loaded by the celload and picload commands. PNG format is recommended when using the alpha channel.
The current version does not support gmode 6 (color subtraction). This is a limitation only for the android (NDK) version. We plan to support it in future versions.
When reading an image whose vertical and horizontal sizes are not 2 ^ n, that is, 1,2,4,8,16,32,64,128,256,512,1024 ..., some overhead will be incurred due to internal conversion.
(Usually you don't have to worry too much. It requires extra CPU resources when loading a large number of images)
Image files can be placed in the assets folder inside the project directory.
We have received reports that if the number of buffers read simultaneously by the mmload instruction exceeds 30, it will not be played back correctly.
This is due to OpenSL / ES restrictions on android, and we plan to fix this issue.
In a hurry, please keep the number of buffers used by mmload to 30 or less by switching as necessary.
(Especially when playing music, it is not necessary to play at the same time, so it is better to share one buffer ID)
In addition, since it is a limitation only on android, there is no problem on Windows and iOS.
Sound corresponds to files with extensions ".wav", ".mp3", ".ogg" and ".aac".
Please note that not all formats are supported for .aac and .ogg.
".Wav" and ".mp3" are widely supported formats in all hsp3dish including Windows version.
Be sure to put the sound files in the assets folder in your project directory. If you include it in data.dpm, it cannot be read from the system side of the OS.
The current version does not support automatic screen rotation during execution. Be sure to create it with specifications that operate with the vertical and horizontal screens fixed.
If the screen size is specified by the hsp3dish.ini setting file, the vertical screen and horizontal screen are automatically set.
If you want to set the screen orientation (rotation) manually, you can rewrite AndroidManifest.xml to control it.
        <activity android:name="android.app.NativeActivity"
	          android:screenOrientation="portrait"
                  android:label="@string/app_name">
If the parameter specified in the "android: screenOrientation =" line is "portrait", it is a vertical screen. In the case of "landscape", each is fixed to the horizontal screen.
Data files can be read and written to application-specific folders using the bsave and bload commands.
If only the file name (half-width English characters) is specified without including "/", the folder is unique to the application.
(The location indicated by "/ data / data /
Android version will be updated
The following features will be added with higher priority in order from the top.
- Acquisition of various system information
- Camera and browser call support
The version upgrade will be announced on the HSP official site HSPTV !, so please check back from time to time.