HSP : HSP3Dish / onion software 2021(c)

HSP3Dish iOS Version Programming Guide
- Overview of HSP3Dish for iOS
- Preparing the environment
- About iOS folders
- Script preparation
- Run and configure HSP3Dish
- App name and icon settings
- Save user data by bsave command
- About the data in the Resource folder
- Support for exec instructions
- Accelerometer support
- Support for dialog instructions
- Retina display support
- Universal app support
- About screen rotation
- About device control
- Response in case of error
- About registration on the App Store
- AdMob support
- About the HGIMG4 project
- Notes and restrictions for iOS
- iOS version will be updated
Overview of HSP3Dish for iOS
HSP3Dish for iOS is a runtime of HSP3Dish that runs on iOS-equipped models (iPhone series, iPad series, iPod Touch).
It is possible to reproduce the functions supported by HSP3Dish for Windows on iOS.
(The iOS version of HSP3Dish is intended to execute the Windows version of the script, and does not reproduce the HSP3 development system itself on iOS.)
In this manual, we will explain how to use the iOS version and points to note.
Preparing the environment
Currently, in order to operate on the actual iPhone / iPad, MacOSX environment and development tool Xcode12 or later are required, and iOS Developer Program (paid) is required for distribution in the store.
The process required up to this point is no different from normal iPhone / iPad development. For details, refer to various materials such as the iOS Developer Program homepage.
	iOS Developer Program
	https://developer.apple.com/programs/jp/
In this document, we will explain how to install HSP3 Dish on the assumption that Xcode will actually work and the program can be transferred to the actual iPhone / iPad.
For the preparations up to that point, please refer to the existing manuals.
The version of XCode used for verification is XCode 12.
The SDK version to be used is assumed to be iOS14 or later, and the operating environment is assumed to be iOS10 or later.
About iOS folder
 The iOS folder contains the basic project for the HSP3Dish runtime and xcode.
- iHSP30 folder --HSP3Dish runtime body
- gameplay folder-runtime for HGIM G4
- extlib folder --library for HG IMG4
- hspproj folder --HSP3Dish basic project
- hspproj_gp folder --HGIGG4 basic project
Basically, create a project for iOS using HSP3Dish Helper. Runtimes and libraries should be copied as needed.
Script preparation
If you want the script to run on iOS, first create a project on Windows.
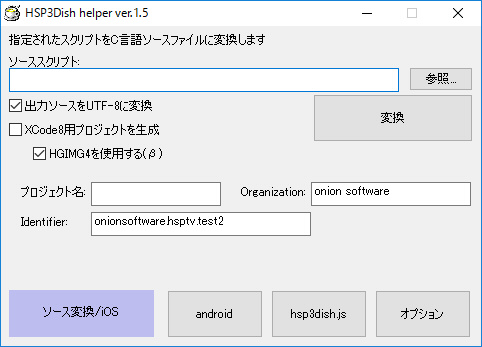
Start HSP3Dish Helper (hsp3dh.exe), which is a conversion tool.
(You can also start it by selecting the "Convert specified file to C source" menu from the "Tools" menu of the script editor.)
When the tool starts, make sure that the "Source Conversion" tab is selected, and set the following contents.
- Source Script-HSP source script to work. You can select from the file dialog with the "Browse" button.
- Project name --This will be the project name on XCode. It is necessary to specify only single-byte alphanumeric characters (without spaces).
- Organization --This is the Organization name specified for the project on XCode. Please enter the name of the creator or organization. ..
- Identifier --This is the Identifier (creator identification name) name specified for the project on XCode. It is necessary to specify only single-byte alphanumeric characters (without spaces). You need to specify a string that is unique to other authors. Normally, the URL is reversed and specified as "net.onionsoft". The AppID (Bundle Identifier) is obtained by adding the project name to this Identifier. The App ID will be required when operating on the actual device or registering on the App Store, so be prepared in advance. (For example, if the Identifier is "net.onionsoft" and the project name is "block3", the AppID will be "net.onionsoft.block3".)
After making the above specifications, click the "Convert" button. At this time, don't forget to check "Generate project for XCode8" and "Convert output source to UTF-8". (Also, if you are using the HGIMG4 runtime, check "Use HGIMG4" as well.)
If it ends normally, the project folder for XCode (the folder name specified by the project name) will be created in the same folder as the script. This completes the script and project preparation.
Run and configure HSP3Dish
If you want to actually run it on iOS, you need to compile the project on XCode.
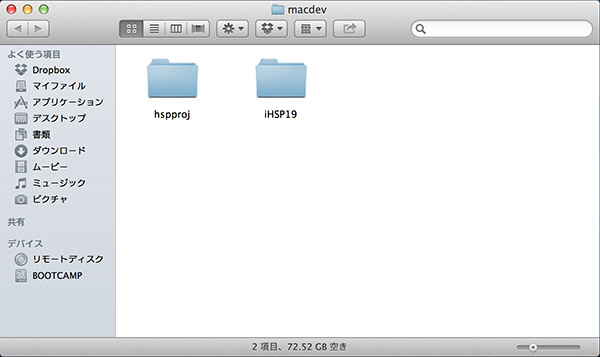
Copy the project folder for XCode and the "iHSP30" folder (included in the iOS folder in the HSP archive) output in Script preparation to MacOSX. please.
Be sure to place the "iHSP30" folder in the same hierarchy as the created project folder.
(For the HGIMG4 project, place "extlib" and "gameplay" in the same way.)
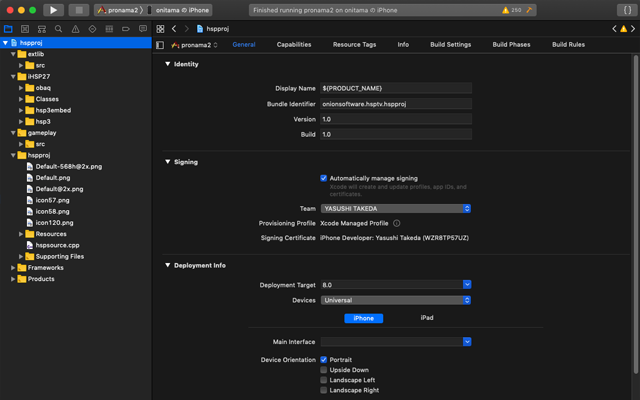
Open the project folder and start the "hspproj.xcodeproj" file inside. XCode will launch automatically and the project will be loaded.
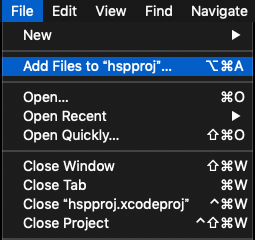
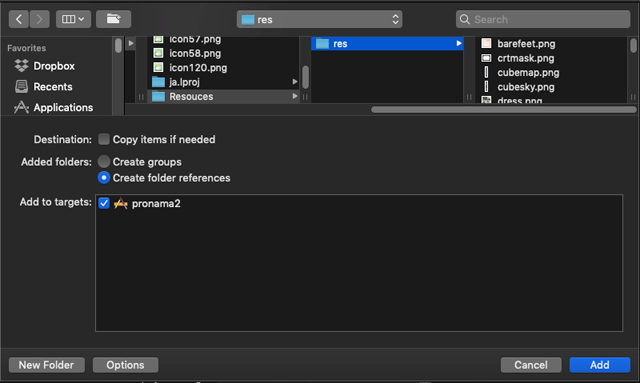
If you have additional data files such as images and sounds, you need to copy them to the "Resource" folder and select "Add Files to" hspproj "..." from the "File" menu to register the resource files in the project. there is.
By registering the files under Resource on XCode, it is possible to read data files such as images from the script.
When using HGIMG4, add the "res" folder as a reference (reference) under the Resource folder. All files under the "res" folder will be treated as resources.
If you want to use the pre-packed file (data.dpm), refer to the item "About the data in the Resource folder".
Basically, if you press the execute button (>>) on the upper left from this state, it will compile and execute on the selected device.
In addition, the following settings can be made according to the contents of the application.
When running HSP3Dish, the HSP runtime initialization code written in AppDelegate.m is referenced.
(When using HGIMG4, this setting is invalid. When using HGIMG4, all available screen areas will be drawn.)
By editing this content on XCode, you can change various settings.
To edit AppDelegate.m, select the folder icon in the view on the left side of the screen to display the project file tree. Click the AppDelegate.m item in it to display the contents in the editor.
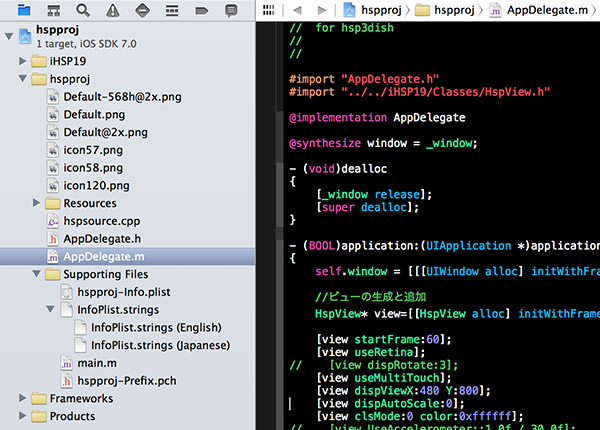
// Create and add views
	    HspView* view=[[HspView alloc] initWithFrame:[[UIScreen mainScreen] applicationFrame]];

	    [view startFrame:60];
	    [view useRetina];
	    //    [view dispRotate:3];
	    [view useMultiTouch];
	    [view dispViewX:480 Y:800];
	    [view dispAutoScale:0];
	    [view clsMode:1 color:0xffffff];
	    //    [view useAccelerometer:1.0f / 30.0f];
In the above part, the initialization code with standard settings (480 x 800, 60 frames) is written. Lines that start with "//" are recognized as comments, and the written content is invalid. If necessary, you can enable the setting by deleting "//". The content of each line has the following meanings:
[view startFrame:60];
This setting allows you to control the frame rate at which the task is executed. Normally, by specifying 60, it is 60 frames per second (fps), but you can change this value. Unlike normal HSP, the iOS version of HSP3Dish executes in the specified frame rate as a unit. It is possible to specify a high frame rate, but the load on the CPU will affect battery consumption, so We recommend that you keep the value as low as possible.
[view clsMode:1 color:0xffffff];
With this setting, you can change whether to clear (erase) the screen at the start of drawing by "redraw 0".
By default, clear is enabled and the background color is white (0xffffff).
If you set "cls Mode: 0", the screen will not be cleared, so you need to clear it yourself.
(When clearing the screen by yourself, it is an option setting to avoid clearing duplicately.)
"Color: 0xffffff" specifies the color to be cleared, and describes the RGB code in hexadecimal.
[view useRetina];
With this setting, on models with Retina display (iPhone 4 or later), the resolution can be doubled for processing. (It is necessary to create an application with a high resolution such as 640 x 960 in advance) Models without a Retina display will maintain normal resolution. If you do not want to use the Retina display intentionally, put a comment "//" to disable it.
[view useMultiTouch];
By adding this setting, it is possible to acquire multi-touch information using the mtlist and mtinfo commands.
If this is not specified, even if you touch multiple points, it will be considered as one touch.
[view dispViewX:480 Y:800];
You can set the resolution (expected resolution) at which the script operates.
Be sure to set it when using the screen scaling function (dispAutoScale, dispScaleX). The above example shows that the horizontal size is 480 and the vertical size is 800.
If this item is commented out (disabled), the entire device resolution at startup will be valid as it is, and the script will be able to perform processing according to the screen size.
[view dispScaleX:2.0f Y:2.0f];
The original screen size is displayed at the specified magnification. Use this if you want to fix the magnification. Use dispAutoScale to set automatically according to the screen size.
[view dispAutoScale:0];
Scales the drawn screen size appropriately and displays it on the current screen.
The numbers in parentheses allow you to specify several scaling methods.
0: Optimal size that fits on the entire screen (aspect ratio is maintained)
1: Scale based on the size in the X direction (aspect ratio is maintained)
2: Scale based on the size in the Y direction (aspect ratio is maintained)
3: Ignore the aspect ratio and display it on the entire screen
Scaling settings are made at startup. It cannot be changed while the script is running.
[view useAccelerometer:1.0f / 30.0f];
By adding this setting, it is possible to get the value of the accelerometer.
The value you specify sets the reading interval for the sensor. With the above settings, acquisition is performed in 1/30 second units.
Accelerometer values are in the system variables ginfo_accx, ginfo_accy, and ginfo_accz, respectively.
The values on the X, Y, and Z axes are assigned as real numbers.
This is the acceleration of each coordinate axis obtained in the range of -1.0 to +1.0.
Do not add this setting if you do not use accelerometers. Acquiring sensor information consumes extra battery.
In an environment where the accelerometer cannot be used, such as on Windows, 0.0 is acquired.

App name and icon settings
The project comes with a default icon (HSP soup cup icon), app name and splash screen.
You can see these settings by selecting the General item for your project.
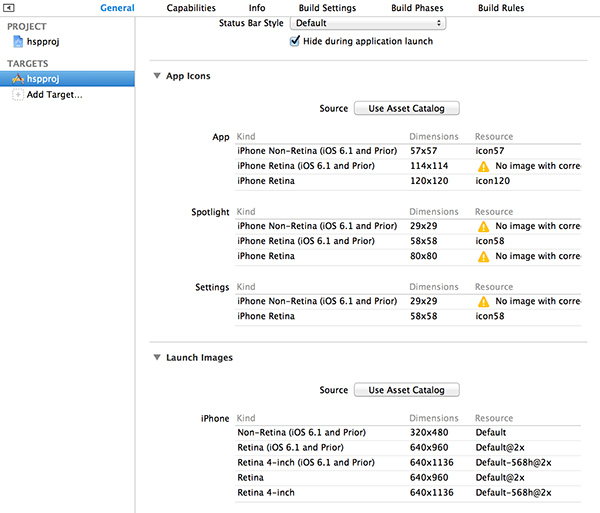
The following three files are registered as the minimum required icon files. Each image is the same but has a different resolution. If you want to use the image you prepared, replace the icon file.
icon57.png --Icon used as standard on iOS (57 x 57 dots)
icon58.png --Icon used in Spotlight and setting screen (58 x 58 dots)
icon120.png --Icon used as standard on iOS with Retina display (120 x 120 dots)
The splash screen is the screen that is displayed when the application is started, and different files are prepared for each screen size. The following three files are registered as the minimum required files. If you want to use the image you prepared, replace the image file.
Default.png --Splash screen used on older models (320 x 480 dots)
Default@2x.png --Splash screen for Retina display (640 x 960 dots)
Default-568h@2x.png --Splash screen for 4 inch Retina display (640 x 1136 dots)
The app name displayed on iOS is set in the InfoPlist.strings file. You can edit it by selecting InfoPlist.strings in the Supporting Files folder in your project's file tree.
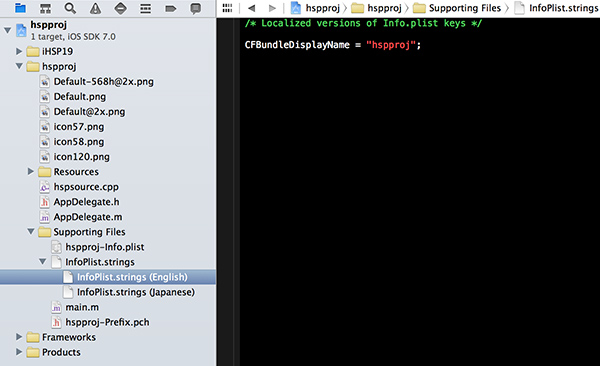
InfoPlist.strings (English)-Setting app names in English
InfoPlist.strings (Japanese) --Setting app name in Japanese
Two types of projects, Japanese and English, are registered. Select each file and
CFBundleDisplayName = "hspproj";
Please rewrite the "hspproj" character string in the part marked with and set the application name. If you want to add a name in another language, add localization from XCode and make the same settings.
Save user data by bsave command
The bsave instruction allows you to save the contents of the variable buffer as user data.
(You cannot specify a folder on iOS, so please specify only the file name.)
The saved data can be read by the bload command by specifying the same file name.
The bsave instruction cannot save a file with the same name as the file on the resource.
User data is stored in a different area for each application. Data cannot be shared between different applications.
About the data in the Resource folder
Create a Resource folder for the image and audio data files read from the script.
It can be read by adding it to the project.
However, please note that unlike Windows, the file name is case-sensitive, so you need to write the file name correctly.
It is possible to access data packed with multiple files by adding the data.dpm file to the resource.
The data.dpm file can be created on the HSP development system on Windows. For details, refer to the items such as dpm file and pack file.
Also, please note that HSP3Dish cannot include files accessed by the iOS system such as audio files (wav, mp3, etc.) and icons. The file name length limit (up to 12 characters) is the same as the HSP packfile specification.
Support for exec instructions
By specifying the URL scheme with the exec instruction, you can open the Safari browser with the specified URL.
exec "http://hsp.tv/",16
In the above example, the site of "hsp.tv" is opened. Make sure to specify 16 (execute associated application) for the second parameter as in Windows.
Support for dialog instructions
Supports system dialog display. Only types 0 to 3 are supported. However, the warning icon etc. like the Windows version is not displayed. If you select the "Yes" or "No" option, the same result as in the Windows version will be assigned to the system variable stat.
Accelerometer support
The iOS version supports the acquisition of accelerometer information. You need to add the required initialization to AppDelegate.m. See Running and configuring HSP3Dish for more information.
Currently, the Windows version cannot read the same values as accelerometers, so be sure to write code to test according to the runtime you are running.
Retina display support
You can make it compatible with Retina displays by enabling the initialization of AppDelegate.m ("[view use Retina];").
Create an app with a high-definition size such as 640x960 (640x1136 for iPhone 5) in advance, and then make the settings.
[view useRetina];
With this setting, it will be reflected correctly on models with Retina display, and will be displayed in reduced size on models without Retina display.
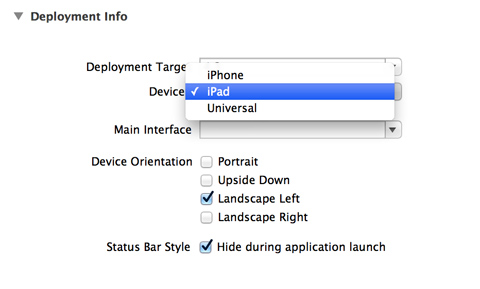
Universal app support
If you want to build the project as a Universal app (the same app works on both iPad and iPhone),
Change the project's General item-> Deployment Info-> Deployment Target to Universal.
After that, you will be able to make settings for each iPhone and iPad, so make the same settings and build.
For Universal apps, either use the view dispViewX item at initialization in AppDelegate.m to correctly specify the resolution used by the app and scale.
Please note that it is necessary to check the screen initialization size (ginfo_sx, gfino_sy, etc.) on the application side and then perform drawing corresponding to it.
About screen rotation
The current version does not support automatic screen rotation during execution. Be sure to create it with specifications that operate with the vertical and horizontal screens fixed.
You can set the screen orientation with the Device Orientation checkbox in TARGETS-> General in the hspproj settings.
Be sure to check either Portrait, Upside Down or Landscape Left, Landscape Right.
In the previous version, the rotation was set by setting "view disp Rotate:" in the settings in AppDelegate.m.
The setting by "view disp Rotate:" is also left for compatibility, but in XCode 6 or later, please set by Device Orientation.
About device control
It is possible to access iOS device-specific functions with commands such as devcontrol.
devcontrol "control command", parameter 1, parameter 2, parameter 3
Perform device control in the above format.
On iOS devices, the control command specified as a character string recognizes the following.
(The control command string must match exactly, including case.)
Note that an error does not occur even if you write a control command that is not recognized.
Control command content
	-------------------------------------------
vibrate Vibrate operation
sound System sound playback (parameter 1)
for example,
devcontrol "vibrate"
Instructs the device to perform a vibrate operation.
Some control commands recognize numeric parameters.
devcontrol "sound",1000
Plays a built-in sound (Sound ID = 1000). Various built-in sounds can be played by changing the numerical values of the parameters. (The sound ID can be 1000-117. For more information, see the iOS AudioServicesPlaySystemSound function reference.)
Response in case of error
A Code Signing Error may occur when transferring or compiling the actual device. This often happens when the Provisioning Profile and Bundle Identifier do not match. When you register for iOS development, you will need a Provisioning Profile, but please make sure that it matches the Identifier (app identification name such as onion software. *) Of the App ID specified at that time.
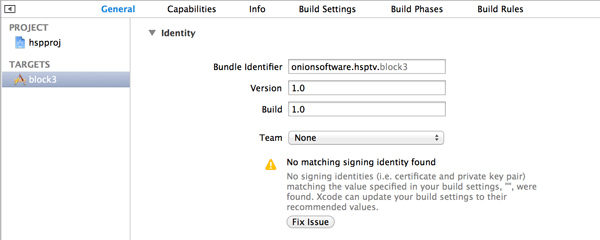
If the Code Signing Identity and Provisioning Profile in the TARGETS-> Build Settings-> Code Signing Error item of the project are not specified correctly, an error will occur.
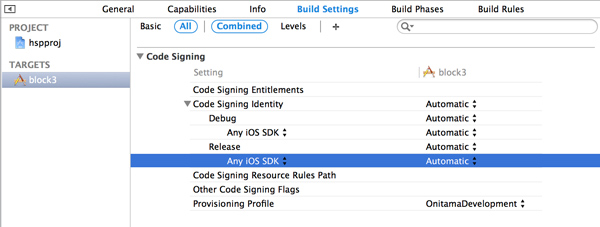
If the Provisioning Profile is not properly installed on the device, you will also get an error during the transfer. In this case, check whether the device registration is correct and the encryption key settings are correct, and then compile again.
About registration to the App Store
Even if you create an app using HSP3Dish, you can register it in the App Store using the same procedure as for normal app development.
By registering in the App Store, users other than you will be able to download and run the app. Also, if you set it as a paid application, you can sell it on the App Store.
If you have already registered as a Developer, the general flow is as follows.
- Create an App ID for use in your app from the "iOS Provisioning Portal" site
- Create a Distribution Provisioning Profile and download the configuration file
- Register the provisioning profile for Distribution created in the environment where xcode is running
- In the project on xcode, set the profile for distribution in Code Signing in Build Settings
- Build in Release mode and make sure there are no errors
- Register the app on the "iTunes Connect" site. Set the app name, screenshot, etc. and set the status to "Waiting For Upload"
- Execute the "Product"-> "Archive" menu from xcode to create a file for uploading
- The Organizer window will open automatically, so validate the file
- If Validate is successful, select "Submit" to upload to the server
- After a successful upload, Apple will review it. You can check the progress on the iTunes Connect site
- If you pass the screening successfully, the app will be published on the App Store
The registration process is so complicated that it is rare that everything will work from the beginning.
Learn how to register by referring to the documents published by Apple and the materials on the Internet.
Already, works by HSP3Dish are gradually appearing on the App Store.
You can publish your work to the world market, so please try it.
* Due to Apple's rules, you cannot apply for binaries that do not include 64-bit codes. Be sure to use the HSP3Dish 3.5 β3 or later runtime to create the file. Also, be sure to set "No" to "Build Active Architecture Only" in the project build settings. "Build Active Architecture Only" has settings for PROJECT and TARGETS respectively, so make sure that "No" is set for both. Also, make sure that "Standard Architectures" (armv7, arm64) is selected for the Architectures item.
About iAd support
The iAd system supported by HSP3.4 has been discontinued.
AdMob support
AdMob's system for displaying ads within the app is a new system integrated with Google Firebase. We plan to support the new version of AdMob in future versions. Please wait a moment now.
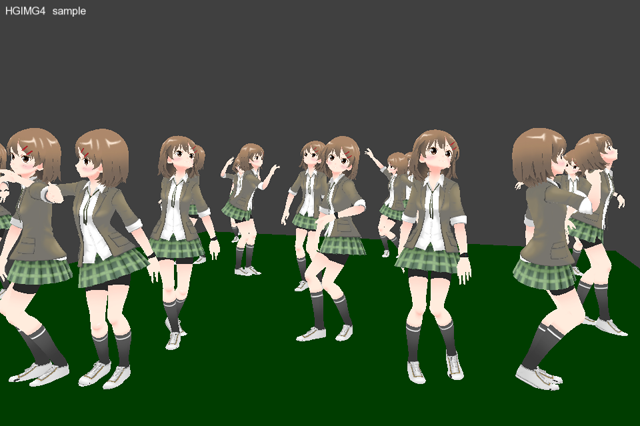
About the HGIMG4 project
This version supports building HGIM G4 scripts.
Please note that it is currently β-compatible and various functions are restricted.
Kei Kurui (Professional student) (C) Pronama LLC
In addition to increasing the size of the application, the HGIMG4 project may slow down depending on the device environment and model. (We will aim to support a wide range of terminals in the future, so please wait for a while)
In HGIMG4, files such as res folder and shader are always required at startup. (The folder structure is "Resouces / res / ...")
The minimum required files are as follows.
		res/font.gpb
Files under res / shaders
Please note that the following functions are not supported. It will be supported in a future version.
- Screen size specification and scaling are not supported (manual setting items such as hgio_view / hgio_scale do not work)
- Sensor value is always obtained
- Always receive multi-touch information
- Not compatible with off-screen rendering (currently investigating the cause and fixing it)
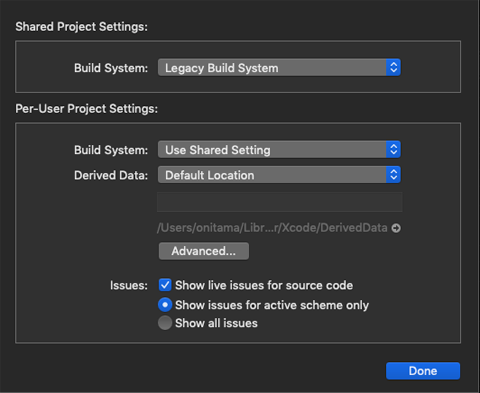
- When using with XCode9, the project setting must be Legacy Build System
Notes and restrictions for iOS
- Information that can be entered
- About image format
- JPEG baseline (progressive JPEG is not supported)
- PNG (8bit, 24bit, 24bit + alpha channel format supported)
- TGA (subset)
- BMP (black and white, RLE compression not supported)
- PSD (read only RGB 24bit)
- GIF
- HDR (radiance rgbE format)
- PIC (Softimage PIC)
- About image size
- Playable sound files
- About mes, print instructions
- About closing the app
The tapped coordinates are reflected in mousex and mousey. You can also get click (tap) ON / OFF by stick command.
The following formats can be used for images loaded by the celload and picload commands. PNG format is recommended for iOS.
Images whose vertical and horizontal sizes are not 2 ^ n, that is, 1,2,4,8,16,32,64,128,256,512,1024,2048 ... When reading, some overhead is incurred due to the internal conversion. (Usually you don't have to worry too much. It requires extra CPU resources when loading a large number of images)
It corresponds to files with the extensions ".wav", ".mp3", ".caf" and ".aac". For compressed audio files, it is not recommended to load a lot of music at the same time, as all waveforms will be expanded into memory when loaded with the mmload command. The ".caf" and ".aac" formats are supported on Mac and iOS. ".Wav" and ".mp3" are widely supported formats in all hsp3dish including Windows version.
It is not recommended to rewrite many character strings at once because the character string drawing by the mes and print instructions is a very costly (execution time) process.
The drawing of the character string has a cache inside the system, and the previously drawn contents are displayed at high speed,
Please note that processing that displays many different character strings for each frame will be a heavy load.
If the characters to be displayed are only English characters, prepare and use the character data yourself in advance.
You can get good performance. (Please refer to test1.hsp etc. of hsp3dish sample)
In the iOS version, the application is not terminated by the end command (the process is the same as the stop command).
The iOS app creation guidelines require that the program itself not terminate.
Unlike Windows and android, on iOS, it is possible to make it so that there is no action of quitting the application
Please note that you will be asked.
iOS version will be updated
The following features will be added with higher priority in order from the top.
- Acquisition of various system information
- http connection, browser call support
- Settings for various services such as GAMECENTER and Google Play Services
The version upgrade will be announced on the HSP official site HSPTV !, so please check back from time to time.