HSP : HSP3Dish / onion software 2021(c)

HSP3Dish Programming Manual
- What is HSP3Dish
- How to use HSP3Dish
- Difference from HSP3
- About placement objects (New!)
- About standard sprites (New!)
- About screen resizing (New!)
- Coordinate transformation by viewcalc command (New!)
- Image data control by celbitmap command (New!)
- About the gmode instruction
- About the gmulcolor instruction
- About the gfilter instruction
- About setreq and getreq instructions
- Acquisition of multi-touch information
- Sound function
- http communication function
- Sample script
- HSP3Dish command list
- Creating an executable file on Windows
- About the startup configuration file
- Support for physics engine OBAQ
- Conversion to other platforms (New!)
- Support for extension plugins and external DLLs
- Support for various inputs and outputs
- Known bugs
- Copyright and license
- Contacts
What is HSP3Dish?
HSP3Dish is for building the operating environment of HSP3 on various devices. It is an additional set. Scripts developed on Windows on another OS It provides a mechanism to make it work.
The HSP3 Dish runtime running on Windows has limited functionality compared to the regular version of HSP3. Some special features have been added. The same function as this HSP3 Dish runtime, such as iPhone / iPad or android Scripts that run on the Windows version can be reused by implementing them on different systems. It is a mechanism.
HSP3Dish is intended for special use, but when used on Windows,
High-speed drawing using DirectX / OpenGL, standard support for alpha channel and PNG format, etc.
It also has advantages that ordinary HSP3 does not have.
In addition, the HGIMG4 runtime , which supports 3D functionality and advanced physics, is also provided as a derivative of HSP3Dish.
HSP3 for Linux / Raspberry Pi , which runs on Linux and the small device Raspberry Pi, is a separate package. We are distributing the edition. For more information, Please see the HSP3 for Linux / Raspberry Pi page.
HSP3Dish will continue to evolve as a new HSP3 trend. Please look forward to it.
An introduction page about HSP3 Dish is available on the official website HSPTV !. Please take a look at the latest information about HSP3Dish and useful information such as user works and materials.
HSP3Dish support page
https://hsp.tv/make/hsp3dish.html
HSP3 for Linux/Raspberry Pi
https://hsp.tv/make/hsp3linux_pi.html
How to use HSP3Dish
With HSP3Dish, you can develop using the normal HSP environment such as HSP3 script editor running on Windows.
If possible, please use the latest version of HSP.
If you want to create a script that works in the HSP3Dish environment,
You need to add the following code to the first line:
#include "hsp3dish.as"
After that, you can write the source like a normal HSP3 script. However, in order to operate on multiple platforms, the following functions are There is a restriction that it cannot be used. As long as you use it on Windows platforms only, you don't have these restrictions.
- Extension plugin instructions are not supported
- COM object operation, COM type / Variant type variables are not supported
- External DLL calling function is not supported
- Functions related to module variables are not supported (module functions themselves are supported)
These use features that cannot be reproduced on platforms other than Windows. Please use the function according to the platform support.
It also reflects smartphone memory and security constraints. The following features are limited.
- Output is limited to a single screen (ID # 0) only (Multiple window display is not supported) Cannot process the image buffer created by the
- buffer command. (Images can be assigned, but drawing commands cannot be used. However, the HGIM G4 runtime has limited support)
- Unable to completely unify fonts between devices (Japanese character fonts are model-dependent)
- There are restrictions on writing to devices such as notesave and bsave instructions Some placement objects except the
- button are not supported. (Chkbox and input are limitedly supported)
In HSP3Dish, many instructions and functions can be used in the same way as normal HSP3, Limited functionality to absorb differences in the environment and familiar with the Windows version People may have some troublesome parts. In future versions Applying to a wide range of environments without being aware of the difference from the Windows version I have a goal.
Some restrictions are for generating native code It is occurring through the HSP3 source converter. For more information, please refer to the HSP3 Source Converter Manual (hsp3cnv.txt). Please refer to.
Difference from HSP3
HSP3Dish assumes high-speed drawing and multi-platform It has been created. It differs from normal HSP3 in the following points.
- The screen needs to be refreshed by the redraw command
For the source related to screen rewriting, use redraw 0 to notify the start of drawing,
Make sure to use redraw 1 to notify the end of drawing.
As a result, various drawing commands are executed efficiently.
Unlike normal HSP3, by specifying "redraw 0", the screen will be displayed.
Since it will be cleared once, the contents drawn up to that point will not remain.
Be aware that you need to draw what you want to see every time.
redraw 0; Start drawing (clear screen)
~ Write the drawing command here ~
redraw 1; Complete drawing (screen refreshed)
await 1000/60; wait for a while (wait in 1/60 seconds)
Be sure to write "redraw 0" and "redraw 1", and draw a drawing command between them. Must be described. HSP3 is similar, but in the loop, wait time Must be included. Adjust the timing with the await or wait instruction.
Image file including alpha channel by picload and celload command It can be read. (The recommended image format is a PNG file) With instructions such as celput and gcopy, the copy including the alpha channel is It will be executed. Therefore, there are some differences in the specification by gmode. For details, refer to the item "About the gmode instruction".
In normal HSP3, drawing acceleration was limited, With HSP3Dish and HGIMG4, take full advantage of the features of your graphics card High-speed drawing and high-quality rotation / enlargement / reduction are performed. The difference is noticeable with the use of translucency and alpha channels.
Weights are managed by a timer that is more accurate than normal HSP. The wait time for wait / await instructions may be slightly different from normal HSP.
On platforms other than Windows version, avi / mpg / wmv format by mmload / mmplay command Video playback is not supported. It is possible to use wav for sound effects and mp3 for BGM (sound), Different platforms may support different formats.
About placement objects
Placement objects currently supported on all platforms are It is only a button by the button command. Please note that the following points are different from the standard object.
-By default, the background of the button uses a gray gradation.
-It is possible to change the button background image with the objimage command.
-Keyboard button operation and focus movement are not supported.
-The button is drawn when the image is updated by redraw.
The following deployment objects are supported on Windows / Linux platforms.
・ Check box (chkbox)
・ Input box (input)
We plan to support a wide range of placement objects on many platforms in the future.
About standard sprites
HSP3Dish and HGIMG4 runtimes now support easy-to-use standard sprites .
The standard sprite instructions are compatible with the instructions added as the hspdx plugin, making it easy to handle 2D drawing.
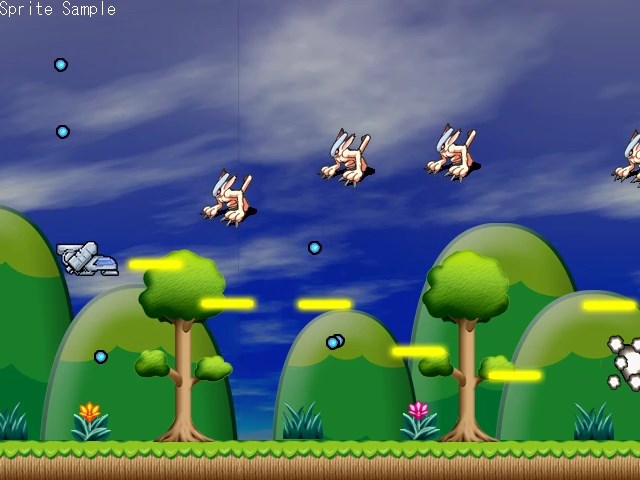
There were several ways to use sprites (rectangular images) when drawing in 2D with HSP3.
・ HSPDX plug-in
・ HGIMG / HGIM GX plug-in
・ HGIM G3 plug-in
・ HGIM G4 plug-in
・ Mod_sprite module
Among them, the plug-ins up to HSPDX, HGIMG, and HGIMGX are from the HSP2 era, and development has already been completed.
It is difficult to operate with the current OS and environment.
The HGIMG3 / HGIMG4 plug-in has 3D functionality as well as a highly functional 2D sprite.
It also has functions, but instead of managing all coordinates with real numbers and having many functions
There was a lot of content to learn and it was difficult to handle easily.
This time, the HSPDX plug-in that has the longest history and has been used by many users
Based on the commands, we have expanded the easy and easy-to-use 2D-only sprite commands.
Sprites can be displayed with simple commands, and sprite images can be freely registered.
It is equipped with a flexible system. Also, sprite callbacks, map drawing, etc.
A unique mechanism has also been introduced, making it more convenient than the original HSPDX plugin.
Coordinates are also managed by integers, making it easy to handle in 2D games and UI displays.
Of course, you can also use the conventional plug-in for autonomous movement by event list and cooperation with 3D.
Standard sprites work on all platforms supported by HSP3Dish and HGIMG4, as well as
We plan to support it in the HSP3 standard runtime as well.
For more information on standard sprites, see Standard Sprite Programming Guide .
Supports dynamic change of screen (window) size in Windows / Linux version of HSP3Dish and HGIMG4. (HSP3.6β2 or later)
Previously, the size was fixed at startup according to the size recorded in the hsp3dish.ini file,
We have received requests from many people to change the size and support full screen, and have corrected it.
From HSP3.6, the screen (window) size can be changed by the screen command and bgscr command.
	screen p1,p2,p3,p4,p5,p6

p1 = 0 to (0): Window ID
p2 = 1 to (640): Screen size to be initialized X (1 dot unit)
p3 = 1 to (480): Screen size Y to initialize (1 dot unit)
p4 = 0 to 1 (0): Screen mode to initialize
p5 = 0 to (-1): Window layout X (1 dot unit)
p6 = 0 to (-1): Window layout Y (1 dot unit)
The window ID of p1 is 0 only. The following values can be specified for the initialization mode of p4.
+4 (screen_fixedsize): Fixed size window
+8 (screen_tool): Tool window
+16 (screen_frame): Window with deep edges
+256: Full screen
If you specify 256 for p4, it will be initialized as full screen with the specified resolution.
Also note that when resizing the screen, unlike the normal runtime, all image buffers loaded up to that point will be lost.
Coordinate transformation by viewcalc command
In HSP3Dish and HGIMG4, the viewcalc instruction that sets the coordinate transformation at the time of drawing has been added.
The viewcalc instruction is a powerful function that allows you to apply arbitrary calculations to the X and Y coordinates when drawing in 2D.
You can scale, move, rotate, etc. the entire rendered display.
	viewcalc p1,p2,p3,p4,p5

p1 (0): Setting mode
p2 (0.0): Parameter 1 (real number)
p3 (0.0): Parameter 2 (real number)
p4 (0.0): Parameter 3 (real number)
p5 (0.0): Parameter 4 (real number)
There are several types of setting modes specified by p1, and various conversions can be performed.
Macro name value Content
	-----------------------------------------------------
vptype_off 0 No coordinate transformation (default)
vptype_translate 1 Specify movement parameters
vptype_rotate 2 Specify rotation parameter
vptype_scale 3 Specify scale parameter
vptype_3dmatrix 4 Coordinate transformation by 4 × 4 matrix
vptype_2d 5 Set 2D coordinate transformation
vptype_3d 6 Set 3D coordinate transformation
vptype_2d is in a mode to apply basic 2D coordinate transformations. Parameters 1 to 3 allow you to set the X and Y scales (magnification) and rotation angle (in radians).
viewcalc vptype_2d, 2.0, 2.0, 0.0
If you specify as, it will be displayed on a double scale in the X and Y directions, and the angle will be 0.
You can specify various other parameters. See the viewcalc instruction help for more information.
Image data control by celbitmap command
In HSP3Dish and HGIMG4, the celbitmap instruction for handling the contents of the variable buffer as image data has been added.
Until now, HSP3Dish could not directly access the image data in dot units, but this command makes it possible to read and write the contents of the memory as image data.
	celbitmap p1,var,p2

p1 (0): Window ID
var: Array variable to replace the image
p2 (0): Operation option
When using the celbitmap instruction, it is necessary to initialize the offscreen buffer created by the buffer instruction in advance and the variable buffer to replace it.
Create an offscreen buffer by specifying the screen_offscreen option with the buffer instruction.
buffer 2,256,256,screen_offscreen
Then create a variable buffer to replace the buffer.
Initialize the one-dimensional array with the dim command and create it. The size to be created is X size x Y size of the offscreen buffer.
dim bitmap, 256*256
Now you are ready to use the celbitmap instruction.
By specifying the ID of the offscreen buffer and the array variable with the celbitmap command, the contents of the variable buffer are applied as they are as an image.
The variable buffer is 1 dot per element. One dot is RGB format data in which 32-bit elements are stored in 8-bit units for each of R, G, B, and A. (Please note that the order of RGB has changed between 3.6β2 version and 3.6β3 version.)
For example, if you specify "$ ff204080" (hexadecimal), A = $ ff (255), B = $ 20 (32), G = $ 40 (64), R = $ 80 (128). (Decimal numbers in parentheses)
Please note that replacing image data is a costly process and may reduce the frame rate when replacing large size images.
The p2 parameter allows you to specify the replacement format and behavior.
Value macro behavior
	---------------------------------------------------------
0 Hold data in celbitmap_rgb $ aabbggrr format
1 Hold data in celbitmap_bgr $ aarrggbb format
16 celbitmap_capture Read the contents of the drawing screen into a variable
Normally, the format of celbitmap_rgb that conforms to the OpenGL standard is used. If celbitmap_bgr is specified as an option, the ARGB sequence will be in accordance with the DirectX standard.
When celbitmap_capture is specified, the data on the drawing destination screen is read into the array variable. (The read size will be the size of the offscreen buffer)
* The celbitmap_capture option is an experimental implementation. Currently, it can be used only on Windows (excluding DirectX version HGIMG4) and Linux version.
About the gmode instruction
In hsp3dish, the alpha channel is included in the image copy command such as celput and gcopy. The copy will be executed. Therefore, there are some differences in specifying the copy mode by gmode.
gmode 0,1: No alpha channel (ignored)
gmode 2: Alpha channel enabled, translucent rate disabled
gmode 3,4: Alpha channel enabled, translucent rate enabled
gmode 5: Color addition / alpha channel enabled, translucent rate enabled
gmode 6: Color subtraction / alpha channel enabled, translucent rate enabled
The alpha channel is information added to image data such as PNG format.
Please note that you cannot select the mode that is transparent when RGB is 0 in a normal HSP, or the mode that is transparent when a specific color code is transmitted.
Please note that the current version does not support gmode 6 (color subtraction) in the android (NDK) runtime.
In copy mode 2 or higher, you can set "texture multiplication" to multiply the image by a specific value. For details, refer to the item "About the gmulcolor instruction".
About the gmulcolor command
From hsp3dish ver3.5b3, the gmulcolor instruction for setting the texture multiplication value has been added.
		gmulcolor p1,p2,p3
		-----------------------------------------------
p1, p2, p3 = 0 to 255 (255): Color code (brightness of R, G, B)
p1, p2, and p3 are the brightness of R, G, and B, respectively. The specified R, G, B values are multiplied by the image copied by the gcopy, gzoom, celput, grottate command, etc. The initial value is 255 for each of RGB. You can change the color of the original image by setting the texture multiplication value. Note that when copying an image, if the copy mode specified by the gmode instruction is 0 or 1 (does not reflect the alpha channel), the texture multiplication value will be invalid. The texture multiplication value is not reflected in the drawing of characters by the mes command and the drawing of the gsquare command. Also, it is not reflected in single color drawing such as boxf and line commands. (Including single color drawing of grottate instruction)
About the gfilter instruction
Set filtering (texture interpolation) from hsp3dish ver3.3a2 A gfilter instruction has been added for this.
Macro name value Content
	-------------------------------------------
FILTER_NONE 0 No interpolation (NEAREST)
FILTER_LINEAR 1 Linear interpolation (LINEAR)
FILTER_LINEAR2 2 Area interpolation (advanced interpolation processing)
By setting filtering, you can change the dot interpolation method when enlarging / reducing the image. You can choose. No interpolation (near rest) by specifying FILTER_NONE It will be in the state of. FILTER_LINEAR is linear interpolation, FILTER_LINEAR2 is Select a more advanced interpolation method (such as bilinear). The settings of the gfilter instruction apply to all subsequent drawing instructions. Also, when the screen is cleared by "redraw 0", the filtering setting is set. It will be reset to FILTER_NONE.
About setreq and getreq instructions
From hsp3dish ver3.3a6, setreq and getreq instructions for making various system settings
Has been added.
setreq type, val write system request settings

type: Setting type (SYSREQ_???)
val: Value to set

getreq var, type Read system request settings

var: variable name to which the result is assigned
type: Setting type (SYSREQ_???)
Setting type name Read / write (*) Contents
	-------------------------------------------
SYSREQ_CLSMODE RW Background clear flag
SYSREQ_CLSCOLOR RW background clear color
SYSREQ_TIMER R Timer value in milliseconds
Platform running SYSREQ_PLATFORM R HSP3Dish

(*) Whether reading (R) or writing (W) is possible differs depending on the item.
Set whether to clear the screen when drawing by redraw 0 starts. If SYSREQ_CLSMODE is set to 1, it is cleared, and if it is 0, it is not cleared. If you are clearing the screen in the script, it is better not to clear the background on the system side This will lead to an improvement in processing speed. You can set the color code for clearing with SYSREQ_CLSCOLOR. The color code is set with a single RGB 24bit ($ rrggbb).
Returns a timer value in milliseconds. The value returned varies from platform to platform, but the value is incremented by 1 per millisecond.
Returns the following HSP3Dish platform values.
Macro name value Content
	-------------------------------------------
PLATFORM_WINDOWS 0 Windows version
PLATFORM_IOS 1 iOS version
PLATFORM_ANDROID 2 android version
PLATFORM_WEBGL 3 hsp3dish.js (WebGL / JavaScript) version
PLATFORM_LINUX 4 Linux version
PLATFORM_RASPBIAN 5 Raspberry Pi (raspbian) version
Acquisition of multi-touch information
From hsp3dish ver3.4b1, mtlist and mtinfo instructions for acquiring multi-touch information have been added. This makes it possible to obtain information that is touched by multiple points on the smartphone. Even on Windows, Linux, and html5 (browser), multiple touch information can be acquired when a multi-touch device is connected.
mtlist var Point ID list acquisition

var: variable name to which the result is assigned

mtinfo var, id Touch information acquisition

var: variable name to which the result is assigned
id: Point ID
First, get the point ID list currently touched by the mtlist command.
An integer value called the point ID is assigned to the variable specified by the mtlist instruction.
If multiple points are touched, the array variables are var (0), var (1), var (2), and so on.
Multiple point IDs will be assigned.
The number of point IDs assigned to the array is returned in the system variable stat.
If the system variable stat is 0, it means that nothing has been touched.
After obtaining the value of the point ID, it is possible to obtain the detailed information corresponding to the point ID by the mtinfo command.
For example, "mtinfo a, 1" assigns the information of point ID 1 to the variable a.
The variable a specified here is initialized as an integer type array variable and the following contents are assigned.
a (0): Touch state (1 = ON / 0 = OFF)
a (1): Touched X coordinate
a (2): Touched Y coordinate
a (3): Touch identification ID
Based on this information, you can manage multiple points.
The touch identification ID has no meaning in the value itself, and a value different from the others is assigned among multiple touches.
Please note that the touch identification ID value differs for each device.
If you want to get multi-touch information on iOS, you need to include a setting that allows multi-touch input.
For more information, see iOS Programming Guide .
Even on Windows that does not support multi-touch, the information is acquired as information where only one point is touched.
Sound function
HSP3Dish has a media playback function that is upward compatible with standard HSP. However, the mci instruction, which is a Windows-specific feature, is not supported on other devices. Also, video and audio files in avi / mpg / wma / wmv format are not supported. The formats supported on all devices, including iOS and Android, are: It will be .wav as SE (sound effect) and .mp3 for BGM (music).
mmload (wav, mp3 format recommended)
mmplay (similar to HSP standard instructions)
mmstop (ID to stop can be specified, upward compatible with HSP standard instructions)
mmvol (HSP3Dish only, volume setting)
mmpan (HSP3Dish only, panning settings)
mmstat (HSP3Dish only, get information)
Unlike HSP standard instructions, wav format waveform playback allows multiple sounds to be played multiple times.
Long audio playback (.mp3 format) cannot be played multiple times to reduce the load.
For details of each instruction, refer to the instruction help provided by HSP Document Library.
http communication function
HSP3Dish has a simple http communication function.
This makes it possible to access the web (HTTP) server via the network and acquire data.
It only supports basic http communication functions and does not guarantee communication with all web servers.
The current version only supports Windows, Emscripten (WebGL), android platforms. Other platforms will be supported in future versions.
httpload (start HTTP communication)
httpinfo (Get HTTP communication information)
With the above command, it is possible to make a request to the web (HTTP) server by the standard GET and POST methods.
It can be used for purposes such as acquiring web pages and calling CGI and WEB API.
For details of each instruction, refer to the instruction help provided by HSP Document Library.
Sample script
HSP full set sample directory hsp3dish contains sample scripts. Please refer to it as an example using HSP3Dish.
HSP3Dish command list
For compatibility of each instruction / function, refer to the separate file "support_cmds.txt" . Some instructions have not been implemented, but will be expanded in the future.
Creating an executable file on Windows
Using the HSP3Dish runtime file (hsp3dish.hrt), It is possible to create a program that can be executed on Windows. Since there are merits that normal HSP3 does not have, software compatible with Windows You can also use it for making.
HSP3Dish runtime for Windows is for Windows98, Me, 2000, XP or later
It works in the environment where DirectX8 is installed.
(Because it is included as standard in Windows XP or later (Windows Vista, 8, 10)
No additional DirectX installation required)
In addition, the Windows version of HGIMG4 uses OpenGL and DirectX 9.
For the operating environment, refer to the HGIMG4 manual separately.
About the startup configuration file
At normal startup, the screen size is fixed at 320x480. This is the size that fits the iPhone (3G), but the startup configuration file You can change the screen size by preparing it. (For HSP3Dish, the screen size is determined at startup and cannot be changed with the screen and width instructions.)
The startup setting file is a script with the file name "hsp3dish.ini" It will be reflected when they are placed in the same folder. The following is a description example of the configuration file.
	; hsp3dish settings
	wx=320
	wy=480
It will be reflected by writing "wx = horizontal size" and "wy = vertical size" from the beginning of the line. Lines starting with ";" are considered comments. If you want to operate on different devices, use the boot configuration file. Please prepare and execute.
It is possible to use HSP3Dish to create an executable file for Windows, The startup configuration file is not applied to the created executable file. If you want to create an executable file for Windows with the HSP3Dish runtime, Make sure to set the screen size with the #packopt instruction.
#packopt name "filename"
#packopt xsize 320; Horizontal size
#packopt ysize 480; Vertical size
Support for physics engine OBAQ
HSP3Dish supports the functionality of the physics engine OBAQ.
Functions equivalent to the instructions of the OBAQ plug-in can be used on the HSP3 Dish.
The function of the physics engine OBAQ becomes effective after executing the qreset instruction.
If you do not use the OBAQ plug-in instructions, you will not use any extra memory or CPU resources.
For detailed usage, refer to the physics engine OBAQ manual .
* The physics engine OBAQ is operated under a different license from the HSP3 Dish. If the software using OBAQ generates profits that require tax filing (if the profits from paid apps are large), you need to obtain a paid license. However, if you want to distribute a small number of items or distribute them with only the minimum necessary expenses (media price, etc.), it is considered free of charge, so you do not need to obtain a paid license. Of course, for free apps, you don't need to get a license.
Conversion to other platforms
HSP3Dish supports conversion to other platforms. The mechanism of operation is as follows.
- Create a script on HSP3Dish on Windows
- Convert the created script to C source (Uses HSP3 source converter, source is output as UTF-8)
- Compile C source in development environment for another platform (Library for each platform is provided separately)
- Application conversion complete (Except for html5 version, it is executed as native code instead of sequential execution (interpreter))
The "HSP3Dish Helper" application is provided as a tool to support script conversion and so on. "HSP3Dish Helper" can be started from the "Tools"-> "HSP3Dish / C Source Conversion" menu of the HSP Script Editor.
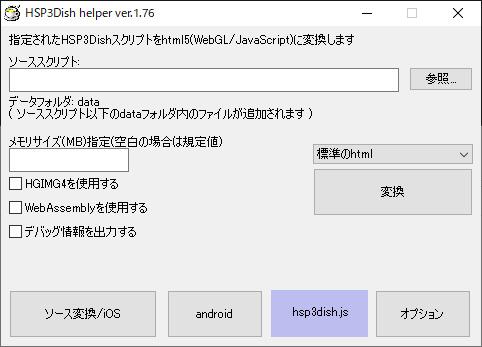
For details, refer to the manual provided for each platform.
- WebGL / JavaScript version (hsp3dish.js) Programming Guide (hsp3dish_js.htm)
- iOS Programming Guide (hsp3dish_ios.htm)
- android (NDK) version programming guide (hsp3dish_ndk.htm)
- HSP3 Source Converter Manual (hsp3cnv.txt)
Support for extension plugins and external DLLs
HSP3Dish on Windows supports extension plug-ins and external DLL calls. (COM objects and ActiveX related functions are not supported) However, please note that some plugins may not be available on the HSP3Dish system.
- Plugins that draw to HSP windows (hgimg, hspdx, etc.) are not available
- Plugins that extend HSP placement objects (buttons and input boxes) are not available
- Other plugins that refer to information about HSP windows (BMSCR structure) may not work properly
In either case, the extension plug-in / external DLL calling function is supported only on Windows, so it will not be converted on other platforms (iOS, android, WebGL, etc.). Please understand that one of the purposes of HSP3Dish, multi-platform, will not be possible before using it.
Support for various inputs and outputs
The devcontrol instruction and its related instructions support the unique functions of a specific device and the acquisition of special input from the device. For more information, see the section for each device control. For those that do not work on Windows, we are considering creating a system that can be tested in a simulated manner.
Known bugs
It has been reported that when calling a user-defined function with multiple parameters by
Copyright and license
The rights of the original software (executable file) created by the user using HSP3Dish belong to the user who created it.
It can be used in any form, commercial or non-commercial. Also, no license fee is required.
User-created software is not obliged to indicate that you are using onion software or that you are using HSP. Onion software does not claim copyright to the original software. For secondary development systems (game creation system, etc.) created using HSP, please operate at the responsibility of the author who created the system.
HSP3Dish is part of the interpreted language Hot Soup Processor (HSP) and is copyrighted by onion software. onion software does not guarantee any damage caused by this program. Use at your own risk.
HSP3Dish is a derivative of OpenHSP technology. Files and source code included in HSP3Dish and OpenHSP can be freely attached, duplicated, reorganized, and redistributed under the BSD license. can. In that case, please specify license notation (License_j.txt) .
Those who are considering operating the produced software for commercial use and who wish to receive support for a fee Please contact us by email at info@hsp.tv. We will inform you about the details.